주요 콘텐츠로 건너뛰기

HP Pavilion x360 m3-u001dx USB Port Shield Replacement

단지 전제 조건
이 안내서는 다른 가이드의 선행 작업으로 사용하기 위한 것입니다. 그 자체로는 불완전합니다.

필요한 것

  1. HP Pavilion x360 m3-u001dx USB Port Shield  Replacement, Keyboard: 1 단계, 이미지 1/1
    • Shut down the computer.

    • Disconnect the power and all external devices connected to the computer.

    • Working on your device while it is turned on may result in electric shock.

  2. HP Pavilion x360 m3-u001dx USB Port Shield  Replacement: 2 단계, 이미지 1/2 HP Pavilion x360 m3-u001dx USB Port Shield  Replacement: 2 단계, 이미지 2/2
    • Use a Metal Spudger and remove the rubber foot closet from the bottom of the laptop.

  3. HP Pavilion x360 m3-u001dx USB Port Shield  Replacement: 3 단계, 이미지 1/1
    • Remove all of the screws located on the bottom of the laptop:

    • 5 Phillips 2.4 x 5.7 mm screws

    • 5 Phillips 2.0 x 5.0 mm screws

    • Make special note of each screw and screw lock size and location during removal and replacement.

  4. HP Pavilion x360 m3-u001dx USB Port Shield  Replacement: 4 단계, 이미지 1/1
    • Turn the computer over onto its base, with the computer open and the keyboard facing upward.

  5. HP Pavilion x360 m3-u001dx USB Port Shield  Replacement: 5 단계, 이미지 1/2 HP Pavilion x360 m3-u001dx USB Port Shield  Replacement: 5 단계, 이미지 2/2
    • The keyboard is attached internally by clips. Use a small amount of force when removing the keyboard.

    • Use the Plastic Opening Tool to separate the keyboard from the base of the laptop.

  6. HP Pavilion x360 m3-u001dx USB Port Shield  Replacement: 6 단계, 이미지 1/1
    • Raise the keyboard slightly to access the touch pad and keyboard cables.

    • Raising the keyboard too far or with excessive force may cause damage to the keyboard, touch pad cables, or their connectors.

  7. HP Pavilion x360 m3-u001dx USB Port Shield  Replacement: 7 단계, 이미지 1/1
    • Disconnect the ribbon cables attaching the touch pad and keyboard to the system board (motherboard).

    • Using the Heavy-Duty Spudger lift up the plastic locks connecting the ribbon cable to the motherboard.

    • Use the blue plastic tab on the ribbon cable to pull it out from the lock on the motherboard.

  8. HP Pavilion x360 m3-u001dx USB Port Shield  Replacement: 8 단계, 이미지 1/1
    • Lift the keyboard away from the base of the laptop.

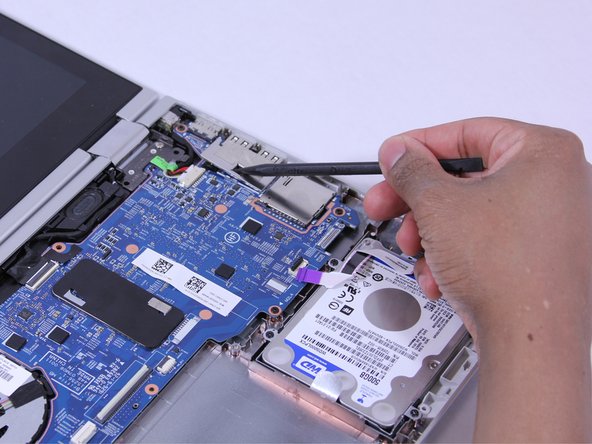
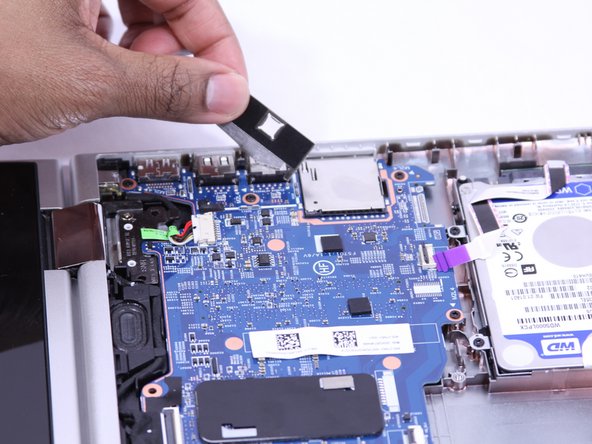
  9. HP Pavilion x360 m3-u001dx USB Port Shield  Replacement, USB Port Shield: 9 단계, 이미지 1/3 HP Pavilion x360 m3-u001dx USB Port Shield  Replacement, USB Port Shield: 9 단계, 이미지 2/3 HP Pavilion x360 m3-u001dx USB Port Shield  Replacement, USB Port Shield: 9 단계, 이미지 3/3
    • (You don't NEED to remove this shielding as you can remove the board with it still there.)

    • Remove the adhesive strip.

    • Lift the shield away from the base of the laptop.

결론

Follow these instructions in reverse order to reassemble your device.

Subhleen

회원 가입일: 02/01/17

1,268 평판

안내서 5개 작성하였습니다

UW Tacoma, Team 1-6, Rose Winter 2017 UW Tacoma, Team 1-6, Rose Winter 2017 회원

UWT-ROSE-W17S1G6

4 회원들

안내서 8개 작성하였습니다

댓글 0개

댓글 쓰기

조회 통계:

24 시간 전: 0

7일 전: 0

30일 전: 0

전체 시간: 62