주요 콘텐츠로 건너뛰기

HP Pavillion dm1-3010nr Cooling Fan Replacement

필요한 것

  1. HP Pavillion dm1-3010nr Cooling Fan Replacement, Battery: 1 단계, 이미지 1/1
    • Flip the device over, so that the bottom cover is exposed.

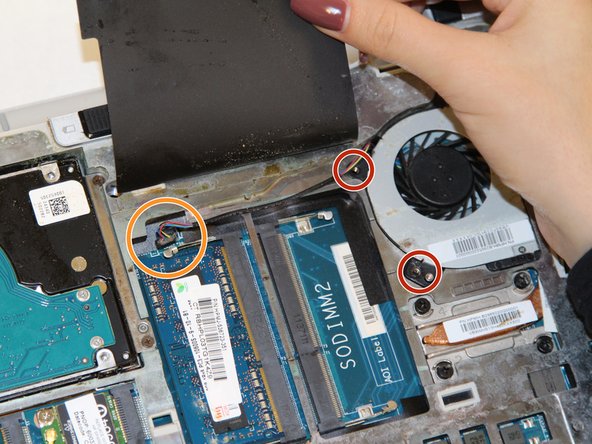
    • Slide the black locking mechanism into its unlock position.

  2. HP Pavillion dm1-3010nr Cooling Fan Replacement: 2 단계, 이미지 1/1
    • After unlocking the mechanism, slide the battery out of its compartment.

  3. HP Pavillion dm1-3010nr Cooling Fan Replacement, Cooling Fan: 3 단계, 이미지 1/1
    • With the battery removed, the bottom cover can be opened with your hand.

  4. HP Pavillion dm1-3010nr Cooling Fan Replacement: 4 단계, 이미지 1/2 HP Pavillion dm1-3010nr Cooling Fan Replacement: 4 단계, 이미지 2/2
    • Use a screwdriver from your iFixit Toolkit to remove the two 5mm Phillips #0 screws shown in each picture.

    • Use tweezers to carefully remove the fan's power cable from the motherboard. The cable can be seen in the second picture.

  5. HP Pavillion dm1-3010nr Cooling Fan Replacement: 5 단계, 이미지 1/1
    • After removing the screws and unplugging the wire, remove the fan.

결론

To reassemble your device, follow these instructions in reverse order.

Amitpal Gill

회원 가입일: 10/22/18

375 평판

안내서 3개 작성하였습니다

UC Davis, Team S7-G1, Lore Fall 2018 UC Davis, Team S7-G1, Lore Fall 2018 회원

UCD-LORE-F18S7G1

3 회원들

안내서 4개 작성하였습니다

댓글 0개

댓글 쓰기

조회 통계:

24 시간 전: 1

7일 전: 2

30일 전: 4

전체 시간: 579