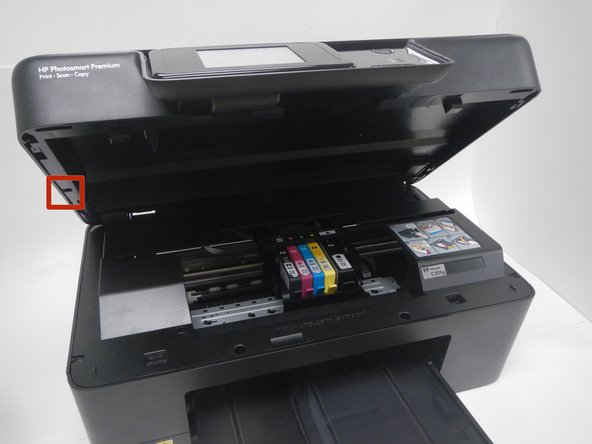
주요 콘텐츠로 건너뛰기

HP Photosmart Premium C309g TouchSmart Display Screen Replacement

필요한 것

  1. HP Photosmart Premium C309g TouchSmart Display Screen  Replacement, TouchSmart Display Screen: 1 단계, 이미지 1/1
    • Open the top of printer. The printer should appear as shown.

  2. HP Photosmart Premium C309g TouchSmart Display Screen  Replacement: 2 단계, 이미지 1/2 HP Photosmart Premium C309g TouchSmart Display Screen  Replacement: 2 단계, 이미지 2/2
    • Use the blue plastic opening tool to pry the trim pieces all the way around the printer.

    • Loosen the pieces around the edges before pulling to remove from the printer.

    • Pull the (4) trim pieces off and set them aside.

  3. HP Photosmart Premium C309g TouchSmart Display Screen  Replacement: 3 단계, 이미지 1/2 HP Photosmart Premium C309g TouchSmart Display Screen  Replacement: 3 단계, 이미지 2/2
    • Using the blue plastic opening tool, pull from the middle and then slide back to remove the side panels.

    • The side trim pieces need to be removed before the front trim pieces.

  4. HP Photosmart Premium C309g TouchSmart Display Screen  Replacement: 4 단계, 이미지 1/1
    • Using the T9 Torx Security screwdriver bit, unscrew the five 12mm screws shown.

  5. HP Photosmart Premium C309g TouchSmart Display Screen  Replacement: 5 단계, 이미지 1/1
    • The scanner flap is attached by a clip that can be dislodged by pulling it gently away from the printer.

    • Keeping the scanner flap upright, slide it toward the unattached clip in order to dislodge the second clip.

    • Both clips will come unattached and you can set the scanner flap aside.

  6. HP Photosmart Premium C309g TouchSmart Display Screen  Replacement: 6 단계, 이미지 1/2 HP Photosmart Premium C309g TouchSmart Display Screen  Replacement: 6 단계, 이미지 2/2
    • Lift the scanner glass piece from the printer and set it aside.

  7. HP Photosmart Premium C309g TouchSmart Display Screen  Replacement: 7 단계, 이미지 1/1
    • Gently pull the display screen away from the printer.

    • Locate & unscrew the two 12mm screws using the T9 Torx Security screwdriver bit.

  8. HP Photosmart Premium C309g TouchSmart Display Screen  Replacement: 8 단계, 이미지 1/2 HP Photosmart Premium C309g TouchSmart Display Screen  Replacement: 8 단계, 이미지 2/2
    • Place thumb and forefinger where shown and pull this piece away from the printer.

    • Do not pull it away too hard. The piece is still connected by wiring ribbon.

  9. HP Photosmart Premium C309g TouchSmart Display Screen  Replacement: 9 단계, 이미지 1/2 HP Photosmart Premium C309g TouchSmart Display Screen  Replacement: 9 단계, 이미지 2/2
    • Pull both wiring ribbons out from the display screen piece. This will separate the piece from the printer.

    • Use tweezers if necessary.

  10. HP Photosmart Premium C309g TouchSmart Display Screen  Replacement: 10 단계, 이미지 1/2 HP Photosmart Premium C309g TouchSmart Display Screen  Replacement: 10 단계, 이미지 2/2
    • Push forward and down to release the retaining piece. This will detach the display screen from the front panel.

  11. HP Photosmart Premium C309g TouchSmart Display Screen  Replacement: 11 단계, 이미지 1/1
    • Set the display screen face down.

    • Locate and unscrew all four 12mm screws on the back on the display screen using the T9 Torx Security screwdriver bit.

  12. HP Photosmart Premium C309g TouchSmart Display Screen  Replacement: 12 단계, 이미지 1/1
    • Lift the back of the display screen to remove it.

  13. HP Photosmart Premium C309g TouchSmart Display Screen  Replacement: 13 단계, 이미지 1/2 HP Photosmart Premium C309g TouchSmart Display Screen  Replacement: 13 단계, 이미지 2/2
    • Place hands as shown and push with your thumbs to detach the plastic from the screen.

결론

To reassemble your device, follow these instructions in reverse order.

다른 한 분이 해당 안내서를 완성하였습니다.

Laura

회원 가입일: 10/23/14

694 평판

안내서 3개 작성하였습니다

Michigan Tech, Team 1-2, Lauer Fall 2014 Michigan Tech, Team 1-2, Lauer Fall 2014 회원

MTU-LAUER-F14S1G2

3 회원들

안내서 5개 작성하였습니다

댓글 한 개

where can i get replacement part

fernando - 답글

댓글 쓰기

조회 통계:

24 시간 전: 0

7일 전: 4

30일 전: 7

전체 시간: 1,178