이 버전에는 잘못된 편집 사항이 있을 수 있습니다. 최신 확인된 스냅샷으로 전환하십시오.
필요한 것
-
이 단계는 번역되지 않았습니다. 번역을 도와주십시오
-
Rotate the printer 90 degrees counter clockwise so that the side panel next to control panel is facing you.
-
Remove the two T10 12mm Torx screws from the left side panel.
-
-
이 단계는 번역되지 않았습니다. 번역을 도와주십시오
-
Firmly pull the the back of the side panel until it separates from the body of the printer.
-
Rotate the side panel upwards while pulling it towards yourself to remove the panel.
-
-
이 단계는 번역되지 않았습니다. 번역을 도와주십시오
-
Rotate the printer 90 degrees clockwise.
-
Grasp the paper tray and rotate it down.
-
Insert your fingers into the slot in the printer door and pull to rotate the gate down.
-
-
이 단계는 번역되지 않았습니다. 번역을 도와주십시오
-
Rotate the printer 90 degrees clockwise.
-
Remove the two T10 12 mm Torx screws.
-
Grasp both sides of the side panel and pull it forward to remove the panel.
-
-
이 단계는 번역되지 않았습니다. 번역을 도와주십시오
-
Rotate the printer 90 degrees counter clockwise.
-
Lift the scanner lid to expose the scanner glass.
-
-
이 단계는 번역되지 않았습니다. 번역을 도와주십시오
-
Rotate the printer 90 degrees counter clockwise.
-
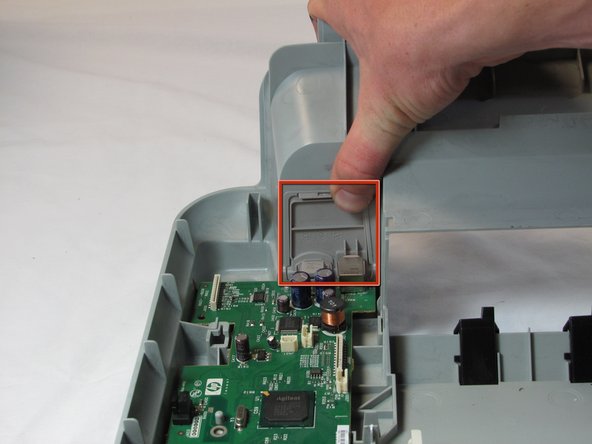
Inside the printer is a small white tab. Press it inward with a spudger until a pop is heard.
-
Remove the front panel by grasping its front and pulling away from the printer.
-
-
이 단계는 번역되지 않았습니다. 번역을 도와주십시오
-
Rotate the printer 90 degrees clockwise.
-
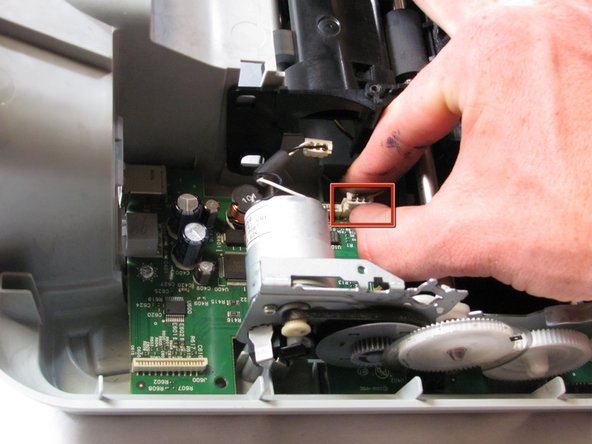
Remove the cable connecting the top panel of the printer to the power button assembly.
-
-
이 단계는 번역되지 않았습니다. 번역을 도와주십시오
-
Carefully lift the top panel of the printer away from the printer body.
-
-
이 단계는 번역되지 않았습니다. 번역을 도와주십시오
-
Set aside the top panel of the printer.
-
Remove the two T10 12 mm Torx screws from the top front of the printer
-
-
이 단계는 번역되지 않았습니다. 번역을 도와주십시오
-
Rotate the Printer 90 degrees counter clockwise.
-
Remove the scanner cable from the main circuit board.
-
-
이 단계는 번역되지 않았습니다. 번역을 도와주십시오
-
Rotate the printer 90 degrees clockwise.
-
Using both hands, lift the scanner tray from the body of the printer.
-
-
이 단계는 번역되지 않았습니다. 번역을 도와주십시오
-
Remove the power button circuit board from the support frame by pinching the left side, and pulling forward and to the left simultaneously.
-
Push up on the tab holding the secondary control circuit board with the spudger and pull it forward to remove it.
-
-
-
이 단계는 번역되지 않았습니다. 번역을 도와주십시오
-
Remove the two T10 12 mm Torx screws.
-
Lift the support frame off of the printer body with both hands.
-
-
이 단계는 번역되지 않았습니다. 번역을 도와주십시오
-
Remove the printer door and paper tray by putting them in the closed position and not laying flat then rotating them upwards lift the left side up.
-
-
이 단계는 번역되지 않았습니다. 번역을 도와주십시오
-
Remove both of the ink cartridges by grabbing the front of the ink cartridge and pulling down.
-
-
이 단계는 번역되지 않았습니다. 번역을 도와주십시오
-
Remove the T10 6 mm Torx screw on the left side of the track assembly.
-
Remove the T10 12 mm Torx screw on the left side of the track assembly.
-
-
이 단계는 번역되지 않았습니다. 번역을 도와주십시오
-
Gently push the ink cartridge carriage to the left side of the printer.
-
-
이 단계는 번역되지 않았습니다. 번역을 도와주십시오
-
Remove the two T10 12 mm Torx screws.
-
Remove the two T10 6 mm Torx screws.
-
-
이 단계는 번역되지 않았습니다. 번역을 도와주십시오
-
Rotate the printer 90 degrees counter clockwise.
-
Remove the cable connecting the ink cartridge carriage to the main circuit board.
-
-
이 단계는 번역되지 않았습니다. 번역을 도와주십시오
-
Carefully remove the connector holding the drive motor wires to the main circuit board.
-
-
이 단계는 번역되지 않았습니다. 번역을 도와주십시오
-
Slide the ink cartridge carriage all the way to the right side of the printer.
-
Using both hands, carefully lift the ink cartridge track off of the main body of the printer.
-
-
이 단계는 번역되지 않았습니다. 번역을 도와주십시오
-
Set aside the ink cartridge carriage.
-
Remove the three T10 12mm Torx screws holding the paper guide to the printer body.
-
Lift the paper guide directly up to remove it and set it aside.
-
-
이 단계는 번역되지 않았습니다. 번역을 도와주십시오
-
Remove the plastic gear cover by pulling it away from the printer body and lifting it up.
-
-
이 단계는 번역되지 않았습니다. 번역을 도와주십시오
-
Remove the metal tab by rotating it away from the body of the printer and pulling up.
-
Remove the brush by grasping it firmly by the base and lift straight up.
-
-
이 단계는 번역되지 않았습니다. 번역을 도와주십시오
-
Remove the connector holding the feed roller motor to the logic board by pulling it strait up
-
Remove the T10 12mm Torx screw on the roller panel.
-
-
이 단계는 번역되지 않았습니다. 번역을 도와주십시오
-
Disconnect the page sensor from the logic board by pulling straight up on the connector.
-
-
이 단계는 번역되지 않았습니다. 번역을 도와주십시오
-
Rotate the printer 180 degrees and turn it up on to the front side, so that the back of the printer is facing up and the bottom facing you.
-
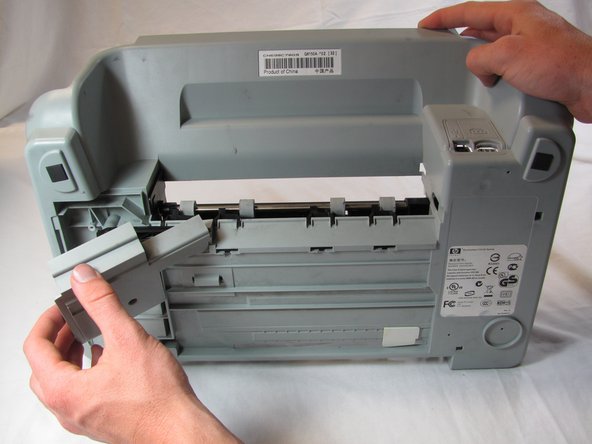
Push in the tab on the left side of the back panel and pull outward to remove the back panel.
-
-
이 단계는 번역되지 않았습니다. 번역을 도와주십시오
-
Tilt the printer up until the bottom of the printer can be seen.
-
Remove the T10 12mm Torx screw from the bottom panel.
-
Grasp the top edge of the bottom panel and pull to remove it.
-
-
이 단계는 번역되지 않았습니다. 번역을 도와주십시오
-
Turn the printer back down so that it is sitting on the bottom panel and rotate the printer 180 degrees.
-
-
이 단계는 번역되지 않았습니다. 번역을 도와주십시오
-
Remove the printer head cleaner by lifting the front of the printer head cleaner above the track and slide it forward.
-
-
이 단계는 번역되지 않았습니다. 번역을 도와주십시오
-
Grasp the left side of the feed roller assembly and pull towards the front of the printer and up to free the metal tab from the slot.
-
-
이 단계는 번역되지 않았습니다. 번역을 도와주십시오
-
Set aside the feed roller assembly.
-
Push down on the tab that is on the power and USB back panel and then away from the printer to remove the power and USB back panel.
-
-
이 단계는 번역되지 않았습니다. 번역을 도와주십시오
-
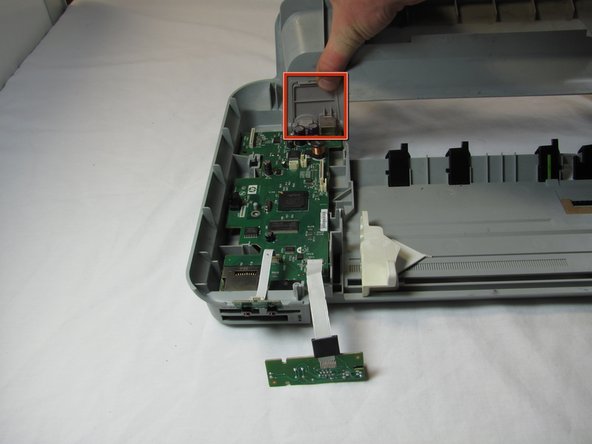
Remove the main circuit board by gently lifting it up from the back and pulling away from the front of the printer.
-
Be careful not to lift to fast, as doing so can cause damage to the main circuit board.
-


다른 7명이 해당 안내서를 완성하였습니다.
팀

Cal Poly, Team 20-30, Maness Fall 2011 Cal Poly, Team 20-30, Maness Fall 2011 회원
CPSU-MANESS-F11S20G30
4 회원들
안내서 25개 작성하였습니다
댓글 4개
Muito boas elucidações das etapas para desmontagem da HP C3180
Excellent guide! You saved my printer. Thanks!
Dino Conte - 답글
Hi, love your instructional slide shows. Very detailed. Thank you.
So now the big question: where do I buy the parts from? I have an HP C4280 all-in-one printer/scanner and I need to replace {because of your videos} either the control panel circuitry or the main control panel. But I have no idea where to get them. Can you suggest anyone?
Thank you,
Diane L.