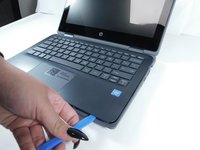
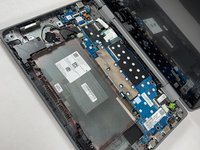
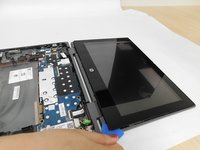
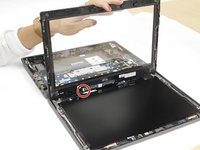
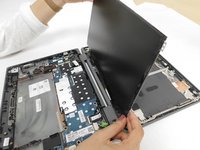
주요 콘텐츠로 건너뛰기

HP ProBook x360 11 G5 EE Display Panel Replacement

필요한 것

  1. HP ProBook x360 11 G5 EE Display Panel Replacement, Keyboard Assembly: 1 단계, 이미지 3개 중 1개 HP ProBook x360 11 G5 EE Display Panel Replacement, Keyboard Assembly: 1 단계, 이미지 3개 중 2개 HP ProBook x360 11 G5 EE Display Panel Replacement, Keyboard Assembly: 1 단계, 이미지 3개 중 3개
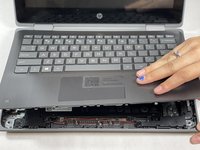
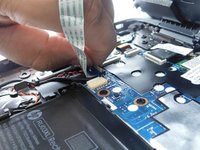
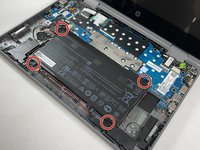
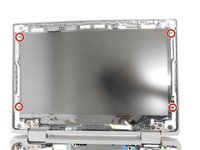
    • Remove the 4.1 mm screws with a T5 Torx screwdriver.

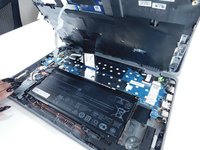
    • Remove the 4.1 mm screws using a JIS #0 screwdriver.

  2. HP ProBook x360 11 G5 EE Display Panel Replacement: 2 단계, 이미지 1개 중 1개
    • Use an opening pick to pry the corners of the keyboard deck.

  3. HP ProBook x360 11 G5 EE Display Panel Replacement: 3 단계, 이미지 3개 중 1개 HP ProBook x360 11 G5 EE Display Panel Replacement: 3 단계, 이미지 3개 중 2개 HP ProBook x360 11 G5 EE Display Panel Replacement: 3 단계, 이미지 3개 중 3개
    • Use an opening pick or opening tool to pry around the sides of the keyboard assembly.

  4. HP ProBook x360 11 G5 EE Display Panel Replacement: 4 단계, 이미지 3개 중 1개 HP ProBook x360 11 G5 EE Display Panel Replacement: 4 단계, 이미지 3개 중 2개 HP ProBook x360 11 G5 EE Display Panel Replacement: 4 단계, 이미지 3개 중 3개
    • Lift the keyboard assembly to expose two ribbon cables.

    • Lift the two plastic tabs that hold the cables in place on the motherboard

    • Slide the ribbon cables out of each connector.

  5. HP ProBook x360 11 G5 EE Display Panel Replacement: 5 단계, 이미지 2개 중 1개 HP ProBook x360 11 G5 EE Display Panel Replacement: 5 단계, 이미지 2개 중 2개
    • Remove the keyboard assembly from the rest of the computer.

  6. HP ProBook x360 11 G5 EE Display Panel Replacement, Battery: 6 단계, 이미지 2개 중 1개 HP ProBook x360 11 G5 EE Display Panel Replacement, Battery: 6 단계, 이미지 2개 중 2개
    • Remove the four 3 mm screws from the battery with the JIS #0 screwdriver.

  7. HP ProBook x360 11 G5 EE Display Panel Replacement: 7 단계, 이미지 3개 중 1개 HP ProBook x360 11 G5 EE Display Panel Replacement: 7 단계, 이미지 3개 중 2개 HP ProBook x360 11 G5 EE Display Panel Replacement: 7 단계, 이미지 3개 중 3개
    • Pry the battery up from the laptop using an opening pick.

    • Lift the battery out of its place.

  8. HP ProBook x360 11 G5 EE Display Panel Replacement, Display Panel: 8 단계, 이미지 3개 중 1개 HP ProBook x360 11 G5 EE Display Panel Replacement, Display Panel: 8 단계, 이미지 3개 중 2개 HP ProBook x360 11 G5 EE Display Panel Replacement, Display Panel: 8 단계, 이미지 3개 중 3개
    • Use the opening pick and metal spudger to pry open the display cover.

  9. HP ProBook x360 11 G5 EE Display Panel Replacement: 9 단계, 이미지 2개 중 1개 HP ProBook x360 11 G5 EE Display Panel Replacement: 9 단계, 이미지 2개 중 2개
    • Remove the ribbon wire that is attached to the display cover to fully detach it.

  10. HP ProBook x360 11 G5 EE Display Panel Replacement: 10 단계, 이미지 2개 중 1개 HP ProBook x360 11 G5 EE Display Panel Replacement: 10 단계, 이미지 2개 중 2개
    • Remove the four 2.3 mm screws holding the screen in place with the JIS #0 screwdriver.

  11. HP ProBook x360 11 G5 EE Display Panel Replacement: 11 단계, 이미지 3개 중 1개 HP ProBook x360 11 G5 EE Display Panel Replacement: 11 단계, 이미지 3개 중 2개 HP ProBook x360 11 G5 EE Display Panel Replacement: 11 단계, 이미지 3개 중 3개
    • Lift the screen to disconnect the wire attaching it to the laptop.

    • Remove the display panel from the rest of the laptop.

결론

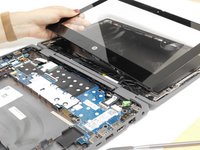
To reassemble your device, follow these instructions in reverse order.

다른 2명이 해당 안내서를 완성하였습니다.

작성자

1다른 기여자 명과 함께

Michelle Pina

회원 가입일: 10/26/21

506 평판

안내서 4개를 작성함

Gateway, Team 1-4, Pee Fall 2021 Gateway, Team 1-4, Pee Fall 2021 회원

GCC-PEE-F21S1G4

5 회원들

안내서 5개를 작성함

0가이드 댓글

댓글 쓰기

조회 통계:

지난 24시간: 1

지난 7일: 14

지난 30일: 51

전체 시간: 3,758