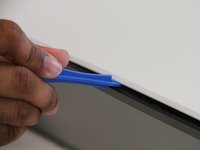
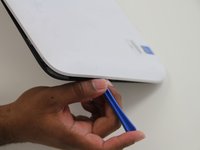
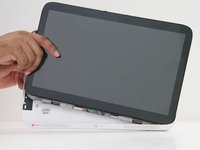
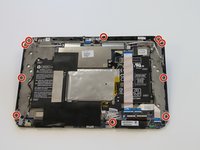
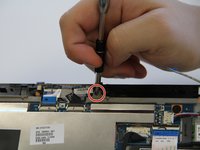
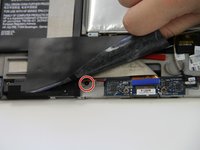
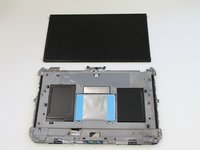
주요 콘텐츠로 건너뛰기

HP Split x2 Screen Replacement

필요한 것

  1. HP Split x2 Screen Replacement, Rear Cover: 1 단계, 이미지 1/1
    • Opening the device voids the manufacturer warranty.

    • Power down the HP Split x2 before beginning the repair

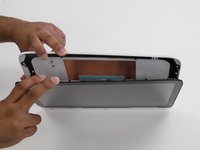
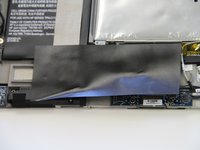
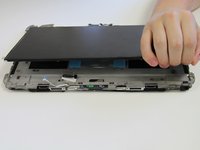
    • Separate the tablet from the keyboard by pushing the slider to the left and lifting the tablet from the keyboard.

  2. HP Split x2 Screen Replacement: 2 단계, 이미지 1/3 HP Split x2 Screen Replacement: 2 단계, 이미지 2/3 HP Split x2 Screen Replacement: 2 단계, 이미지 3/3
    • Remove the four white caps on the bottom edge of the tablet.

    • Use a tweezer to grasp white caps.

    • The white caps are easily lost. Store them in a secure place.

  3. HP Split x2 Screen Replacement: 3 단계, 이미지 1/1
    • Use a Phillips #000 screwdriver to remove the four 3mm screws.

  4. HP Split x2 Screen Replacement: 4 단계, 이미지 1/2 HP Split x2 Screen Replacement: 4 단계, 이미지 2/2
    • Use a plastic opening tool to pry the tabs on the top, left and right sides of the tablet.

    • Only the top and sides have tabs. Remove all tabs before lifting screen.

  5. HP Split x2 Screen Replacement: 5 단계, 이미지 1/2 HP Split x2 Screen Replacement: 5 단계, 이미지 2/2
    • Separate the cover and the screen.

    • Gently lift the screen out of the cover.

  6. HP Split x2 Screen Replacement, Screen: 6 단계, 이미지 1/2 HP Split x2 Screen Replacement, Screen: 6 단계, 이미지 2/2
    • Use a J0 screwdriver to remove the ten 4mm Phillips screws.

  7. HP Split x2 Screen Replacement: 7 단계, 이미지 1/2 HP Split x2 Screen Replacement: 7 단계, 이미지 2/2
    • Peel back the large black tape.

    • Remove the 4mm Phillips screw.

  8. HP Split x2 Screen Replacement: 8 단계, 이미지 1/3 HP Split x2 Screen Replacement: 8 단계, 이미지 2/3 HP Split x2 Screen Replacement: 8 단계, 이미지 3/3
    • Remove three 2 mm zero insertion force (ZIF) connectors. Lift the black tab in front and then remove the ribbon from the rear.

    • Remove two larger zero insertion force (ZIF) connectors. Lift the black tab in front and then remove the ribbon from the rear.

  9. HP Split x2 Screen Replacement: 9 단계, 이미지 1/3 HP Split x2 Screen Replacement: 9 단계, 이미지 2/3 HP Split x2 Screen Replacement: 9 단계, 이미지 3/3
    • The last attachment to the screen is the bronze colored display cable connector.

    • Use a pair of tweezers to lift the metal bar and swing it to the other side on top of the cable.

    • Pull in the direction of the cable to remove the connector.

  10. HP Split x2 Screen Replacement: 10 단계, 이미지 1/1
    • Glue is holding the device together along the edges. The glue is can be very strong. A heat gun may be required to loosen the glue for removal of the digitizer to prevent damage to the screen.

    • Apply pressure to to the sides of the tablet.

    • Separate the digitizer from the the body of the tablet.

  11. HP Split x2 Screen Replacement: 11 단계, 이미지 1/2 HP Split x2 Screen Replacement: 11 단계, 이미지 2/2
    • Glue is holding the screen on at the four corners.

    • Lift the screen up, breaking any adhesion forced by the glue.

    • Replace the old screen with a new one.

결론

To reassemble your device, follow these instructions in reverse order.

다른 11명이 해당 안내서를 완성하였습니다.

Ricky Huitema

회원 가입일: 09/24/15

449 평판

안내서 2개 작성하였습니다

Texas Tech, Team 22-5, Rauch Fall 2015 Texas Tech, Team 22-5, Rauch Fall 2015 회원

TTU-RAUCH-F15S22G5

3 회원들

안내서 2개 작성하였습니다

댓글 5개

This is not helpful because the one I am working on has no screws.

Matt Brown - 답글

I also have a Split x2 with no screws

dbmacaulay -

I want change my screen because My screen is broken but I do not know , where I can buy my screen

Nohora Chitiva - 답글

ebay or amazon

Andrei Isari -

Is HP Touch Screen Digitizer Glass for HP Split X2 The same as the screen being replaced here?? I need to know

Nwatu Chineme Edger - 답글

댓글 쓰기

조회 통계:

24 시간 전: 0

7일 전: 11

30일 전: 30

전체 시간: 13,107