주요 콘텐츠로 건너뛰기

HTC Desire 510 Front and Main Cameras Replacement

필요한 것

동영상 개요

  1. HTC Desire 510 Front and Main Cameras Replacement, BATTERY REMOVAL: 1 단계, 이미지 1/3 HTC Desire 510 Front and Main Cameras Replacement, BATTERY REMOVAL: 1 단계, 이미지 2/3 HTC Desire 510 Front and Main Cameras Replacement, BATTERY REMOVAL: 1 단계, 이미지 3/3
    • Switch off the phone, remove the battery and any installed SIM and memory cards.

    • Remove 7x Torx T5 screws.

  2. HTC Desire 510 Front and Main Cameras Replacement, REAR BEZEL REMOVAL: 2 단계, 이미지 1/3 HTC Desire 510 Front and Main Cameras Replacement, REAR BEZEL REMOVAL: 2 단계, 이미지 2/3 HTC Desire 510 Front and Main Cameras Replacement, REAR BEZEL REMOVAL: 2 단계, 이미지 3/3
    • Use a plastic tool to remove the rear bezel.

    • The loudspeaker is on the inner side of the rear bezel.

  3. HTC Desire 510 Front and Main Cameras Replacement, FLEX CABLES DISCONNECTING: 3 단계, 이미지 1/3 HTC Desire 510 Front and Main Cameras Replacement, FLEX CABLES DISCONNECTING: 3 단계, 이미지 2/3 HTC Desire 510 Front and Main Cameras Replacement, FLEX CABLES DISCONNECTING: 3 단계, 이미지 3/3
    • Disconnect the touch screen flex cable.

    • Disconnect the light sensor flex cable.

    • Unstuck the vibra-motor from the middle frame.

    • Remove the coaxial antenna cable from the middle frame.

    • The LCD display flex cable is connected to the bottom side of the board.

  4. HTC Desire 510 Front and Main Cameras Replacement, LOGIC BOARD REMOVAL: 4 단계, 이미지 1/3 HTC Desire 510 Front and Main Cameras Replacement, LOGIC BOARD REMOVAL: 4 단계, 이미지 2/3 HTC Desire 510 Front and Main Cameras Replacement, LOGIC BOARD REMOVAL: 4 단계, 이미지 3/3
    • At the upper left side, the board is held by a plastic locking clip. Use a plastic tool and start the separating from here.

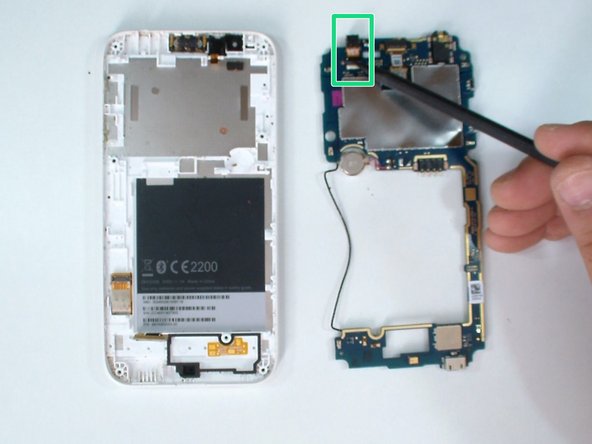
    • Gently disconnect the LCD display flex cable.

    • Now remove the logic board.

  5. HTC Desire 510 Front and Main Cameras Replacement, Front and Main Cameras: 5 단계, 이미지 1/2 HTC Desire 510 Front and Main Cameras Replacement, Front and Main Cameras: 5 단계, 이미지 2/2
    • Main / Rear camera.

    • New line.

결론

To reassemble your device, follow these instructions in reverse order.

다른 2명이 해당 안내서를 완성하였습니다.

ZFix

회원 가입일: 12/09/13

191,182 평판

안내서 330개 작성하였습니다

Master Techs Master Techs 회원

Community

322 회원들

안내서 2,521개 작성하였습니다

댓글 0개

댓글 쓰기

조회 통계:

24 시간 전: 0

7일 전: 0

30일 전: 0

전체 시간: 1,548