주요 콘텐츠로 건너뛰기

HTC Droid DNA Battery Replacement

필요한 것

  1. HTC Droid DNA Battery Replacement, Remove the SIM Card Tray: 1 단계, 이미지 1/1
    • Poke a paperclip into the hole to the right of the SIM Card Tray. The SIM Card Tray will automatically pop out.

  2. HTC Droid DNA Battery Replacement, Removing the SIM Card Tray: 2 단계, 이미지 1/2 HTC Droid DNA Battery Replacement, Removing the SIM Card Tray: 2 단계, 이미지 2/2
    • Pull out the SIM Card Tray with your fingers.

  3. HTC Droid DNA Battery Replacement, Loosen the Phone Casing: 3 단계, 이미지 1/2 HTC Droid DNA Battery Replacement, Loosen the Phone Casing: 3 단계, 이미지 2/2
    • Make sure the USB cover on the bottom of the phone is removed first.

    • Starting at a corner, slowly work your way around the edge of the sides with your prying tool to loosen the front panel.

    • Take your time. A lot of force is necessary to loosen the front panel.

  4. HTC Droid DNA Battery Replacement, Pull the Casing Apart: 4 단계, 이미지 1/1
    • Slowly pull the panel apart from the back of the phone.

    • Apply a moderate force to pry the panel from the back of the phone.

  5. HTC Droid DNA Battery Replacement, Remove the Black Tape: 5 단계, 이미지 1/1
    • Set the device down so that the bottom of the phone is facing to the right.

    • Gently take off the piece of black tape surrounding the motherboard.

    • Be careful not to rip the tape.

  6. HTC Droid DNA Battery Replacement, Remove the Yellow Tape: 6 단계, 이미지 1/1
    • Use your tweezers to take off the yellow tape on the bottom left corner of the phone.

  7. HTC Droid DNA Battery Replacement: 7 단계, 이미지 1/1
    • Rotate your phone 90 degrees clockwise so the bottom of the phone is facing you.

    • Use the T5 Torx screwdriver to remove the two 4mm screws located at the bottom of the phone.

  8. HTC Droid DNA Battery Replacement, Remove the Void Screw: 8 단계, 이미지 1/1
    • Use the Phillips #000 screwdriver to remove the single 2.7mm void screw on the bottom right.

  9. HTC Droid DNA Battery Replacement, Remove the Screw Retaining Bracket: 9 단계, 이미지 1/1
    • Rotate your phone back 90 Degrees counter-clockwise.

    • Use your tweezers to take off the small metal retaining bracket on the bottom right of the phone.

  10. HTC Droid DNA Battery Replacement, Remove the Connector Screws: 10 단계, 이미지 1/1
    • Remove the following Phillips #000 screws from the motherboard:

    • Four 1.6 mm screws

    • Two 1.5 mm screws

  11. HTC Droid DNA Battery Replacement, Unfasten the Connectors: 11 단계, 이미지 1/2 HTC Droid DNA Battery Replacement, Unfasten the Connectors: 11 단계, 이미지 2/2
    • Use your pry tool to unfasten the connectors on both sides of the motherboard.

    • The connectors will still be attached to the green camera board at the top so DO NOT try to pull them off or bend them severely.

  12. HTC Droid DNA Battery Replacement, Remove the Yellow Tape: 12 단계, 이미지 1/1
    • Use your tweezers to remove the two pieces of yellow tape shown.

  13. HTC Droid DNA Battery Replacement, Flipping up the White Board: 13 단계, 이미지 1/2 HTC Droid DNA Battery Replacement, Flipping up the White Board: 13 단계, 이미지 2/2
    • Use your tweezers to gently snap up the white board on the bottom right of the motherboard.

  14. HTC Droid DNA Battery Replacement, Disconnect the Connector: 14 단계, 이미지 1/1
    • Use your tweezers to disconnect the black connector on the bottom right of the motherboard.

    • Be careful not to bend the Flex Cable of the Connector.

  15. HTC Droid DNA Battery Replacement, Flipping up the White Board: 15 단계, 이미지 1/2 HTC Droid DNA Battery Replacement, Flipping up the White Board: 15 단계, 이미지 2/2
    • Use your tweezers to gently snap the other white board on the bottom right of the motherboard up.

  16. HTC Droid DNA Battery Replacement, Disconnect the Connector: 16 단계, 이미지 1/1
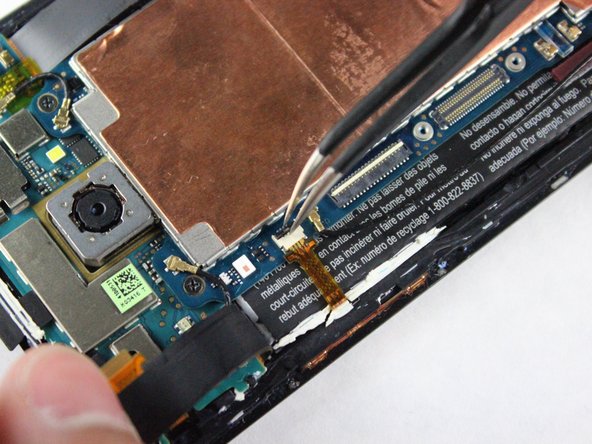
    • Use your tweezers to disconnect the other small connector on the bottom right of the motherboard.

    • Be careful not to bend the Flex Cables for the Connector.

  17. HTC Droid DNA Battery Replacement, Flipping up the White Board: 17 단계, 이미지 1/2 HTC Droid DNA Battery Replacement, Flipping up the White Board: 17 단계, 이미지 2/2
    • Rotate the phone 180 degrees.

    • Use your tweezers to gently snap up the white board on the top left of the motherboard.

  18. HTC Droid DNA Battery Replacement, Disconnect the Connector: 18 단계, 이미지 1/1
    • Use your tweezers to disconnect the cable on the top left of the motherboard.

    • Be careful not to bend the Flex Cable of the Connector.

  19. HTC Droid DNA Battery Replacement, Flipping up the Black Board: 19 단계, 이미지 1/2 HTC Droid DNA Battery Replacement, Flipping up the Black Board: 19 단계, 이미지 2/2
    • Use your tweezers to gently snap up the black board on the top left of the motherboard.

  20. HTC Droid DNA Battery Replacement, Disconnect the Small Ribbon Connector: 20 단계, 이미지 1/1
    • Use your tweezers to gently remove the yellow connector on the top left of the phone.

  21. HTC Droid DNA Battery Replacement, Remove the Black Wire: 21 단계, 이미지 1/1
    • Remove the long black wire on the left of the motherboard.

  22. HTC Droid DNA Battery Replacement, Remove the Two Black Wires: 22 단계, 이미지 1/1
    • Reorient the phone so that the green camera board is farthest from you.

    • Use your tweezers to remove the two wires located at the top of the board. The wires snap off very easily so not much force is needed.

  23. HTC Droid DNA Battery Replacement, Remove the Screws: 23 단계, 이미지 1/1
    • Use a Phillips #000 screwdriver to remove the two 3.9mm screws on top of motherboard.

  24. HTC Droid DNA Battery Replacement, Remove the Motherboard: 24 단계, 이미지 1/2 HTC Droid DNA Battery Replacement, Remove the Motherboard: 24 단계, 이미지 2/2
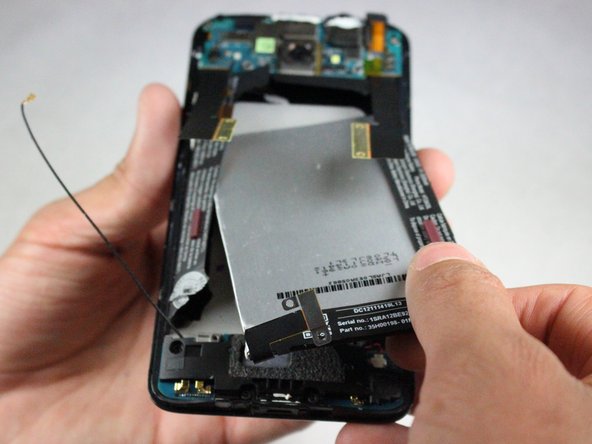
    • Now, use your fingers to slowly pull up the motherboard and remove it from the phone.

  25. HTC Droid DNA Battery Replacement, Separate the Housing: 25 단계, 이미지 1/1
    • Use the pry tool to separate the housing of the phone from the battery.

    • Try not to damage the adhesive holding the battery.

    • The adhesive holding the battery in place is very strong. Use the pry tool in multiple spots around the battery to loosen the adhesive.

  26. HTC Droid DNA Battery Replacement, Remove the Battery: 26 단계, 이미지 1/2 HTC Droid DNA Battery Replacement, Remove the Battery: 26 단계, 이미지 2/2
    • Slowly pull up the battery with the prying tool.

    • Remove the battery with your fingers.

    • Try to keep the black paper in place around the battery. However, should it rip, that is okay.

결론

To reassemble your device, follow these instructions in reverse order.

다른 16명이 해당 안내서를 완성하였습니다.

Madeline Tran

회원 가입일: 10/14/14

707 평판

안내서 3개 작성하였습니다

Cal Poly, Team 4-43, Amido Fall 2014 Cal Poly, Team 4-43, Amido Fall 2014 회원

CPSU-AMIDO-F14S4G43

4 회원들

안내서 10개 작성하였습니다

댓글 2개

Will the replacement battery need adhesive for it? Or will the adhesive still be there on the bottom of the phone? Thanks!

Adam - 답글

Thanks for posting this hope I now get a few more years out of my DNA for not much money.

Gerry Lingner - 답글

댓글 쓰기

조회 통계:

24 시간 전: 0

7일 전: 0

30일 전: 5

전체 시간: 17,324