주요 콘텐츠로 건너뛰기

HTC OPM9200 Backplate Removal Prerequisite

단지 전제 조건
이 안내서는 다른 가이드의 선행 작업으로 사용하기 위한 것입니다. 그 자체로는 불완전합니다.

필요한 것

  1. HTC OPM9200 Backplate Removal Prerequisite, Backplate Removal Prereq: 1 단계, 이미지 1/3 HTC OPM9200 Backplate Removal Prerequisite, Backplate Removal Prereq: 1 단계, 이미지 2/3 HTC OPM9200 Backplate Removal Prerequisite, Backplate Removal Prereq: 1 단계, 이미지 3/3
    • Before you proceed, discharge your device battery below 25%. A charged lithium-ion battery can catch fire and/or explode if accidentally punctured.

    • Power off the device.

    • Locate the SD Card/SIM Card cover flap on the left side of the device.

    • Upon opening the cover flap you will find slots for SD Card and the SIM Card. Carefully remove these items if your device has them and set them aside.

    • Lift on the back cover to begin the removal process. Continue removing the back cover by working along the edge. Once removed set aside the back cover.

  2. HTC OPM9200 Backplate Removal Prerequisite: 2 단계, 이미지 1/1
    • Remove the five 3.5mm T4 Torx Screws.

    • Remove the two 4.5mm #00 Phillips screws.

    • Please be aware of the sticker below the battery. Following this guide past this point may void your device's warranty.

  3. HTC OPM9200 Backplate Removal Prerequisite: 3 단계, 이미지 1/2 HTC OPM9200 Backplate Removal Prerequisite: 3 단계, 이미지 2/2
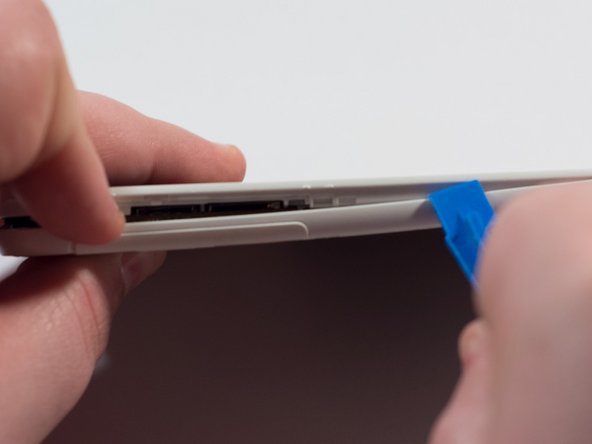
    • Place a plastic opening tool along the seam of the front plate and back plate. Run the opening tool along the seam while prying slightly in order to pop the plastic clips away from the front plate.

    • Once one or two clips have popped away you may begin to use your free hand to apply additional pressure while continuing to apply prying pressure as well with the opening tool.

    • Apply constant but controlled pressure while separating the front from the back. Damage may occur if using excessive pressure while separating the plates along the seam.

  4. HTC OPM9200 Backplate Removal Prerequisite: 4 단계, 이미지 1/1
    • Continue working your way around the seam between the two parts and eventually you will be able to separate the entirety of the backplate revealing the internals of the device.

결론

To reassemble your device, follow these instructions in reverse order.

Steve Gilland

회원 가입일: 01/18/17

1,043 평판

안내서 10개 작성하였습니다

Arkansas State University, Team 1-3, Chamberlain Spring 2017 Arkansas State University, Team 1-3, Chamberlain Spring 2017 회원

ARSU-CHAMBERLAIN-S17S1G3

3 회원들

안내서 20개 작성하였습니다

댓글 0개

댓글 쓰기

조회 통계:

24 시간 전: 0

7일 전: 0

30일 전: 0

전체 시간: 32