주요 콘텐츠로 건너뛰기

HTC One Max Microphone and Speaker Assembly Replacement

필요한 것

  1. HTC One Max Microphone and Speaker Assembly Replacement, Back Case: 1 단계, 이미지 1/1
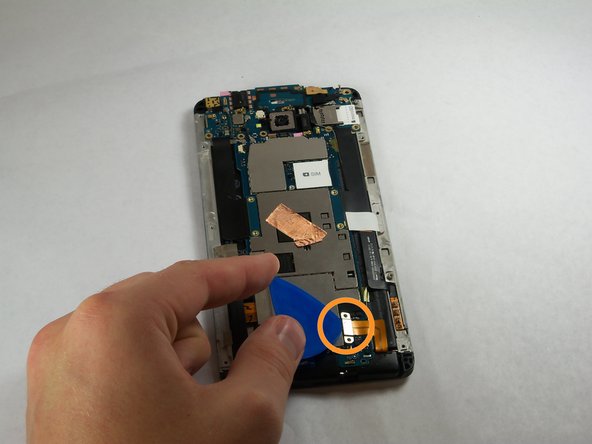
    • Lift back cover while pressing highlighted release switch towards the center of the phone.

  2. HTC One Max Microphone and Speaker Assembly Replacement: 2 단계, 이미지 1/2 HTC One Max Microphone and Speaker Assembly Replacement: 2 단계, 이미지 2/2
    • Remove the four white stickers in each corner that cover the Tri-Wing screws.

    • Remove the white sticker near the buttons that control the volume.

    • Remove the white sticker near the SIM card.

    • Remove the big white sticker with the bar-code in the center of the phone.

  3. HTC One Max Microphone and Speaker Assembly Replacement: 3 단계, 이미지 1/1
    • Remove the thirteen Tri-Wing Y00 screws (Upper & Lower screws are 5 mm length, middle screws are 3.8 mm length) from the back case.

    • Disconnect the cable near the volume buttons.

  4. HTC One Max Microphone and Speaker Assembly Replacement: 4 단계, 이미지 1/2 HTC One Max Microphone and Speaker Assembly Replacement: 4 단계, 이미지 2/2
    • Use the small plastic opening tool to pry between the screen and the rear case.

  5. HTC One Max Microphone and Speaker Assembly Replacement, Fingerprint Sensor: 5 단계, 이미지 1/2 HTC One Max Microphone and Speaker Assembly Replacement, Fingerprint Sensor: 5 단계, 이미지 2/2
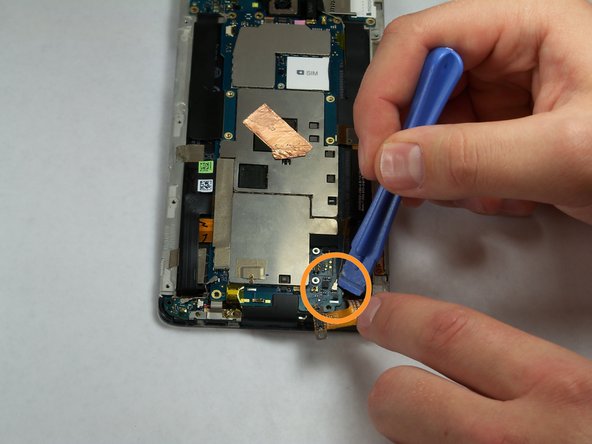
    • Use Tweezers to disconnect the ribbon cable connecting the fingerprint sensor to the motherboard.

    • When replacing the fingerprint sensor, make sure the ribbon cable snaps into the port on the motherboard.

  6. HTC One Max Microphone and Speaker Assembly Replacement, Motherboard: 6 단계, 이미지 1/2 HTC One Max Microphone and Speaker Assembly Replacement, Motherboard: 6 단계, 이미지 2/2
    • Remove the two 2.2 mm Phillips #000 screws holding the battery cable.

    • Use a plastic tool to remove the ribbon cable.

  7. HTC One Max Microphone and Speaker Assembly Replacement: 7 단계, 이미지 1/2 HTC One Max Microphone and Speaker Assembly Replacement: 7 단계, 이미지 2/2
    • Use the plastic opening tool to disconnect the two antenna wires at the top of the phone.

    • Use the plastic opening tool to disconnect a third antenna wire at the bottom of the phone.

  8. HTC One Max Microphone and Speaker Assembly Replacement: 8 단계, 이미지 1/1
    • Remove the seven 3 mm Phillips #000 screws from the motherboard.

  9. HTC One Max Microphone and Speaker Assembly Replacement: 9 단계, 이미지 1/3 HTC One Max Microphone and Speaker Assembly Replacement: 9 단계, 이미지 2/3 HTC One Max Microphone and Speaker Assembly Replacement: 9 단계, 이미지 3/3
    • Use a plastic tool to pry up and disconnect the large ribbon cables on each side of the motherboard.

    • Use caution prying the ribbon cable on the right side because other ribbon cables run under it.

  10. HTC One Max Microphone and Speaker Assembly Replacement: 10 단계, 이미지 1/3 HTC One Max Microphone and Speaker Assembly Replacement: 10 단계, 이미지 2/3 HTC One Max Microphone and Speaker Assembly Replacement: 10 단계, 이미지 3/3
    • Remove the tape covering three flex cable gate connectors on the bottom left side of the phone.

    • Use small plastic opening tool to pry open the latch on each of these gate connectors to disconnect the three cables.

    • Use small plastic opening tool to pry open the latch on each of these gate connectors to disconnect the three cables.

  11. HTC One Max Microphone and Speaker Assembly Replacement: 11 단계, 이미지 1/2 HTC One Max Microphone and Speaker Assembly Replacement: 11 단계, 이미지 2/2
    • Use a plastic tool to lift and remove the motherboard.

    • Use a heat gun to loosen adhesive at bottom if needed.

  12. HTC One Max Microphone and Speaker Assembly Replacement, Microphone and Speaker Assembly: 12 단계, 이미지 1/1
    • Remove the two 2.8 mm Phillips #000 screws from the metal plate near the bottom of the phone.

  13. HTC One Max Microphone and Speaker Assembly Replacement: 13 단계, 이미지 1/2 HTC One Max Microphone and Speaker Assembly Replacement: 13 단계, 이미지 2/2
    • Use the small plastic opening tool to pry back the speaker and microphone assembly from the bottom of the phone.

    • Be careful to not to damage the speaker.

결론

To reassemble your device, follow these instructions in reverse order.

다른 3명이 해당 안내서를 완성하였습니다.

Andrew Keller

회원 가입일: 09/23/14

1,131 평판

안내서 5개 작성하였습니다

USF Tampa, Team 11-3, Blackwell Fall 2014 USF Tampa, Team 11-3, Blackwell Fall 2014 회원

USFT-BLACKWELL-F14S11G3

4 회원들

안내서 7개 작성하였습니다

댓글 0개

댓글 쓰기

조회 통계:

24 시간 전: 0

7일 전: 0

30일 전: 2

전체 시간: 3,853