주요 콘텐츠로 건너뛰기

이 버전에는 잘못된 편집 사항이 있을 수 있습니다. 최신 확인된 스냅샷으로 전환하십시오.

필요한 것

  1. , iOpener 데우기: 1 단계, 이미지 1/2 , iOpener 데우기: 1 단계, 이미지 2/2
    • 전자 레인지 바닥의 더러운 찌꺼기가 iOpener에 묻을 수 있으므로 진행하기 전에 전자 레인지 청소를 권장합니다.

    • iOpener를 전자 레인지 중앙에 놓으세요.

    • 회전식 전자 레인지: 플레이트가 자유롭게 회전하는 것을 확인하세요. iOpener가 걸리면 과열되어 타버릴 수 있습니다.

  2. : 2 단계, 이미지 1/1
    • iOpener를 30초 동안 가열하세요.

    • 수리하는 동안, iOpener가 식으면, 한 번에 30초 씩 전자 레인지로 다시 가열하세요.

    • 수리하는 동안 iOpener가 과열되지 않도록 주의하세요. 과열로 iOpener가 터질 수 있습니다. 100˚C(212˚F) 이상으로 가열하지 마세요.

    • 부풀어 오른 iOpener는 절대로 만지지 마세요.

    • iOpener 중간 부분이 여전히 뜨거워서 만질 수 없다면 더 식어서 다시 가열할 때까지 계속 사용하세요. 제대로 가열한 iOpener는 최대 10분 동안 따뜻함을 유지해야 합니다.

  3. : 3 단계, 이미지 1/1
    • iOpener의 뜨거운 중간 부분을 피하고 평평한 끝 둘 중 하나를 잡아서 iOpener를 전자 레인지에서 꺼내세요.

    • iOpener는 매우 뜨겁습니다 취급시 주의하세요. 필요한 경우 오븐 장갑을 사용하세요.

  4. , iOpener 대체 가열 방법: 4 단계, 이미지 1/2 , iOpener 대체 가열 방법: 4 단계, 이미지 2/2
    • 전자레인지를 사용할 수 없다면 다음 단계에 따라 끓는 물에 iOpener를 데우세요.

    • 냄비나 팬에 iOpener가 완전히 잠길 정도로 충분한 물을 채우세요.

    • 물이 끓을 때까지 가열하세요. 불을 끄세요.

    • iOpener를 뜨거운 물에 2~3분간 담그세요. iOpener가 물에 완전히 잠겼는지 확인합니다.

    • 집게를 사용하여 뜨거운 물에서 가열된 아이오페너를 꺼내세요.

    • 수건으로 iOpener를 완전히 말리세요.

    • iOpener는 매우 뜨거우므로 끝 탭으로만 잡도록 주의하세요.

    • iOpener를 사용할 준비가 되었습니다! iOpener를 재가열해야 한다면 물을 끓인 후 불을 끄고 2~3분 동안 iOpener를 물에 담가 두세요.

  5. 이 단계는 번역되지 않았습니다. 번역을 도와주십시오

    : 5 단계, 이미지 1/1
    • Handling it by the tag, place the heated iOpener across the bottom casing.

    • Let the iOpener sit for at least a minute to soften the adhesive beneath the casing.

  6. 이 단계는 번역되지 않았습니다. 번역을 도와주십시오

    : 6 단계, 이미지 1/3 : 6 단계, 이미지 2/3 : 6 단계, 이미지 3/3
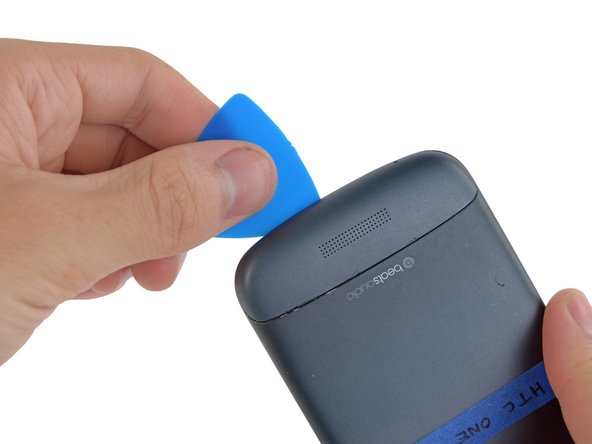
    • Gently place an opening pick in the corner of the gap between the bottom casing and rear case.

    • Slide the opening pick along the side of the casing, prying it away from the adhesive as you go.

  7. 이 단계는 번역되지 않았습니다. 번역을 도와주십시오

    : 7 단계, 이미지 1/1
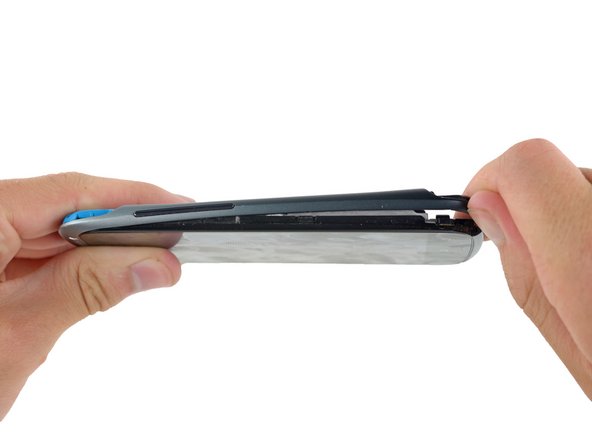
    • Use your fingers to pull the bottom casing off the rest of the phone.

  8. 이 단계는 번역되지 않았습니다. 번역을 도와주십시오

    : 8 단계, 이미지 1/2 : 8 단계, 이미지 2/2
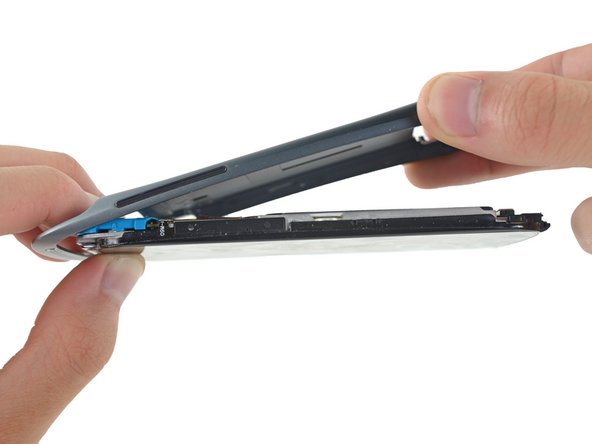
    • Starting at the groove near the headphone jack, use a plastic opening tool to lift the top casing.

  9. 이 단계는 번역되지 않았습니다. 번역을 도와주십시오

    : 9 단계, 이미지 1/1
    • Use your fingers to pull the top casing off of the rest of the phone.

  10. 이 단계는 번역되지 않았습니다. 번역을 도와주십시오

    : 10 단계, 이미지 1/1
    • Remove the following screws holding the rear case to the rest of the phone:

    • Two 3.15 mm Phillips #00 screws

    • One 4.15 Torx T5 screw

    • One 4 mm Torx T5 screw

  11. 이 단계는 번역되지 않았습니다. 번역을 도와주십시오

    : 11 단계, 이미지 1/3 : 11 단계, 이미지 2/3 : 11 단계, 이미지 3/3
    • Place your fingers on either side of the phone and gently push up on the rear case.

    • It is important to start from the bottom of the phone because the rear case wraps around the front of the phone at the top which makes it impossible to start prying from there.

  12. 이 단계는 번역되지 않았습니다. 번역을 도와주십시오

    : 12 단계, 이미지 1/1
    • Pull the rear case away from the rest of the phone with your hands.

  13. 이 단계는 번역되지 않았습니다. 번역을 도와주십시오

    : 13 단계, 이미지 1/2 : 13 단계, 이미지 2/2
    • Using the pointed end of a spudger, lift the battery cable and release the connector.

  14. 이 단계는 번역되지 않았습니다. 번역을 도와주십시오

    : 14 단계, 이미지 1/2 : 14 단계, 이미지 2/2
    • Switching to the flat end of the spudger, work your way underneath the battery and peel it away from the adhesive.

  15. 이 단계는 번역되지 않았습니다. 번역을 도와주십시오

    : 15 단계, 이미지 1/1
    • Remove the battery from the phone.

  16. 이 단계는 번역되지 않았습니다. 번역을 도와주십시오

    : 16 단계, 이미지 1/1
    • Remove the three 3.15mm Phillips #00 screws from the turquoise case.

  17. 이 단계는 번역되지 않았습니다. 번역을 도와주십시오

    : 17 단계, 이미지 1/2 : 17 단계, 이미지 2/2
    • Using a plastic opening tool, lift the turquoise case from the end near the headphone jack.

  18. 이 단계는 번역되지 않았습니다. 번역을 도와주십시오

    : 18 단계, 이미지 1/1
    • Remove the turquoise cover from the phone.

  19. 이 단계는 번역되지 않았습니다. 번역을 도와주십시오

    : 19 단계, 이미지 1/2 : 19 단계, 이미지 2/2
    • A camera filter is now free to move, so remove it using tweezers.

  20. 이 단계는 번역되지 않았습니다. 번역을 도와주십시오

    : 20 단계, 이미지 1/3 : 20 단계, 이미지 2/3 : 20 단계, 이미지 3/3
    • Use tweezers to lift the yellow polyimide tape that covers the ZIF connectors.

  21. 이 단계는 번역되지 않았습니다. 번역을 도와주십시오

    : 21 단계, 이미지 1/2 : 21 단계, 이미지 2/2
    • Use the pointed end of a spudger to lift the white tab on the largest ZIF connector opposite the USB connector.

  22. 이 단계는 번역되지 않았습니다. 번역을 도와주십시오

    : 22 단계, 이미지 1/3 : 22 단계, 이미지 2/3 : 22 단계, 이미지 3/3
    • Use the pointed edge of a spudger to work the ZIF cable out of its connector.

    • To do this, you may have to slowly work both sides until the whole cable is released.

  23. 이 단계는 번역되지 않았습니다. 번역을 도와주십시오

    : 23 단계, 이미지 1/1
    • Repeat the procedure from steps 19 and 20 to remove the cables from the remaining ZIF connectors.

  24. 이 단계는 번역되지 않았습니다. 번역을 도와주십시오

    : 24 단계, 이미지 1/2 : 24 단계, 이미지 2/2
    • Using the pointed end of the spudger, pop the antenna cable from its connector on the motherboard.

  25. 이 단계는 번역되지 않았습니다. 번역을 도와주십시오

    : 25 단계, 이미지 1/1
    • Remove the 3.15 mm Phillips #00 screw from the motherboard.

  26. 이 단계는 번역되지 않았습니다. 번역을 도와주십시오

    : 26 단계, 이미지 1/2 : 26 단계, 이미지 2/2
    • Remove the motherboard from the rest of the phone.

결승점

다른 11명이 해당 안내서를 완성하였습니다.

Jay Miley

회원 가입일: 04/22/14

5,044 평판

안내서 13개 작성하였습니다

Cal Poly, Team 10-55, Amido Spring 2014 Cal Poly, Team 10-55, Amido Spring 2014 회원

CPSU-AMIDO-S14S10G55

4 회원들

안내서 31개 작성하였습니다

댓글 2개

IOpener wasn't necessary, with the plastic opening tool i was able to easily remove the bottom cover. Also, it's real easy to crush/squash the battery with the prying tool.

edgarzaf - 답글

Can you please show me where the bluetooth chip is so I can replace it? Thanks

Milo - 답글

댓글 쓰기

조회 통계:

24 시간 전: 2

7일 전: 4

30일 전: 8

전체 시간: 4,460