주요 콘텐츠로 건너뛰기

HTC Touch Pro 2 Housing Replacement

필요한 것

  1. HTC Touch Pro 2 Housing Replacement, Battery: 1 단계, 이미지 1/3 HTC Touch Pro 2 Housing Replacement, Battery: 1 단계, 이미지 2/3 HTC Touch Pro 2 Housing Replacement, Battery: 1 단계, 이미지 3/3
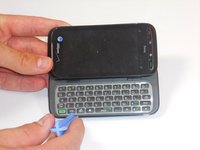
    • Apply pressure and slide upward to remove back cover.

    • Lift the back cover up away from the phone.

  2. HTC Touch Pro 2 Housing Replacement: 2 단계, 이미지 1/2 HTC Touch Pro 2 Housing Replacement: 2 단계, 이미지 2/2
    • Lift battery upward on the upper right-hand side to remove it.

    • Check the battery to make sure there's no bent corners

  3. HTC Touch Pro 2 Housing Replacement, Housing: 3 단계, 이미지 1/2 HTC Touch Pro 2 Housing Replacement, Housing: 3 단계, 이미지 2/2
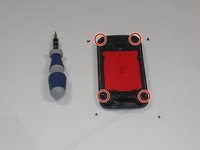
    • Using a T5 screwdriver, remove the four screws in corners as shown.

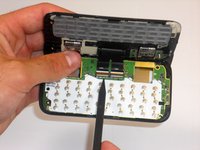
    • Lift the top portion of the rear case.

    • There is a ribbon attached on the back of this part that requires caution to remove.

  4. HTC Touch Pro 2 Housing Replacement: 4 단계, 이미지 1/3 HTC Touch Pro 2 Housing Replacement: 4 단계, 이미지 2/3 HTC Touch Pro 2 Housing Replacement: 4 단계, 이미지 3/3
    • Using an IfixIt Plastic Tool, detach the plastic casing from the keyboard. This may require some force.

    • Using a spudger or other thin tool, carefully pry up ZIF connectors as shown. This will allow the black ribbons to detach from the keyboard.

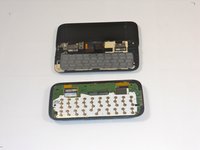
    • Slide the two parts away from each other so that the black ribbons slide through the slots and you will now have housing into two parts.

결론

To reassemble your device, follow these instructions in reverse order.

다른 2명이 해당 안내서를 완성하였습니다.

Melinda Phan

회원 가입일: 04/17/11

438 평판

안내서 9개 작성하였습니다

Cal Poly, Team 9-64, Walters Spring 2011 Cal Poly, Team 9-64, Walters Spring 2011 회원

CPSU-WALTERS-S11S9G64

5 회원들

안내서 18개 작성하였습니다

댓글 0개

댓글 쓰기

조회 통계:

24 시간 전: 0

7일 전: 0

30일 전: 0

전체 시간: 3,877