주요 콘텐츠로 건너뛰기

HTC Vive OLED Screen Replacement

보관된 가이드
해당 안내서는 단지 역사적인 목적으로 보관됩니다. 최신 버전 안내서를 사용하여 수리 하십시오.

필요한 것

  1. HTC Vive OLED Screen Replacement, Release the upper head strap: 1 단계, 이미지 1/2 HTC Vive OLED Screen Replacement, Release the upper head strap: 1 단계, 이미지 2/2
    • Be sure to power down and disconnect your Vive before beginning.

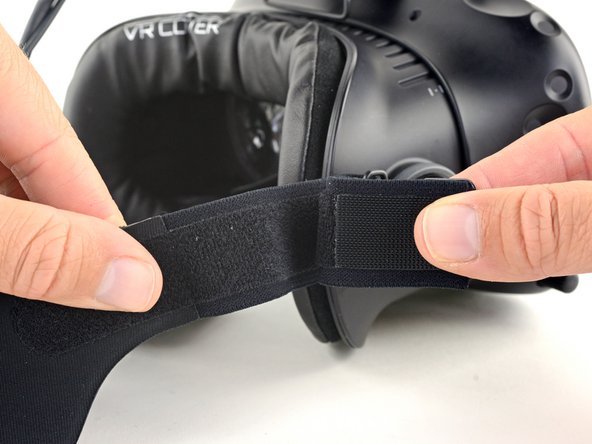
    • Pull the hook-and-loop (Velcro) closure at the top of the head strap apart to release the top of the head strap.

  2. HTC Vive OLED Screen Replacement, Remove the upper head strap: 2 단계, 이미지 1/2 HTC Vive OLED Screen Replacement, Remove the upper head strap: 2 단계, 이미지 2/2
    • Slide the top part of the head strap through its metal loop on the headset to remove it.

  3. HTC Vive OLED Screen Replacement, Remove the right side of the head strap: 3 단계, 이미지 1/3 HTC Vive OLED Screen Replacement, Remove the right side of the head strap: 3 단계, 이미지 2/3 HTC Vive OLED Screen Replacement, Remove the right side of the head strap: 3 단계, 이미지 3/3
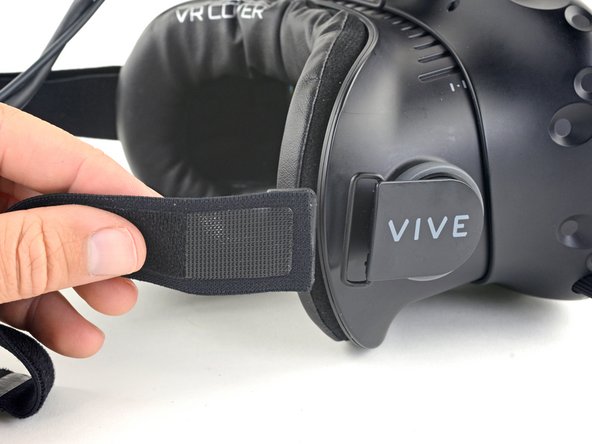
    • Pull the hook-and-loop closure at the right side of the head strap apart to release the right side of the head strap.

    • Slide the right side of the head strap through its metal loop to remove it.

  4. HTC Vive OLED Screen Replacement, Remove the left side of the head strap: 4 단계, 이미지 1/3 HTC Vive OLED Screen Replacement, Remove the left side of the head strap: 4 단계, 이미지 2/3 HTC Vive OLED Screen Replacement, Remove the left side of the head strap: 4 단계, 이미지 3/3
    • Pull the hook-and-loop closure at the left side of the head strap apart to release the left side of the head strap.

    • Slide the left side of the head strap through its metal loop to remove it.

  5. HTC Vive OLED Screen Replacement, Remove the head strap: 5 단계, 이미지 1/3 HTC Vive OLED Screen Replacement, Remove the head strap: 5 단계, 이미지 2/3 HTC Vive OLED Screen Replacement, Remove the head strap: 5 단계, 이미지 3/3
    • Slide the head strap along the cable, away from the Vive.

    • When the head strap comes to the end of the cable, gently slide it over the plugs and remove it.

  6. HTC Vive OLED Screen Replacement, Unscrew the head strap mounts: 6 단계, 이미지 1/2 HTC Vive OLED Screen Replacement, Unscrew the head strap mounts: 6 단계, 이미지 2/2
    • Be sure to power down and disconnect your Vive before beginning.

    • Use a T5 Torx driver to remove the two 12 mm-long screws securing the head strap mounts on either side of the headset.

    • For some devices, a T6 Torx driver may work better.

    • The mounts may fall off when the screws are removed, so be careful not to lose any parts.

  7. HTC Vive OLED Screen Replacement, Remove the head strap mounts: 7 단계, 이미지 1/3 HTC Vive OLED Screen Replacement, Remove the head strap mounts: 7 단계, 이미지 2/3 HTC Vive OLED Screen Replacement, Remove the head strap mounts: 7 단계, 이미지 3/3
    • Remove both head strap mounts.

  8. HTC Vive OLED Screen Replacement, Remove the facerest: 8 단계, 이미지 1/2 HTC Vive OLED Screen Replacement, Remove the facerest: 8 단계, 이미지 2/2
    • Slide the facerest straight away from the headset to remove it.

  9. HTC Vive OLED Screen Replacement, Unscrew the outer shell: 9 단계, 이미지 1/3 HTC Vive OLED Screen Replacement, Unscrew the outer shell: 9 단계, 이미지 2/3 HTC Vive OLED Screen Replacement, Unscrew the outer shell: 9 단계, 이미지 3/3
    • Use tweezers to remove the small stickers over the four screws securing the outer shell.

    • Use a T5 Torx driver to remove the four 3.4 mm-long screws securing the outer shell.

  10. HTC Vive OLED Screen Replacement, Remove the outer shell: 10 단계, 이미지 1/2 HTC Vive OLED Screen Replacement, Remove the outer shell: 10 단계, 이미지 2/2
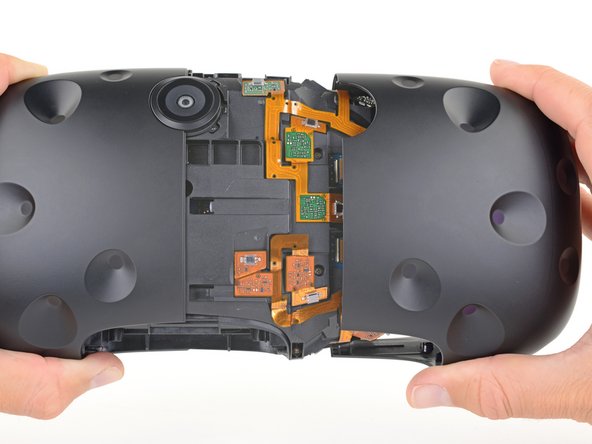
    • Use the flat end of a spudger to pry up the top edge of the right half of the outer shell, behind the component cover and near the seam in the center, until it is unclipped from the headset.

  11. HTC Vive OLED Screen Replacement: 11 단계, 이미지 1/2 HTC Vive OLED Screen Replacement: 11 단계, 이미지 2/2
    • Grasp the right half the outer shell and pull it to the right and toward the front of the headset until you feel the clips on the front of the cover release.

    • If the shell is difficult to remove, try prying along the seam with the flat end of a spudger to release the clips.

  12. HTC Vive OLED Screen Replacement: 12 단계, 이미지 1/2 HTC Vive OLED Screen Replacement: 12 단계, 이미지 2/2
    • Slide the right side of the outer shell to the right and off of the headset.

  13. HTC Vive OLED Screen Replacement: 13 단계, 이미지 1/2 HTC Vive OLED Screen Replacement: 13 단계, 이미지 2/2
    • Repeat the last three steps for the left side of the outer shell and remove it.

  14. HTC Vive OLED Screen Replacement, Disconnect the sensor array cables: 14 단계, 이미지 1/3 HTC Vive OLED Screen Replacement, Disconnect the sensor array cables: 14 단계, 이미지 2/3 HTC Vive OLED Screen Replacement, Disconnect the sensor array cables: 14 단계, 이미지 3/3
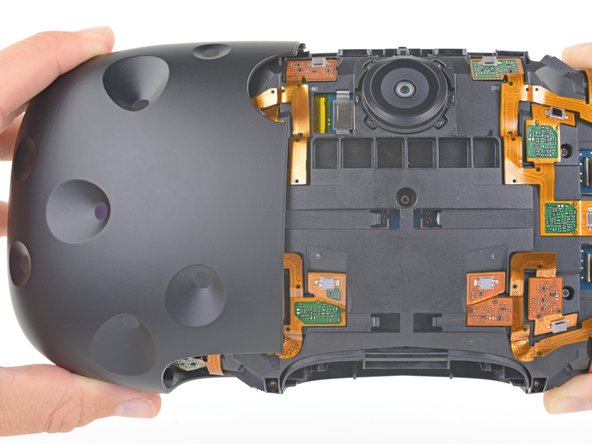
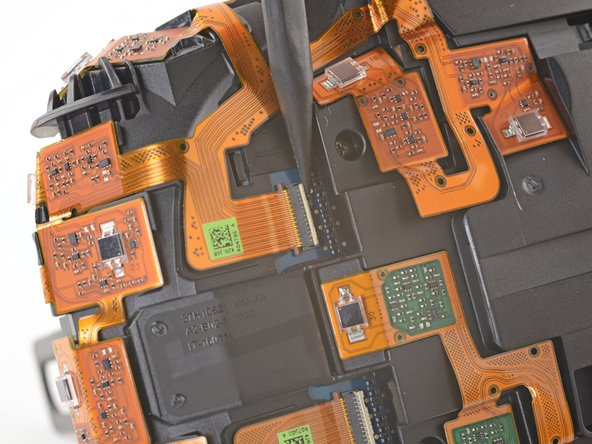
    • Use tweezers to remove the clear tape over all four of the sensor array cable connectors.

  15. HTC Vive OLED Screen Replacement: 15 단계, 이미지 1/3 HTC Vive OLED Screen Replacement: 15 단계, 이미지 2/3 HTC Vive OLED Screen Replacement: 15 단계, 이미지 3/3
    • Use the pointed end of a spudger to flip up the small locking flap on one of the sensor array ZIF connectors.

    • Slide the cable straight out of its socket on the motherboard.

  16. HTC Vive OLED Screen Replacement: 16 단계, 이미지 1/3 HTC Vive OLED Screen Replacement: 16 단계, 이미지 2/3 HTC Vive OLED Screen Replacement: 16 단계, 이미지 3/3
    • Repeat the previous step for the remaining three sensor array cables to disconnect the remaining cables.

  17. HTC Vive OLED Screen Replacement: 17 단계, 이미지 1/2 HTC Vive OLED Screen Replacement: 17 단계, 이미지 2/2
    • Use tweezers or a spudger to pry up the camera cable cover and remove it.

  18. HTC Vive OLED Screen Replacement: 18 단계, 이미지 1/2 HTC Vive OLED Screen Replacement: 18 단계, 이미지 2/2
    • Use the flat end of a spudger to pry the camera cable connector straight up from its socket on the motherboard.

  19. HTC Vive OLED Screen Replacement, Unscrew the sensor array: 19 단계, 이미지 1/1
    • Use a PH000 driver to remove the five 3.9 mm screws securing the sensor array.

  20. HTC Vive OLED Screen Replacement: 20 단계, 이미지 1/1
    • Use a PH000 driver to remove the four 3.9 mm screws securing the sensor array.

  21. HTC Vive OLED Screen Replacement: 21 단계, 이미지 1/2 HTC Vive OLED Screen Replacement: 21 단계, 이미지 2/2
    이 단계에 사용된 도구:
    Phillips #000 Screwdriver
    $5.49
    구매
    • Use a PH000 driver to remove the four 3.9 mm screws securing the sensor array.

    • You'll need a narrow, long-shaft driver to reach these screws.

  22. HTC Vive OLED Screen Replacement, Remove the sensor array: 22 단계, 이미지 1/2 HTC Vive OLED Screen Replacement, Remove the sensor array: 22 단계, 이미지 2/2
    • Lift the sensor array away from the headset to remove it.

  23. HTC Vive OLED Screen Replacement, Disconnect the motherboard: 23 단계, 이미지 1/3 HTC Vive OLED Screen Replacement, Disconnect the motherboard: 23 단계, 이미지 2/3 HTC Vive OLED Screen Replacement, Disconnect the motherboard: 23 단계, 이미지 3/3
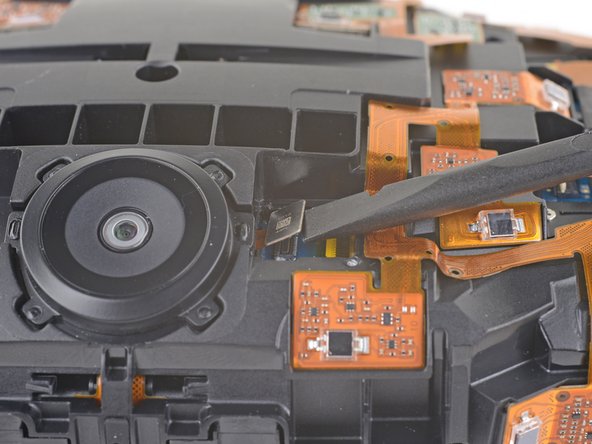
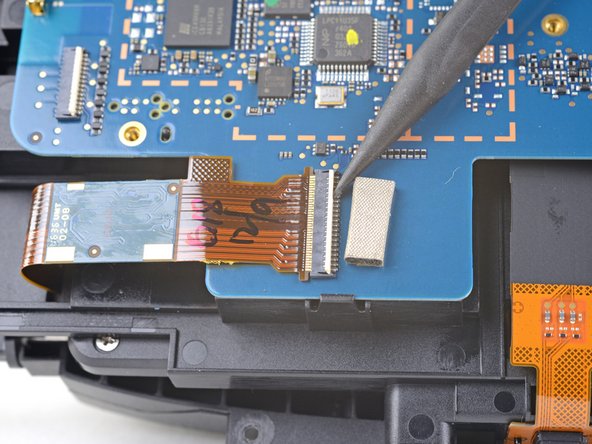
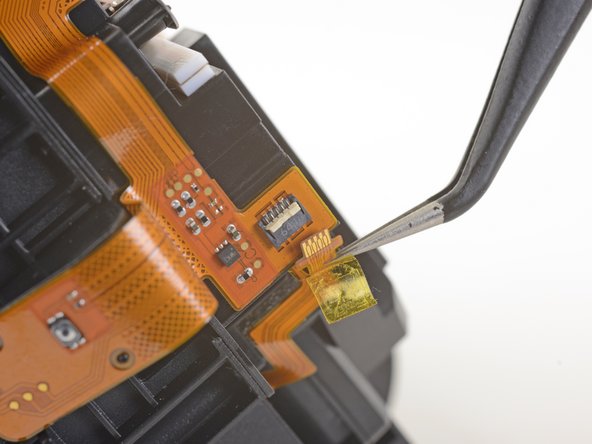
    • Remove the tape covering the interconnect cable socket.

    • Use the point of a spudger to flip up the small locking flap on the cable socket.

    • Slide the interconnect cable straight out of its socket on the motherboard.

  24. HTC Vive OLED Screen Replacement: 24 단계, 이미지 1/3 HTC Vive OLED Screen Replacement: 24 단계, 이미지 2/3 HTC Vive OLED Screen Replacement: 24 단계, 이미지 3/3
    • Remove the tape covering the left OLED cable socket.

    • Use the point of a spudger to flip up the small locking flap on the cable socket.

    • Slide the left OLED cable straight out of its socket on the motherboard.

  25. HTC Vive OLED Screen Replacement: 25 단계, 이미지 1/3 HTC Vive OLED Screen Replacement: 25 단계, 이미지 2/3 HTC Vive OLED Screen Replacement: 25 단계, 이미지 3/3
    • Remove the tape covering the right OLED cable socket.

    • Use the point of a spudger to flip up the small locking flap on the cable socket.

    • Slide the right OLED cable straight out of its socket on the motherboard.

  26. HTC Vive OLED Screen Replacement: 26 단계, 이미지 1/2 HTC Vive OLED Screen Replacement: 26 단계, 이미지 2/2
    • Use a pair tweezers to slightly twist the interconnect cable and press it down until the tabs on either side of the cable clear the hole in the motherboard.

    • During reassembly, make sure to thread the interconnect cable through its slot in the motherboard.

  27. HTC Vive OLED Screen Replacement, Remove the motherboard: 27 단계, 이미지 1/3 HTC Vive OLED Screen Replacement, Remove the motherboard: 27 단계, 이미지 2/3 HTC Vive OLED Screen Replacement, Remove the motherboard: 27 단계, 이미지 3/3
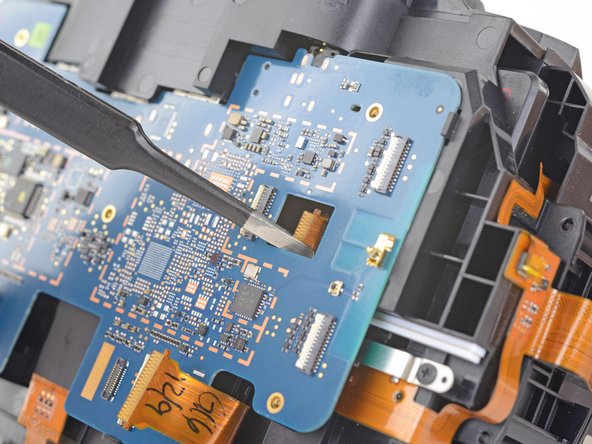
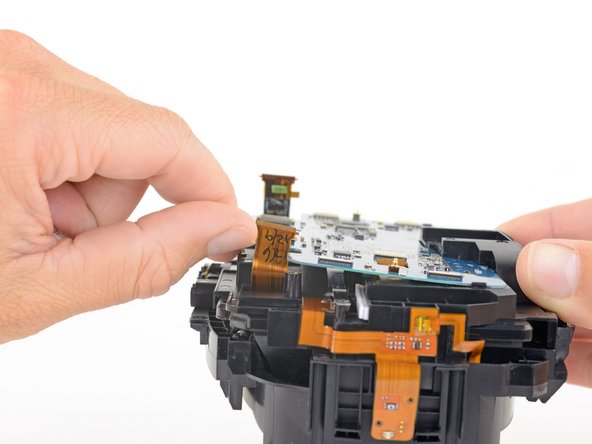
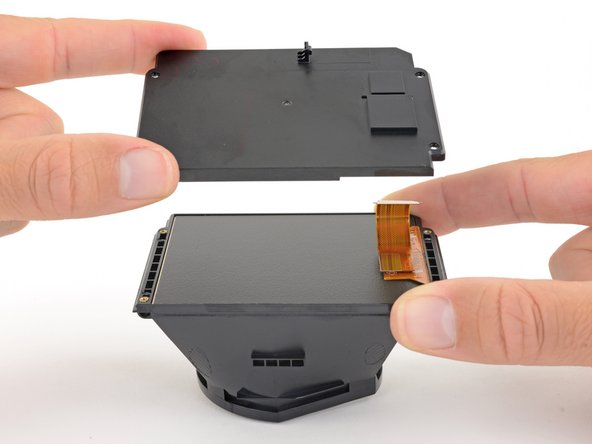
    • Press the non-port-end of the motherboard toward the top of headset while hinging it away from the midframe to free it from the clips securing that end.

    • Slide the motherboard toward the bottom of the headset, over the clips, to remove it.

    • Take care not to snag any cables during removal.

  28. HTC Vive OLED Screen Replacement, Disconnect the facerest midframe: 28 단계, 이미지 1/3 HTC Vive OLED Screen Replacement, Disconnect the facerest midframe: 28 단계, 이미지 2/3 HTC Vive OLED Screen Replacement, Disconnect the facerest midframe: 28 단계, 이미지 3/3
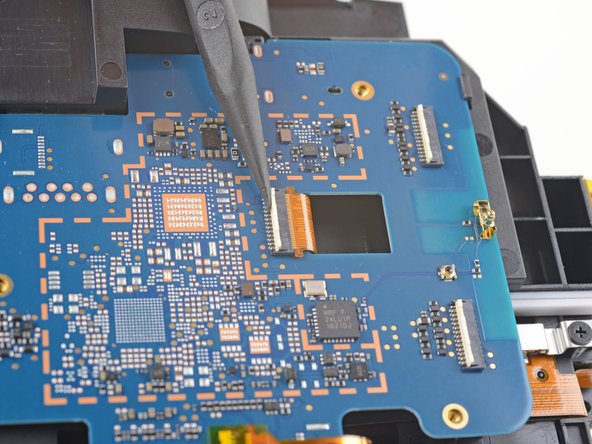
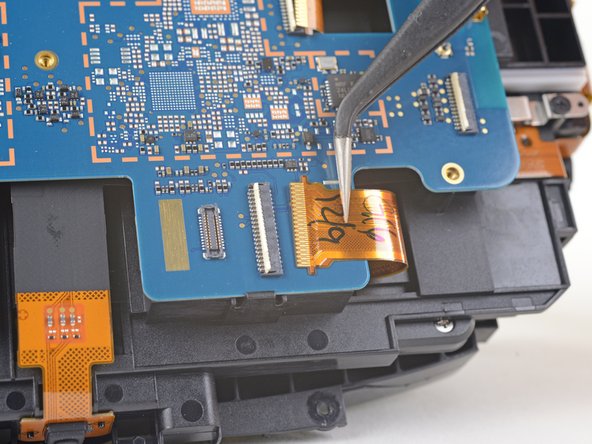
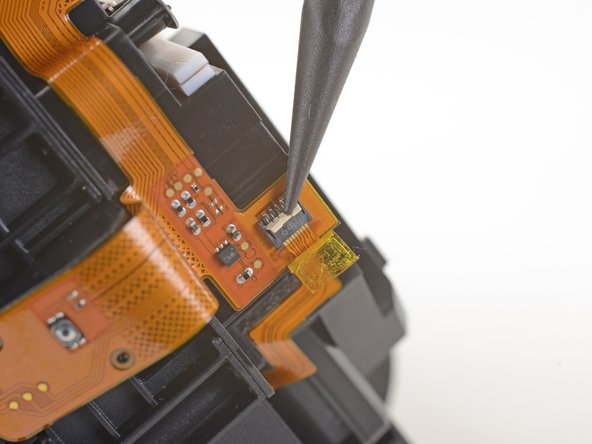
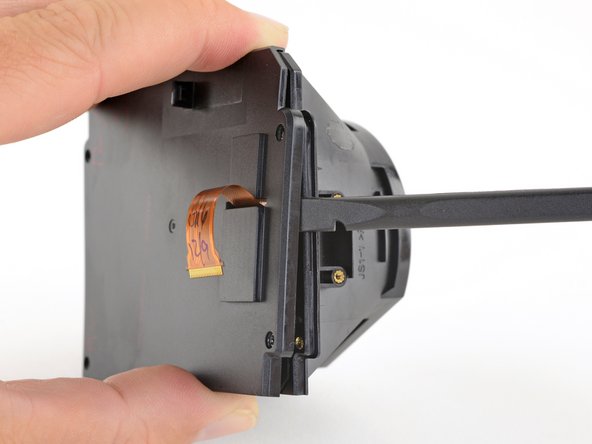
    • Use a pair of tweezers to peel back the plastic covering the eyepiece midframe cable socket.

    • Use the pointed end of a spudger to flip up the plastic locking flap on the socket.

    • Slide the cable straight out of its socket to remove it.

  29. HTC Vive OLED Screen Replacement: 29 단계, 이미지 1/2 HTC Vive OLED Screen Replacement: 29 단계, 이미지 2/2
    • Gently peel the eyepiece midframe cable off of the facerest midframe.

  30. HTC Vive OLED Screen Replacement, Unscrew the facerest midframe: 30 단계, 이미지 1/1
    • Use a PH000 driver to remove the four 3.9 mm screws securing the facerest midframe.

  31. HTC Vive OLED Screen Replacement, Remove the facerest midframe: 31 단계, 이미지 1/2 HTC Vive OLED Screen Replacement, Remove the facerest midframe: 31 단계, 이미지 2/2
    • Lift the facerest midframe off of the eyepiece midframe.

    • Take care not to snag any cables during removal.

  32. HTC Vive OLED Screen Replacement, Remove the eyepiece gasket: 32 단계, 이미지 1/3 HTC Vive OLED Screen Replacement, Remove the eyepiece gasket: 32 단계, 이미지 2/3 HTC Vive OLED Screen Replacement, Remove the eyepiece gasket: 32 단계, 이미지 3/3
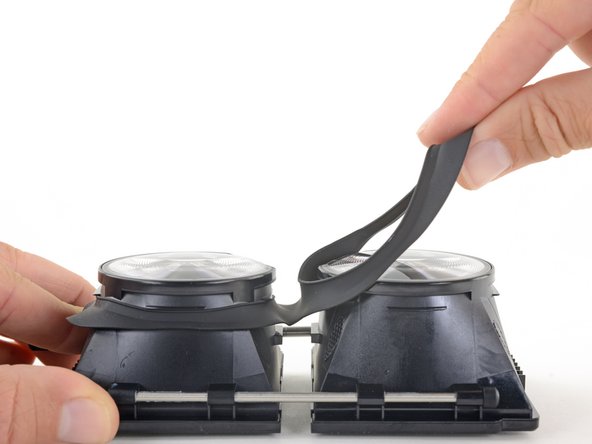
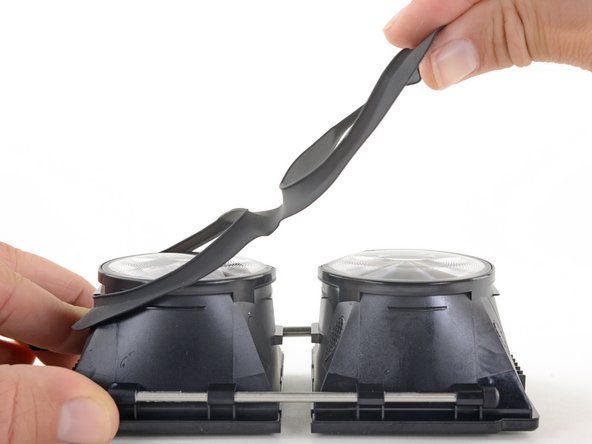
    • Gently lift the eyepiece gasket off of the lens and OLED frames to remove it.

  33. HTC Vive OLED Screen Replacement, Remove the support rod: 33 단계, 이미지 1/3 HTC Vive OLED Screen Replacement, Remove the support rod: 33 단계, 이미지 2/3 HTC Vive OLED Screen Replacement, Remove the support rod: 33 단계, 이미지 3/3
    • Pull the rubber bumpers off of either end of the support rod.

  34. HTC Vive OLED Screen Replacement: 34 단계, 이미지 1/3 HTC Vive OLED Screen Replacement: 34 단계, 이미지 2/3 HTC Vive OLED Screen Replacement: 34 단계, 이미지 3/3
    • Slide the support rod out of its brackets on the lens and OLED frames.

  35. HTC Vive OLED Screen Replacement, Remove the focus rod: 35 단계, 이미지 1/1
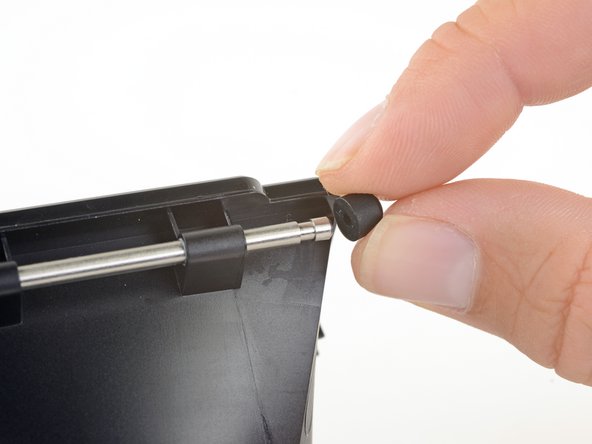
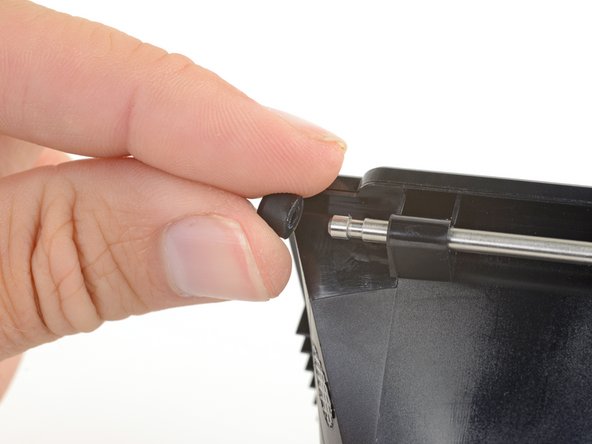
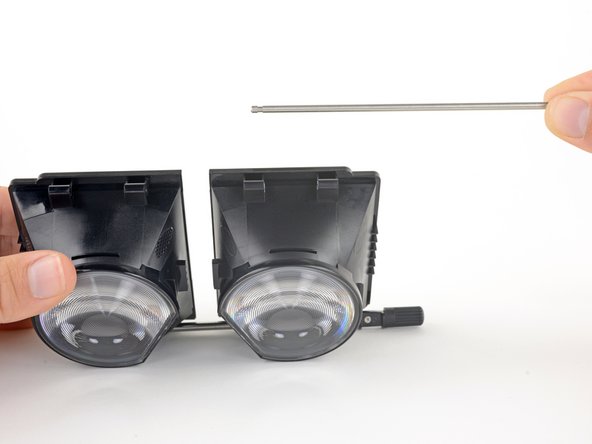
    • Use a PH000 driver to remove the eight 3.1 mm screws securing the focus rod brackets.

  36. HTC Vive OLED Screen Replacement: 36 단계, 이미지 1/1
    • Remove the focus rod and its brackets.

  37. HTC Vive OLED Screen Replacement, Unscrew the OLED covers: 37 단계, 이미지 1/1
    • Use a PH000 driver to remove the eight 2.4 mm screws securing the OLED covers.

  38. HTC Vive OLED Screen Replacement, Remove the OLED covers: 38 단계, 이미지 1/2 HTC Vive OLED Screen Replacement, Remove the OLED covers: 38 단계, 이미지 2/2
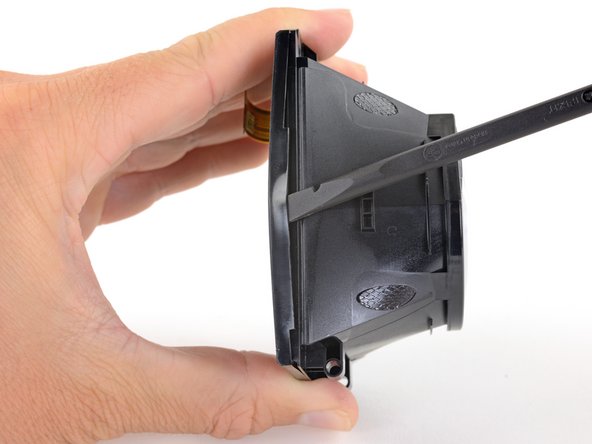
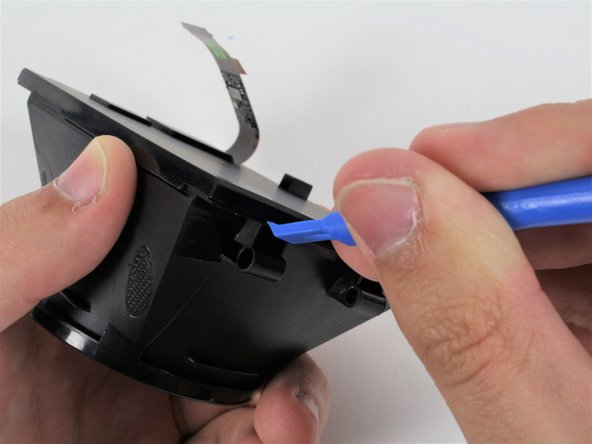
    • Use the flat end of a spudger push up one edge of the OLED cover and start unclipping that edge.

  39. HTC Vive OLED Screen Replacement: 39 단계, 이미지 1/2 HTC Vive OLED Screen Replacement: 39 단계, 이미지 2/2
    • Slide the spudger under the clip along that edge to free the rest of the edge.

  40. HTC Vive OLED Screen Replacement: 40 단계, 이미지 1/3 HTC Vive OLED Screen Replacement: 40 단계, 이미지 2/3 HTC Vive OLED Screen Replacement: 40 단계, 이미지 3/3
    • Slide the spudger around the remaining edges of the OLED cover to unclip those edges.

  41. HTC Vive OLED Screen Replacement: 41 단계, 이미지 1/2 HTC Vive OLED Screen Replacement: 41 단계, 이미지 2/2
    • Remove the OLED cover.

    • Repeat the last three steps to remove the other OLED cover.

    • During reassembly, remember to thread the OLED cables through their slots in the OLED cover.

  42. HTC Vive OLED Screen Replacement, Remove the OLED displays: 42 단계, 이미지 1/1
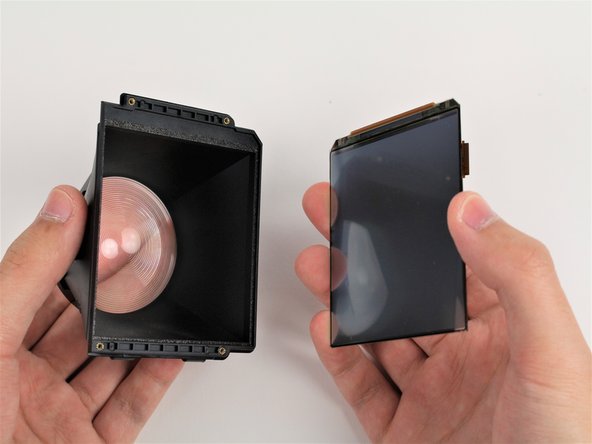
    • Very carefully lift the OLED display by its edges out of its frame.

    • If you are reusing the OLED displays, be very careful to avoid touching the front of the displays or bending or cracking the displays.

    • Repeat this process for the other OLED display.

  43. HTC Vive OLED Screen Replacement, Remove the lenses: 43 단계, 이미지 1/1
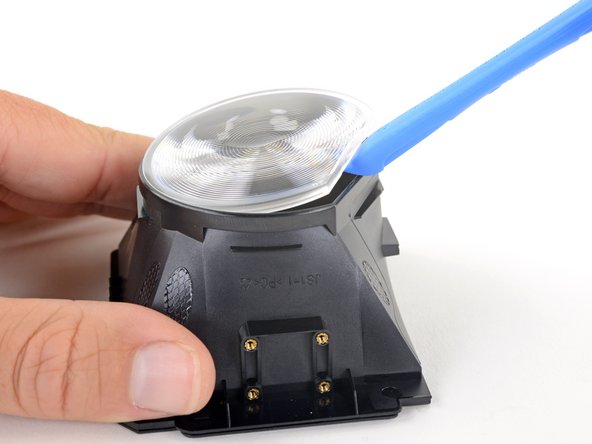
    • Apply an iOpener to the lens to soften the adhesive securing it to the frame.

  44. HTC Vive OLED Screen Replacement: 44 단계, 이미지 1/2 HTC Vive OLED Screen Replacement: 44 단계, 이미지 2/2
    • Use an opening tool to pry up the flat edge of the lens.

    • If it's difficult to pry up, apply the iOpener for another 30 seconds to further soften the adhesive.

  45. HTC Vive OLED Screen Replacement, Remove the lens: 45 단계, 이미지 1/1
    • Remove the lens.

    • Repeat the last two steps to remove the other lens.

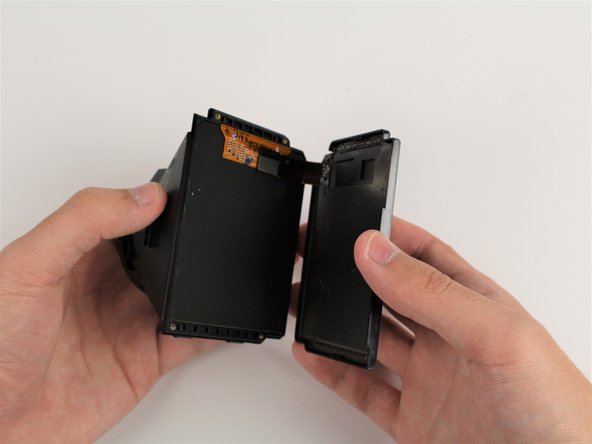
    • Only the lens and OLED frames remain.

    • During reassembly, make sure the convex side of the lens is facing away from the frame.

  46. HTC Vive OLED Screen Replacement, OLED Screen: 46 단계, 이미지 1/1
    • The screws are very close to the screen. Applying too much pressure to the screws can stress or crack the screen. Be careful when unscrewing and screwing around the screen.

    • Remove the four 2mm #00 Philips head screws holding the screen in place from the eyepiece assembly.

  47. HTC Vive OLED Screen Replacement: 47 단계, 이미지 1/3 HTC Vive OLED Screen Replacement: 47 단계, 이미지 2/3 HTC Vive OLED Screen Replacement: 47 단계, 이미지 3/3
    • Use a plastic opening tool to gently pry around the seam between the eyepiece housing and the screen.

    • Gently pull the screen cover away from the eyepiece housing, threading the ribbon cable through the hole.

  48. HTC Vive OLED Screen Replacement: 48 단계, 이미지 1/2 HTC Vive OLED Screen Replacement: 48 단계, 이미지 2/2
    • Remove the screen from the eyepiece housing by pulling the two pieces away from each other.

결론

To reassemble your device, follow these instructions in reverse order.

다른 한 분이 해당 안내서를 완성하였습니다.

Caleb Watts

회원 가입일: 09/25/17

2,427 평판

안내서 11개 작성하였습니다

Cal Poly, Team S18-G1, Forte Fall 2017 Cal Poly, Team S18-G1, Forte Fall 2017 회원

CPSU-FORTE-F17S18G1

5 회원들

안내서 11개 작성하였습니다

댓글 3개

This is a beautiful guide and I’m elated that I’ve found it. However, in order to use it, I need a place that I can get the screen since it has been flickering, color is off, and now it has a solid green vert line. Any direction? Thanks!

Jason - 답글

Hi can you clean the vive OLED screen? if it has smudge mark on it… And what would you use

Al Shelley - 답글

where do you buy a new screen from I’ve looked all over the net for it I can’t find one for my headset (htc vive cosmos elite)

Ian Miller - 답글

댓글 쓰기

조회 통계:

24 시간 전: 0

7일 전: 3

30일 전: 3

전체 시간: 4,527