주요 콘텐츠로 건너뛰기

이 안내서에는 최근 변경 사항이 더 있습니다. 최신 비검증 버전으로 전환하십시오.

Handspring Visor Edge Battery Replacement

필요한 것

  1. Handspring Visor Edge Battery Replacement, Flip Cover: 1 단계, 이미지 1/2 Handspring Visor Edge Battery Replacement, Flip Cover: 1 단계, 이미지 2/2
    • Open the Visor Edge and place it on a table facing down.

    • Gently push the tab that connects the flip cover (top half) to the PDA (bottom half) upward, lift the pieces apart to detach them.

    • Do not pull on the flip cover in an attempt to remove it from the PDA.

  2. Handspring Visor Edge Battery Replacement, Back Panel: 2 단계, 이미지 1/1
    • Remove the six 4.1 mm Phillips screws from the back plate using the #00 Phillips Scewdriver.

  3. Handspring Visor Edge Battery Replacement: 3 단계, 이미지 1/1
    • Remove the gray back plate from the PDA.

  4. Handspring Visor Edge Battery Replacement: 4 단계, 이미지 1/2 Handspring Visor Edge Battery Replacement: 4 단계, 이미지 2/2
    • Remove the four 2.6 mm Philips screws that are on the sides of the frame.

    • Remove the 3.9 mm Philips screw holding the stylus holster to the frame.

  5. Handspring Visor Edge Battery Replacement: 5 단계, 이미지 1/2 Handspring Visor Edge Battery Replacement: 5 단계, 이미지 2/2
    • Remove the four 2.6 mm Philips screws on the top and bottom of the frame.

  6. Handspring Visor Edge Battery Replacement: 6 단계, 이미지 1/1
    • Gently remove the white frame from the back of the PDA.

  7. Handspring Visor Edge Battery Replacement, Battery: 7 단계, 이미지 1/1
    • Pull front cover off gently.

  8. Handspring Visor Edge Battery Replacement: 8 단계, 이미지 1/2 Handspring Visor Edge Battery Replacement: 8 단계, 이미지 2/2
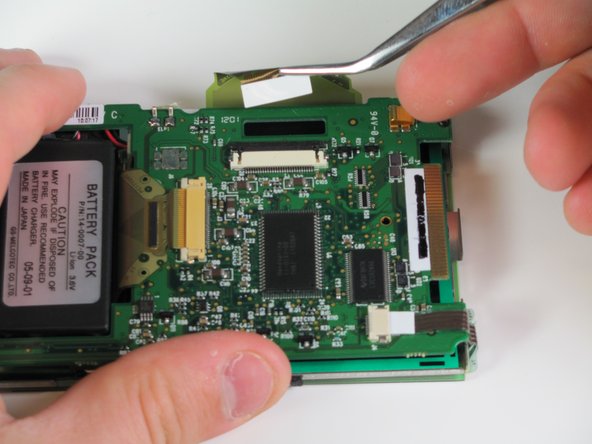
    • Using your finger or tweezers, carefully push back the brown lock holding the ribbon cable on the side of the circuit board.

    • Remove the ribbon cable with tweezers.

  9. Handspring Visor Edge Battery Replacement: 9 단계, 이미지 1/1
    • Using the tweezers, pull back the ribbon cable on the top of the device.

    • Pull by white part of the ribbon to avoid tearing.

  10. Handspring Visor Edge Battery Replacement: 10 단계, 이미지 1/1
    • Using the same technique as with the other ribbons, locate and remove the ribbon cable above the battery pack.

  11. Handspring Visor Edge Battery Replacement: 11 단계, 이미지 1/1
    • All the ribbon cables should be disconnected from the mother board.

    • Remove the four 3.6 mm Philips screws at each corner of the device.

  12. Handspring Visor Edge Battery Replacement: 12 단계, 이미지 1/2 Handspring Visor Edge Battery Replacement: 12 단계, 이미지 2/2
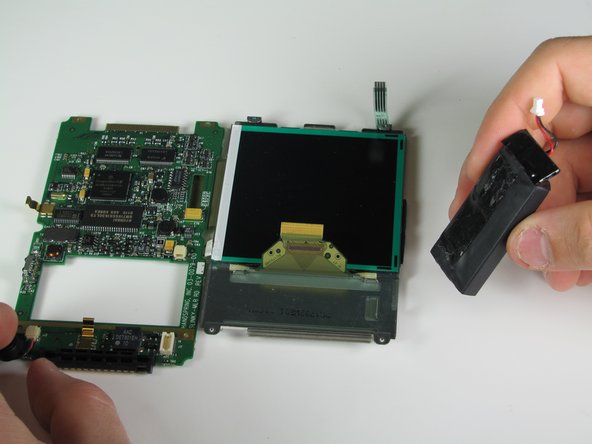
    • Carefully separate the circuit board and the screen.

    • The circuit board isn't fully disconnected, be sure to not break the soldered wires connecting both components.

    • Remove the wire connecting the battery pack to the motherboard using tweezers.

  13. Handspring Visor Edge Battery Replacement: 13 단계, 이미지 1/2 Handspring Visor Edge Battery Replacement: 13 단계, 이미지 2/2
    • The battery is stuck on by an adhesive, wedge the spudger under the battery and pry apart.

결론

To reassemble your device, follow these instructions in reverse order.

Christian Valoria

회원 가입일: 01/23/11

201 평판

안내서 2개 작성하였습니다

Cal Poly, Team 11-28, Maness Winter 2011 Cal Poly, Team 11-28, Maness Winter 2011 회원

CPSU-MANESS-W11S11G28

4 회원들

안내서 7개 작성하였습니다

댓글 0개

댓글 쓰기

조회 통계:

24 시간 전: 0

7일 전: 0

30일 전: 24

전체 시간: 3,141