주요 콘텐츠로 건너뛰기

Handspring Visor Edge Button Board Replacement

필요한 것

  1. Handspring Visor Edge Button Board Replacement, Flip Cover: 1 단계, 이미지 2개 중 1개 Handspring Visor Edge Button Board Replacement, Flip Cover: 1 단계, 이미지 2개 중 2개
    • Open the Visor Edge placing the screen and the inner part of the flip cover face down on a flat surface such as a table

    • On the back of the PDA there is a tab connecting the flip cover to the device. Push gently on this tab trying to slide the cover upwards along the surface then lift the pieces apart to fully detach them

    • Do not pull or tug on the flip cover in an attempt to remove it from the PDA this can result in the cover snapping causing damage to the device

    • To reassemble push the downward on the flip cover where there is an indent on the PDA indicating where the pieces connect. Finally, push the cover until it snaps into place.

  2. Handspring Visor Edge Button Board Replacement, Back Panel: 2 단계, 이미지 1개 중 1개
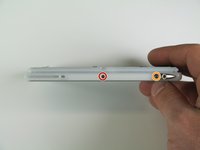
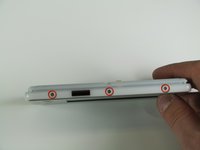
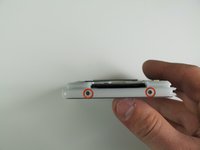
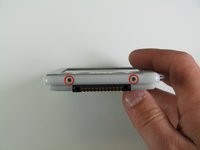
    • Remove the six 4.1 mm Phillips screws from the back plate using the #00 Phillips Scewdriver.

  3. Handspring Visor Edge Button Board Replacement: 3 단계, 이미지 1개 중 1개
    • Remove the gray back plate from the PDA.

  4. Handspring Visor Edge Button Board Replacement: 4 단계, 이미지 2개 중 1개 Handspring Visor Edge Button Board Replacement: 4 단계, 이미지 2개 중 2개
    • Remove the four 2.6 mm Philips screws that are on the sides of the frame.

    • Remove the 3.9 mm Philips screw holding the stylus holster to the frame.

  5. Handspring Visor Edge Button Board Replacement: 5 단계, 이미지 2개 중 1개 Handspring Visor Edge Button Board Replacement: 5 단계, 이미지 2개 중 2개
    • Remove the four 2.6 mm Philips screws on the top and bottom of the frame.

  6. Handspring Visor Edge Button Board Replacement: 6 단계, 이미지 1개 중 1개
    • Gently remove the white frame from the back of the PDA.

  7. Handspring Visor Edge Button Board Replacement, Button Board: 7 단계, 이미지 1개 중 1개
    • Lift the metal cover from the phone to remove it.

  8. Handspring Visor Edge Button Board Replacement: 8 단계, 이미지 1개 중 1개
    • Gently pull the button pad off the device.

결론

To reassemble your device, follow these instructions in reverse order.

작성자

4다른 기여자 명과 함께

Nick Lazarakis

회원 가입일: 01/23/11

334 평판

안내서 3개를 작성함

Cal Poly, Team 11-28, Maness Winter 2011 Cal Poly, Team 11-28, Maness Winter 2011 회원

CPSU-MANESS-W11S11G28

4 회원들

안내서 7개를 작성함

0가이드 댓글

댓글 쓰기

조회 통계:

지난 24시간: 1

지난 7일: 6

지난 30일: 11

전체 시간: 886