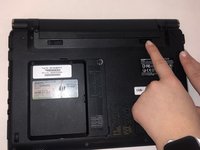
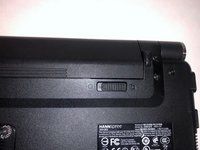
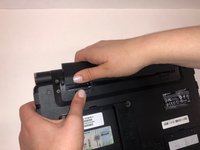
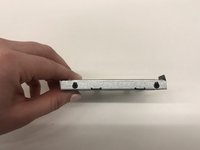
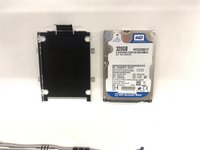
주요 콘텐츠로 건너뛰기

Hannspree SN12E2 Hard Drive Replacement

필요한 것

  1. Hannspree SN12E2 Hard Drive Replacement, Battery: 1 단계, 이미지 1개 중 1개
    • Unplug and power off your laptop.

  2. Hannspree SN12E2 Hard Drive Replacement: 2 단계, 이미지 1개 중 1개
    • Close your laptop .

    • Place your laptop face down on a flat surface.

  3. Hannspree SN12E2 Hard Drive Replacement: 3 단계, 이미지 3개 중 1개 Hannspree SN12E2 Hard Drive Replacement: 3 단계, 이미지 3개 중 2개 Hannspree SN12E2 Hard Drive Replacement: 3 단계, 이미지 3개 중 3개
    • Unlatch the lock on the top right of your laptop first.

    • You will need to pull on the lock on the left side and remove the battery at the same time

    • The left lock is a spring lock and needs constant pressure applied in order to stay open.

  4. Hannspree SN12E2 Hard Drive Replacement, Hard Drive Access Door: 4 단계, 이미지 1개 중 1개
    • Remove the three 3mm Phillips #0 screws.

  5. Hannspree SN12E2 Hard Drive Replacement: 5 단계, 이미지 1개 중 1개
    • Gently pull on the access panel to remove it.

  6. Hannspree SN12E2 Hard Drive Replacement, Hard Drive: 6 단계, 이미지 1개 중 1개
    • Remove the four 4mm Phillips #0 retaining screws.

    • The hard drive caddy is the large piece of metal with black circles.

  7. Hannspree SN12E2 Hard Drive Replacement: 7 단계, 이미지 1개 중 1개
    • Next, lift up the hard drive and pull towards you. Lift up the end of the hard drive that is not plugged into the computer.

  8. Hannspree SN12E2 Hard Drive Replacement: 8 단계, 이미지 2개 중 1개 Hannspree SN12E2 Hard Drive Replacement: 8 단계, 이미지 2개 중 2개
    • Slide your hard drive out of the metal piece by unscrewing the sides.

결론

To reassemble your device, follow these instructions in reverse order.

작성자

3다른 기여자 명과 함께

Kyle Duby

회원 가입일: 03/26/19

193 평판

안내서 2개를 작성함

UMass Dartmouth, Team S2-G2, Simcock Spring 2019 UMass Dartmouth, Team S2-G2, Simcock Spring 2019 회원

UMASSD-SIMCOCK-S19S2G2

4 회원들

안내서 9개를 작성함

0가이드 댓글

댓글 쓰기

조회 통계:

지난 24시간: 0

지난 7일: 0

지난 30일: 12

전체 시간: 281