주요 콘텐츠로 건너뛰기

Hemming Pants

필요한 것

  1. Hemming Pants, Hemming Pants: 1 단계, 이미지 1/1
    • Begin by assessing the pants' current length. This is best done by wearing the pants along with an appropriate pair of shoes.

    • Wearing pants barefoot or with high heels will affect their length relative to the floor.

    • It's helpful to have a second person assist with this step and the two that follow.

  2. Hemming Pants: 2 단계, 이미지 1/3 Hemming Pants: 2 단계, 이미지 2/3 Hemming Pants: 2 단계, 이미지 3/3
    • Fold the cuff of one pant leg inward, and adjust it to the desired length.

    • Insert two or three pins to hold the cuff in position.

    • The pins should be placed parallel to the new fold.

    • With the pins in place, verify that the length is correct.

    • Make any final adjustments to the length as needed.

  3. Hemming Pants: 3 단계, 이미지 1/1
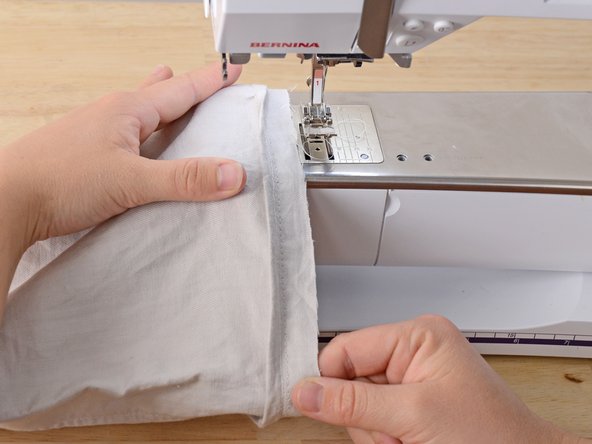
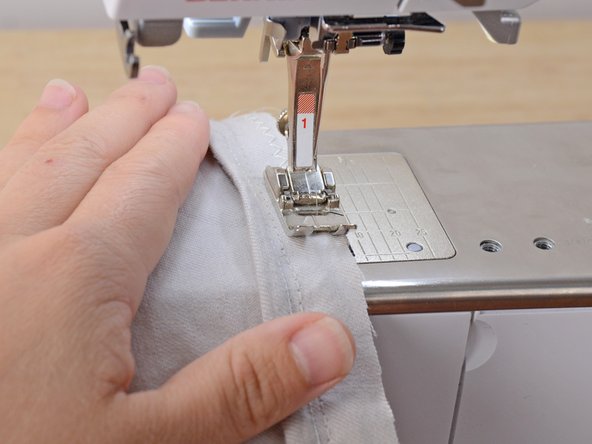
    • On a flat, clean surface, lay the pants down on their side with the newly shortened pant leg on top.

    • Using a ruler, note the distance from the edge of the old cuff to the edge of the new cuff.

    • Repeat the measurement several times along the width of the cuff, making sure the new hemline is perfectly even.

  4. Hemming Pants: 4 단계, 이미지 1/2 Hemming Pants: 4 단계, 이미지 2/2
    • Thread the sewing machine, using a thread color that matches your garment's fabric as closely as possible.

    • Sewing machine setup varies from one model to another. Consult your sewing machine manual for precise instructions.

    • Place the first cuff on the sewing machine, and position the sewing needle between one of your pins and the edge of the cuff.

  5. Hemming Pants: 5 단계, 이미지 1/2 Hemming Pants: 5 단계, 이미지 2/2
    • Gently depress the foot pedal and begin sewing.

    • Be sure the needle penetrates the pant leg on only one side. It may be easier to position the pant leg around the arm of the sewing machine with the table removed. If you sew through both layers, you will sew the pant leg shut!

    • Pause when you reach a pin, and remove it before continuing.

    • Do not attempt to sew over any pins. Hitting a pin can bend or break the sewing machine needle.

  6. Hemming Pants: 6 단계, 이미지 1/2 Hemming Pants: 6 단계, 이미지 2/2
    • Continue sewing all the way around the cuff, until you reach the first few stitches.

    • Sew over the first few stitches to prevent the stitches from unraveling.

  7. Hemming Pants: 7 단계, 이미지 1/1
    • Raise the presser foot, and remove the pants from the sewing machine.

    • Clip any threads.

  8. Hemming Pants: 8 단계, 이미지 1/3 Hemming Pants: 8 단계, 이미지 2/3 Hemming Pants: 8 단계, 이미지 3/3
    • Turn the cuff over so that the extra length of the hem folds out.

    • Clip the extra length, leaving about a half inch of fabric beyond the seam.

    • Be sure to only cut through one layer of the fabric—the excess fabric. Do not cut through the pants.

    • This step is optional. If you are hemming pants for a growing kiddo, leaving the excess length allows you to rip the seam and magically lengthen the pants later on.

  9. Hemming Pants: 9 단계, 이미지 1/3 Hemming Pants: 9 단계, 이미지 2/3 Hemming Pants: 9 단계, 이미지 3/3
    • Set your sewing machine to a zigzag stitch.

    • Insert the freshly cut edge of the hem into the sewing machine.

    • Be sure to only insert one layer of fabric—the hem—or you will sew through the outer, visible layers of the pants.

  10. Hemming Pants: 10 단계, 이미지 1/2 Hemming Pants: 10 단계, 이미지 2/2
    • Sew around the hem, as close to the edge as possible.

    • Zigzagging the edge prevents the edge from unraveling.

  11. Hemming Pants: 11 단계, 이미지 1/2 Hemming Pants: 11 단계, 이미지 2/2
    • Lift the presser foot and remove the pants from the sewing machine.

    • Clip any excess threads.

결론

Repeat steps 5-19 for the second pant leg.

다른 6명이 해당 안내서를 완성하였습니다.

Brittany McCrigler

회원 가입일: 03/05/12

89,014 평판

안내서 131개 작성하였습니다

iFixit iFixit 회원

Staff

135 회원들

안내서 16,816개 작성하였습니다

댓글 2개

댓글 쓰기

조회 통계:

24 시간 전: 2

7일 전: 46

30일 전: 199

전체 시간: 16,174