주요 콘텐츠로 건너뛰기

이 안내서에는 최근 변경 사항이 더 있습니다. 최신 비검증 버전으로 전환하십시오.

Hisense Sero 8 Motherboard Replacement

필요한 것

  1. Hisense Sero 8 Motherboard Replacement, Motherboard: 1 단계, 이미지 1/3 Hisense Sero 8 Motherboard Replacement, Motherboard: 1 단계, 이미지 2/3 Hisense Sero 8 Motherboard Replacement, Motherboard: 1 단계, 이미지 3/3
    • Remove the back cover of the device using a combination of both plastic opening tools.

    • Use your plastic opening tool pry open a corner of the device, then continue down the side of the device with the tool to completely open the device.

  2. Hisense Sero 8 Motherboard Replacement: 2 단계, 이미지 1/2 Hisense Sero 8 Motherboard Replacement: 2 단계, 이미지 2/2
    • Remove the black tape that is located to the left of the device.

    • Remove the clear tape directly below the camera.

  3. Hisense Sero 8 Motherboard Replacement: 3 단계, 이미지 1/1
    • Remove seven of the 4.43mm screws using the Philips #00 screwdriver.

    • It is not necessary to remove the bottom two 4.43mm screws that keep the speakers in place.

  4. Hisense Sero 8 Motherboard Replacement: 4 단계, 이미지 1/1
    • Unlock both latches to the ribbon cable connectors to remove the ribbon cables.

  5. Hisense Sero 8 Motherboard Replacement: 5 단계, 이미지 1/3 Hisense Sero 8 Motherboard Replacement: 5 단계, 이미지 2/3 Hisense Sero 8 Motherboard Replacement: 5 단계, 이미지 3/3
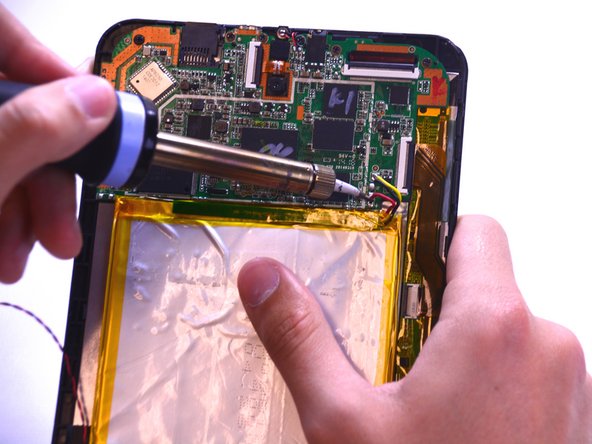
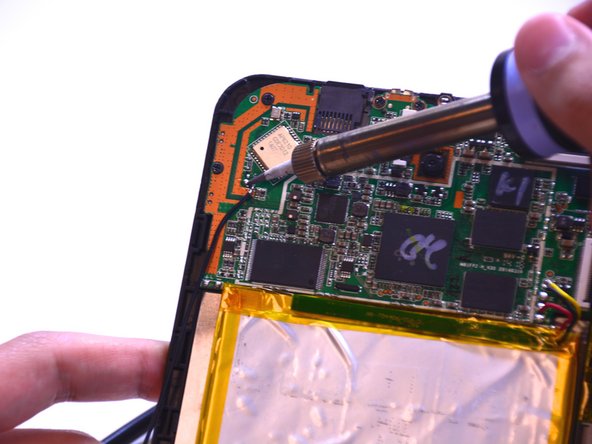
    • Unsolder the red, black, and yellow wires to properly remove the motherboard. Take a look at this guide to learn how to solder and unsolder connections.

    • Unsolder the black wire located on the top left of the device.

    • Once unsoldered, carefully lift the motherboard out of the device.

결론

To reassemble your device, follow these instructions in reverse order.

Katharina

회원 가입일: 02/23/15

506 평판

안내서 2개 작성하였습니다

USF Tampa, Team 1-2, Leahy Winter 2015 USF Tampa, Team 1-2, Leahy Winter 2015 회원

USFT-LEAHY-W15S1G2

3 회원들

안내서 10개 작성하였습니다

댓글 0개

댓글 쓰기

조회 통계:

24 시간 전: 0

7일 전: 0

30일 전: 2

전체 시간: 1,326