주요 콘텐츠로 건너뛰기

Holmes HEH8031 Thermostat Replacement

필요한 것

  1. Holmes HEH8031 Thermostat Replacement, Housing: 1 단계, 이미지 1/1
    • Ensure the device is unplugged from the wall outlet.

  2. Holmes HEH8031 Thermostat Replacement: 2 단계, 이미지 1/1
    • Remove eight 12-mm Phillips #2 screws from the back cover.

  3. Holmes HEH8031 Thermostat Replacement: 3 단계, 이미지 1/2 Holmes HEH8031 Thermostat Replacement: 3 단계, 이미지 2/2
    • Turn heater over so the controls are facing up.

    • Lift the front housing away from the back of the fan and slowly fold the front housing back down to the floor.

    • Internal wires are connected to both halves of the housing. Be careful when separating the housing.

  4. Holmes HEH8031 Thermostat Replacement, Circuit Board Removal: 4 단계, 이미지 1/1
    • Remove four 12mm Phillips #2 screws from the circuit board.

  5. Holmes HEH8031 Thermostat Replacement, Fan: 5 단계, 이미지 1/1
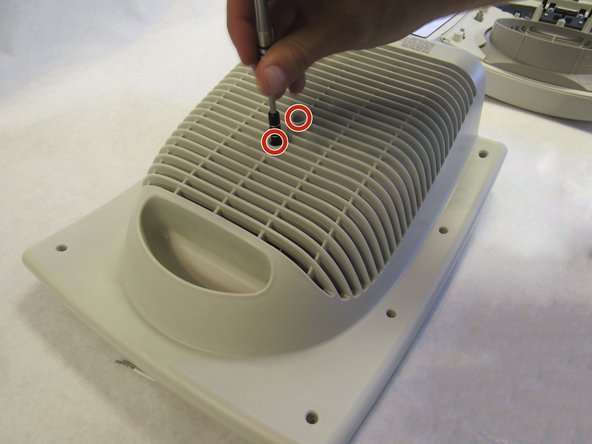
    • Remove two Phillips #2 12mm screws from housing

  6. Holmes HEH8031 Thermostat Replacement: 6 단계, 이미지 1/1
    • Remove zip tie from wire with pliers

  7. Holmes HEH8031 Thermostat Replacement: 7 단계, 이미지 1/1
    • Separate fan assembly from heating coil

  8. Holmes HEH8031 Thermostat Replacement, Thermostat: 8 단계, 이미지 1/1
    • Remove 1 Phillips #2 screw

  9. Holmes HEH8031 Thermostat Replacement: 9 단계, 이미지 1/1
    • Remove thermostat from rear housing

  10. Holmes HEH8031 Thermostat Replacement: 10 단계, 이미지 1/1
    • remove solder from thermostat wire on circuit board

    • Soldering iron will be hot

결론

To reassemble your device, follow these instructions in reverse order.

다른 한 분이 해당 안내서를 완성하였습니다.

Richard S Woodruff

회원 가입일: 10/12/16

142 평판

안내서 1개 작성함

IUPUI, Team 2-1, Baechle Fall 2016 IUPUI, Team 2-1, Baechle Fall 2016 회원

IUPUI-BAECHLE-F16S2G1

4 회원들

안내서 16개 작성하였습니다

댓글 0개

댓글 쓰기

조회 통계:

24 시간 전: 0

7일 전: 3

30일 전: 5

전체 시간: 1,278