주요 콘텐츠로 건너뛰기

Honda 3000 Watt Generator EB3000CK2A Rotor and Stator Assembly Replacement

필요한 것

  1. Honda 3000 Watt Generator EB3000CK2A Rotor and Stator Assembly Replacement, Disconnect the spark plug: 1 단계, 이미지 1/2 Honda 3000 Watt Generator EB3000CK2A Rotor and Stator Assembly Replacement, Disconnect the spark plug: 1 단계, 이미지 2/2
    • Before you begin, disconnect the spark plug connector from the spark plug.

  2. Honda 3000 Watt Generator EB3000CK2A Rotor and Stator Assembly Replacement, Unfasten the cyclo converter cover: 2 단계, 이미지 1/1
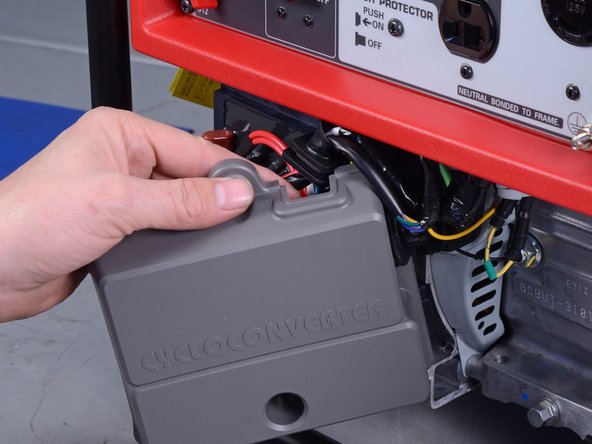
    • Use a 10 mm socket to remove the nut securing the top of the cyclo converter cover.

    • Use a 10 mm socket to remove the bolt securing the bottom of the cyclo converter cover.

  3. Honda 3000 Watt Generator EB3000CK2A Rotor and Stator Assembly Replacement: 3 단계, 이미지 1/3 Honda 3000 Watt Generator EB3000CK2A Rotor and Stator Assembly Replacement: 3 단계, 이미지 2/3 Honda 3000 Watt Generator EB3000CK2A Rotor and Stator Assembly Replacement: 3 단계, 이미지 3/3
    • Un-slot the two black rubber cable grommets from the top and right edge of the plastic cover.

    • Remove the cyclo converter cover.

  4. Honda 3000 Watt Generator EB3000CK2A Rotor and Stator Assembly Replacement, Disconnect the cyclo converter: 4 단계, 이미지 1/3 Honda 3000 Watt Generator EB3000CK2A Rotor and Stator Assembly Replacement, Disconnect the cyclo converter: 4 단계, 이미지 2/3 Honda 3000 Watt Generator EB3000CK2A Rotor and Stator Assembly Replacement, Disconnect the cyclo converter: 4 단계, 이미지 3/3
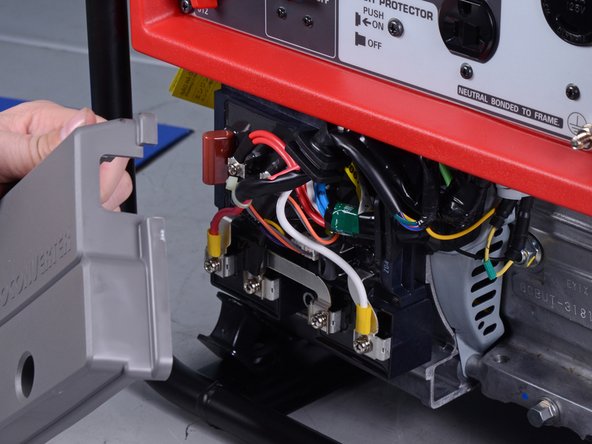
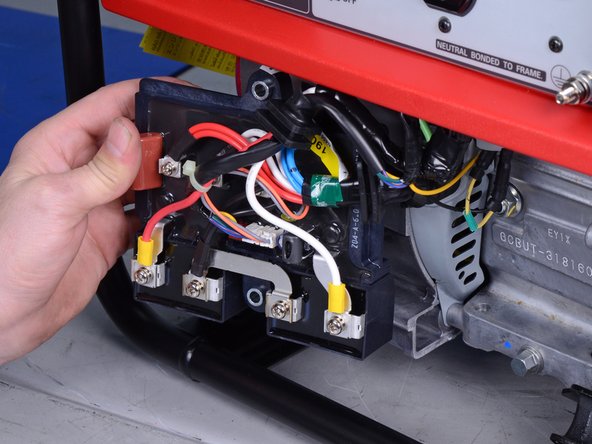
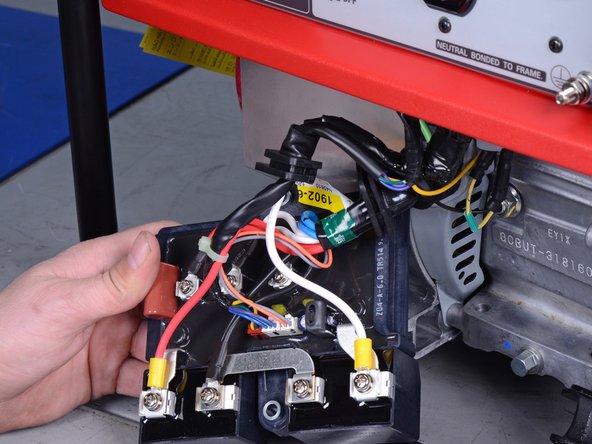
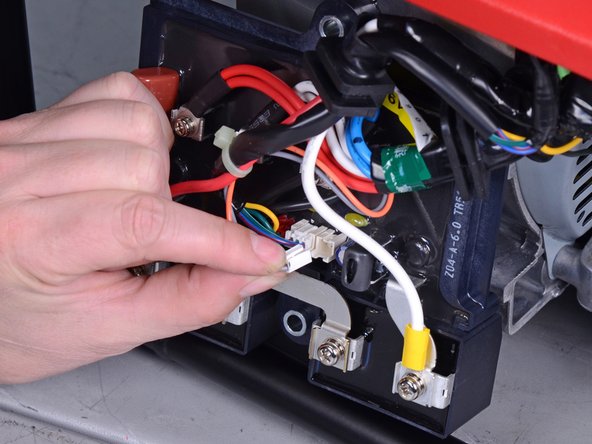
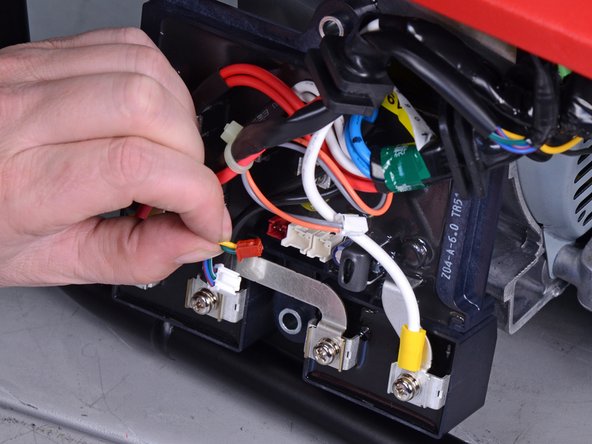
    • Pull the cyclo converter panel off of its posts on the generator body so the screw terminals are easily accessible.

  5. Honda 3000 Watt Generator EB3000CK2A Rotor and Stator Assembly Replacement: 5 단계, 이미지 1/3 Honda 3000 Watt Generator EB3000CK2A Rotor and Stator Assembly Replacement: 5 단계, 이미지 2/3 Honda 3000 Watt Generator EB3000CK2A Rotor and Stator Assembly Replacement: 5 단계, 이미지 3/3
    • Disconnect the two 2-pin and one 3-pin connectors from the panel.

    • Take note of which connector corresponds with each header for reassembly.

    • Reassembly tip: The connectors are keyed so they can not be plugged in with the wrong orientation.

  6. Honda 3000 Watt Generator EB3000CK2A Rotor and Stator Assembly Replacement, Disassembly tip: 6 단계, 이미지 1/1
    • If you are replacing the cyclo converter panel, it can be helpful to transfer a cable from the old panel to the corresponding screw terminal on the replacement panel one at a time. This prevents potentially mixing up cables and screws and maintains OEM cable management.

    • The top three screws are M4 screws while the bottom four are M5 screws. Ensure you are using the correct screw for each terminal during reassembly.

  7. Honda 3000 Watt Generator EB3000CK2A Rotor and Stator Assembly Replacement: 7 단계, 이미지 1/1
    • Use a Phillips #2 screwdriver to remove the seven 10 mm screws from the terminals on the cyclo converter panel. The wire that corresponds with each terminal is listed below:

    • Red cable

    • Double Black cable

    • No cable

    • White Cable

    • Double Red cable

    • Double White cable

    • Double Blue cable

  8. Honda 3000 Watt Generator EB3000CK2A Rotor and Stator Assembly Replacement: 8 단계, 이미지 1/2 Honda 3000 Watt Generator EB3000CK2A Rotor and Stator Assembly Replacement: 8 단계, 이미지 2/2
    • Remove the terminal connecting bar from the panel once the corresponding terminals are unscrewed.

    • During reassembly, ensure the bar is in the correct orientation and lies under the crimp connector on the double black cable.

  9. Honda 3000 Watt Generator EB3000CK2A Rotor and Stator Assembly Replacement, Remove the cyclo converter unit: 9 단계, 이미지 1/1
    • Remove the cyclo converter unit.

  10. Honda 3000 Watt Generator EB3000CK2A Rotor and Stator Assembly Replacement, Remove the recoil starter assembly: 10 단계, 이미지 1/3 Honda 3000 Watt Generator EB3000CK2A Rotor and Stator Assembly Replacement, Remove the recoil starter assembly: 10 단계, 이미지 2/3 Honda 3000 Watt Generator EB3000CK2A Rotor and Stator Assembly Replacement, Remove the recoil starter assembly: 10 단계, 이미지 3/3
    • Use a 10 mm socket to remove the three 12 mm-long bolts securing the recoil starter assembly.

    • Remove the recoil starter assembly.

  11. Honda 3000 Watt Generator EB3000CK2A Rotor and Stator Assembly Replacement, Remove the recoil starter pulley: 11 단계, 이미지 1/3 Honda 3000 Watt Generator EB3000CK2A Rotor and Stator Assembly Replacement, Remove the recoil starter pulley: 11 단계, 이미지 2/3 Honda 3000 Watt Generator EB3000CK2A Rotor and Stator Assembly Replacement, Remove the recoil starter pulley: 11 단계, 이미지 3/3
    • Use a 10 mm socket to remove the two 20 mm-long bolts securing the recoil starter pulley.

    • Remove the recoil starter pulley.

  12. Honda 3000 Watt Generator EB3000CK2A Rotor and Stator Assembly Replacement, Unfasten the control box: 12 단계, 이미지 1/2 Honda 3000 Watt Generator EB3000CK2A Rotor and Stator Assembly Replacement, Unfasten the control box: 12 단계, 이미지 2/2
    • Use a 10 mm socket to remove the two 20 mm-long bolts securing the sides of the control box case.

  13. Honda 3000 Watt Generator EB3000CK2A Rotor and Stator Assembly Replacement, Remove the control box: 13 단계, 이미지 1/3 Honda 3000 Watt Generator EB3000CK2A Rotor and Stator Assembly Replacement, Remove the control box: 13 단계, 이미지 2/3 Honda 3000 Watt Generator EB3000CK2A Rotor and Stator Assembly Replacement, Remove the control box: 13 단계, 이미지 3/3
    • Remove the control box from the generator frame and tilt it downwards.

    • Do not attempt to completely remove the control box as it is still wired to the generator.

  14. Honda 3000 Watt Generator EB3000CK2A Rotor and Stator Assembly Replacement, Unfasten the fuel tank and muffler protector: 14 단계, 이미지 1/2 Honda 3000 Watt Generator EB3000CK2A Rotor and Stator Assembly Replacement, Unfasten the fuel tank and muffler protector: 14 단계, 이미지 2/2
    • Use a 10 mm socket to remove the five bolts securing the muffler protector and the fuel tank to the frame:

    • Two 25 mm-long bolts

    • Three 15 mm-long bolts

    • Use a pair of pliers to remove the lock pin and clutch joint securing the fuel tank to the frame.

  15. Honda 3000 Watt Generator EB3000CK2A Rotor and Stator Assembly Replacement, Remove the fuel tank bar: 15 단계, 이미지 1/3 Honda 3000 Watt Generator EB3000CK2A Rotor and Stator Assembly Replacement, Remove the fuel tank bar: 15 단계, 이미지 2/3 Honda 3000 Watt Generator EB3000CK2A Rotor and Stator Assembly Replacement, Remove the fuel tank bar: 15 단계, 이미지 3/3
    • Use a 10 mm socket to remove the two 20 mm-long bolts securing the fuel tank bar to the rest of the frame.

    • Remove the fuel tank bar.

  16. Honda 3000 Watt Generator EB3000CK2A Rotor and Stator Assembly Replacement, Disconnect the fuel tank tubes: 16 단계, 이미지 1/1
    • Identify these two tubes and their tube clamps:

    • The tube connected to the bottom of the fuel tank

    • The tube connected to the petcock assembly

  17. Honda 3000 Watt Generator EB3000CK2A Rotor and Stator Assembly Replacement: 17 단계, 이미지 1/2 Honda 3000 Watt Generator EB3000CK2A Rotor and Stator Assembly Replacement: 17 단계, 이미지 2/2
    • Use a pair of pliers to squeeze and shift the first tube clamp down the fuel tank tube.

  18. Honda 3000 Watt Generator EB3000CK2A Rotor and Stator Assembly Replacement: 18 단계, 이미지 1/2 Honda 3000 Watt Generator EB3000CK2A Rotor and Stator Assembly Replacement: 18 단계, 이미지 2/2
    • Disconnect the tube from the fuel tank.

    • Residual fuel may leak when you disconnect this tube. Be ready to catch any spillage.

  19. Honda 3000 Watt Generator EB3000CK2A Rotor and Stator Assembly Replacement: 19 단계, 이미지 1/2 Honda 3000 Watt Generator EB3000CK2A Rotor and Stator Assembly Replacement: 19 단계, 이미지 2/2
    • Use a pair of pliers to squeeze and shift the second tube clamp left and away from the petcock assembly.

  20. Honda 3000 Watt Generator EB3000CK2A Rotor and Stator Assembly Replacement: 20 단계, 이미지 1/2 Honda 3000 Watt Generator EB3000CK2A Rotor and Stator Assembly Replacement: 20 단계, 이미지 2/2
    • Disconnect the tube from the petcock assembly.

  21. Honda 3000 Watt Generator EB3000CK2A Rotor and Stator Assembly Replacement, Remove the fuel tank: 21 단계, 이미지 1/2 Honda 3000 Watt Generator EB3000CK2A Rotor and Stator Assembly Replacement, Remove the fuel tank: 21 단계, 이미지 2/2
    • Gently lift one side of the tank and slip it out of the generator frame.

    • Remove the fuel tank.

  22. Honda 3000 Watt Generator EB3000CK2A Rotor and Stator Assembly Replacement, Remove the muffler cover: 22 단계, 이미지 1/2 Honda 3000 Watt Generator EB3000CK2A Rotor and Stator Assembly Replacement, Remove the muffler cover: 22 단계, 이미지 2/2
    • Remove the muffler protector.

  23. Honda 3000 Watt Generator EB3000CK2A Rotor and Stator Assembly Replacement, Remove the choke rod: 23 단계, 이미지 1/2 Honda 3000 Watt Generator EB3000CK2A Rotor and Stator Assembly Replacement, Remove the choke rod: 23 단계, 이미지 2/2
    • Lift the choke rod off of the air cleaner housing.

  24. Honda 3000 Watt Generator EB3000CK2A Rotor and Stator Assembly Replacement: 24 단계, 이미지 1/3 Honda 3000 Watt Generator EB3000CK2A Rotor and Stator Assembly Replacement: 24 단계, 이미지 2/3 Honda 3000 Watt Generator EB3000CK2A Rotor and Stator Assembly Replacement: 24 단계, 이미지 3/3
    • Continue lifting the choke rod until it's free from the generator.

    • Remove the choke rod.

  25. Honda 3000 Watt Generator EB3000CK2A Rotor and Stator Assembly Replacement, Remove the air cleaner cover: 25 단계, 이미지 1/3 Honda 3000 Watt Generator EB3000CK2A Rotor and Stator Assembly Replacement, Remove the air cleaner cover: 25 단계, 이미지 2/3 Honda 3000 Watt Generator EB3000CK2A Rotor and Stator Assembly Replacement, Remove the air cleaner cover: 25 단계, 이미지 3/3
    • Unclip the two clips on top of the air cleaner housing.

    • Tilt the air cleaner cover down slightly.

  26. Honda 3000 Watt Generator EB3000CK2A Rotor and Stator Assembly Replacement: 26 단계, 이미지 1/2 Honda 3000 Watt Generator EB3000CK2A Rotor and Stator Assembly Replacement: 26 단계, 이미지 2/2
    • Remove the air cleaner cover.

  27. Honda 3000 Watt Generator EB3000CK2A Rotor and Stator Assembly Replacement, Remove the air cleaner element: 27 단계, 이미지 1/2 Honda 3000 Watt Generator EB3000CK2A Rotor and Stator Assembly Replacement, Remove the air cleaner element: 27 단계, 이미지 2/2
    • Use a flathead screwdriver or a pick to remove the air cleaner element from the air cleaner housing.

  28. Honda 3000 Watt Generator EB3000CK2A Rotor and Stator Assembly Replacement, Unfasten the air cleaner housing: 28 단계, 이미지 1/2 Honda 3000 Watt Generator EB3000CK2A Rotor and Stator Assembly Replacement, Unfasten the air cleaner housing: 28 단계, 이미지 2/2
    • Use a 10 mm socket to remove the two nuts from the inside of the air cleaner housing.

    • Use a 10 mm socket to remove the 20 mm-long bolt from the inside of the air cleaner housing.

    • During reassembly, tighten these fasteners to 7 lb-ft (10 N-m) of torque.

  29. Honda 3000 Watt Generator EB3000CK2A Rotor and Stator Assembly Replacement, Disconnect the breather tube: 29 단계, 이미지 1/2 Honda 3000 Watt Generator EB3000CK2A Rotor and Stator Assembly Replacement, Disconnect the breather tube: 29 단계, 이미지 2/2
    • Pull up and disconnect the breather tube from the top of the air cleaner housing.

  30. Honda 3000 Watt Generator EB3000CK2A Rotor and Stator Assembly Replacement, Unfasten the canister assembly: 30 단계, 이미지 1/3 Honda 3000 Watt Generator EB3000CK2A Rotor and Stator Assembly Replacement, Unfasten the canister assembly: 30 단계, 이미지 2/3 Honda 3000 Watt Generator EB3000CK2A Rotor and Stator Assembly Replacement, Unfasten the canister assembly: 30 단계, 이미지 3/3
    • Lift up the canister assembly from its mounting rails to release it from the generator frame.

  31. Honda 3000 Watt Generator EB3000CK2A Rotor and Stator Assembly Replacement, Remove the canister and air cleaner assembly: 31 단계, 이미지 1/2 Honda 3000 Watt Generator EB3000CK2A Rotor and Stator Assembly Replacement, Remove the canister and air cleaner assembly: 31 단계, 이미지 2/2
    • Remove the air cleaner and canister assembly.

  32. Honda 3000 Watt Generator EB3000CK2A Rotor and Stator Assembly Replacement, Unfasten the engine mounting nuts: 32 단계, 이미지 1/2 Honda 3000 Watt Generator EB3000CK2A Rotor and Stator Assembly Replacement, Unfasten the engine mounting nuts: 32 단계, 이미지 2/2
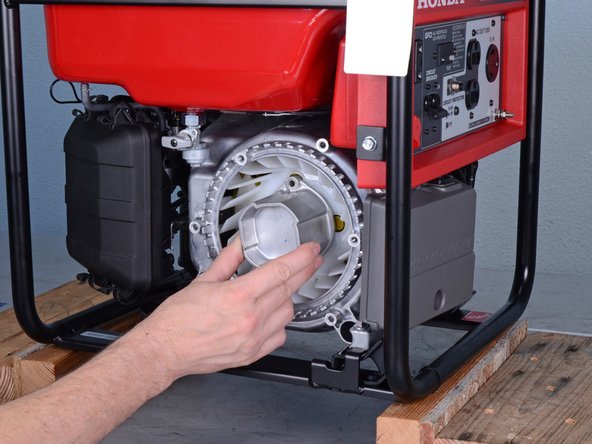
    • Use a 12 mm socket to remove the four nuts securing the motor assembly to the generator frame.

    • During reassembly, tighten these nuts to 25 ft-lb (34 N-m) of torque.

  33. Honda 3000 Watt Generator EB3000CK2A Rotor and Stator Assembly Replacement, Disconnect the ground lead: 33 단계, 이미지 1/2 Honda 3000 Watt Generator EB3000CK2A Rotor and Stator Assembly Replacement, Disconnect the ground lead: 33 단계, 이미지 2/2
    • Remove the ground ring terminal from its motor mount bolt.

  34. Honda 3000 Watt Generator EB3000CK2A Rotor and Stator Assembly Replacement, Remove the canister bracket: 34 단계, 이미지 1/3 Honda 3000 Watt Generator EB3000CK2A Rotor and Stator Assembly Replacement, Remove the canister bracket: 34 단계, 이미지 2/3 Honda 3000 Watt Generator EB3000CK2A Rotor and Stator Assembly Replacement, Remove the canister bracket: 34 단계, 이미지 3/3
    • Use a 10 mm socket to remove the two 15 mm-long bolts securing the canister bracket.

    • Remove the canister bracket.

  35. Honda 3000 Watt Generator EB3000CK2A Rotor and Stator Assembly Replacement, Remove the motor assembly: 35 단계, 이미지 1/3 Honda 3000 Watt Generator EB3000CK2A Rotor and Stator Assembly Replacement, Remove the motor assembly: 35 단계, 이미지 2/3 Honda 3000 Watt Generator EB3000CK2A Rotor and Stator Assembly Replacement, Remove the motor assembly: 35 단계, 이미지 3/3
    • To prevent injury and damage to the device, we highly advise you to perform this step with another individual during reassembly.

    • Remove the motor assembly from the generator frame.

    • Try having one person lift the motor while another slides the frame out from under it.

  36. Honda 3000 Watt Generator EB3000CK2A Rotor and Stator Assembly Replacement, Unfasten the fan cover bolts: 36 단계, 이미지 1/1
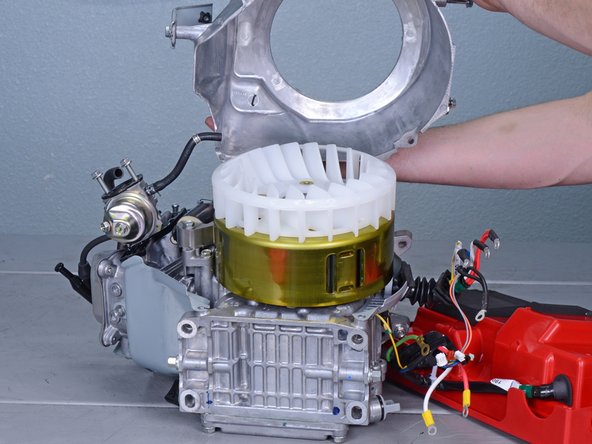
    • Use a 10 mm socket to remove the four bolts securing the fan housing:

    • Two 40 mm-long bolts

    • Two 30 mm-long bolts

    • During reassembly, tighten these bolts to 7 ft-lb (10 N-m) of torque.

  37. Honda 3000 Watt Generator EB3000CK2A Rotor and Stator Assembly Replacement, Remove the fan cover ground lead: 37 단계, 이미지 1/1
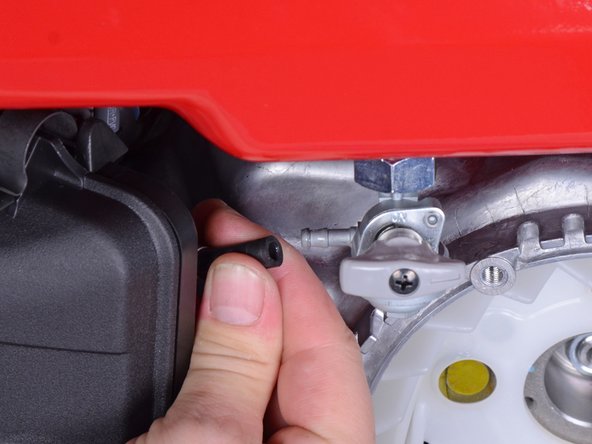
    • Use a 10 mm socket to remove the 12 mm-long bolt securing the ground cable to the fan housing.

  38. Honda 3000 Watt Generator EB3000CK2A Rotor and Stator Assembly Replacement, Remove the fan housing: 38 단계, 이미지 1/3 Honda 3000 Watt Generator EB3000CK2A Rotor and Stator Assembly Replacement, Remove the fan housing: 38 단계, 이미지 2/3 Honda 3000 Watt Generator EB3000CK2A Rotor and Stator Assembly Replacement, Remove the fan housing: 38 단계, 이미지 3/3
    • Lift up and remove the fan housing.

  39. Honda 3000 Watt Generator EB3000CK2A Rotor and Stator Assembly Replacement, Remove the cooling fan: 39 단계, 이미지 1/2 Honda 3000 Watt Generator EB3000CK2A Rotor and Stator Assembly Replacement, Remove the cooling fan: 39 단계, 이미지 2/2
    • Remove the cooling fan.

  40. Honda 3000 Watt Generator EB3000CK2A Rotor and Stator Assembly Replacement, Unfasten the rotor nut and stator bolts: 40 단계, 이미지 1/2 Honda 3000 Watt Generator EB3000CK2A Rotor and Stator Assembly Replacement, Unfasten the rotor nut and stator bolts: 40 단계, 이미지 2/2
    • Use a 19 mm socket with an impact driver to remove the rotor nut from the generator assembly.

    • During reassembly, tighten this nut to 53 ft-lb (74 N-m) of torque.

    • If you are not able to tighten the nut without the rotor moving, use a strap wrench to hold the rotor in place while refastening the nut.

    • Use a 5 mm hex driver to remove the four 61 mm-long bolts from the generator assembly.

    • During reassembly, tighten these bolts to 8 ft-lb (11 N-m) of torque.

  41. Honda 3000 Watt Generator EB3000CK2A Rotor and Stator Assembly Replacement, Pull the rotor and stator: 41 단계, 이미지 1/3 Honda 3000 Watt Generator EB3000CK2A Rotor and Stator Assembly Replacement, Pull the rotor and stator: 41 단계, 이미지 2/3 Honda 3000 Watt Generator EB3000CK2A Rotor and Stator Assembly Replacement, Pull the rotor and stator: 41 단계, 이미지 3/3
    • Ensure the proper pointed tip is fastened to the center of your universal puller.

    • Affix the universal puller to the face of the rotor.

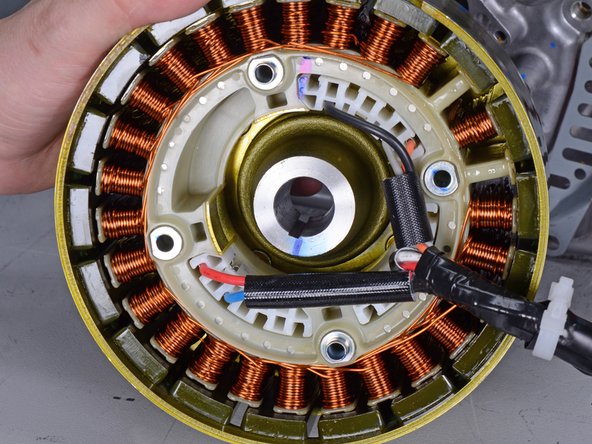
    • Use an impact driver to pull the rotor and stator assembly from the crankshaft.

  42. Honda 3000 Watt Generator EB3000CK2A Rotor and Stator Assembly Replacement, Free the stator cables: 42 단계, 이미지 1/2 Honda 3000 Watt Generator EB3000CK2A Rotor and Stator Assembly Replacement, Free the stator cables: 42 단계, 이미지 2/2
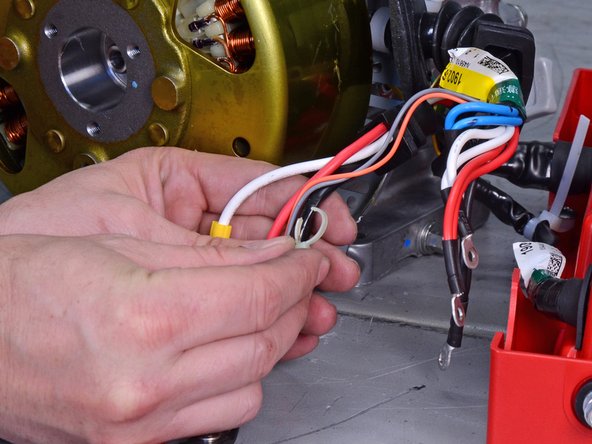
    • Cut and remove the zip tie securing the stator wires to the rest of the harness.

  43. Honda 3000 Watt Generator EB3000CK2A Rotor and Stator Assembly Replacement: 43 단계, 이미지 1/3 Honda 3000 Watt Generator EB3000CK2A Rotor and Stator Assembly Replacement: 43 단계, 이미지 2/3 Honda 3000 Watt Generator EB3000CK2A Rotor and Stator Assembly Replacement: 43 단계, 이미지 3/3
    • Unseat the stator wiring harness grommet from the rotor side plate.

  44. Honda 3000 Watt Generator EB3000CK2A Rotor and Stator Assembly Replacement: 44 단계, 이미지 1/3 Honda 3000 Watt Generator EB3000CK2A Rotor and Stator Assembly Replacement: 44 단계, 이미지 2/3 Honda 3000 Watt Generator EB3000CK2A Rotor and Stator Assembly Replacement: 44 단계, 이미지 3/3
    • Use a pair of pliers to squeeze and release the wire harness clip from the rotor side plate.

  45. Honda 3000 Watt Generator EB3000CK2A Rotor and Stator Assembly Replacement, Remove the rotor and stator: 45 단계, 이미지 1/3 Honda 3000 Watt Generator EB3000CK2A Rotor and Stator Assembly Replacement, Remove the rotor and stator: 45 단계, 이미지 2/3 Honda 3000 Watt Generator EB3000CK2A Rotor and Stator Assembly Replacement, Remove the rotor and stator: 45 단계, 이미지 3/3
    • Remove the rotor and stator assembly.

  46. Honda 3000 Watt Generator EB3000CK2A Rotor and Stator Assembly Replacement, Confirm axle key and wiring harness placement: 46 단계, 이미지 1/2 Honda 3000 Watt Generator EB3000CK2A Rotor and Stator Assembly Replacement, Confirm axle key and wiring harness placement: 46 단계, 이미지 2/2
    • Before you install the new rotor and stator assembly, ensure the axle key is properly installed.

    • Be sure to route the stator wiring harness in the correct orientation, as shown in the second photo.

결론

To reassemble your device, follow these instructions in reverse order.

Tarun Thiruma

회원 가입일: 11/20/19

35,373 평판

안내서 134개 작성하였습니다

댓글 2개

Question, The rotor is it magnetic?

bk2571 - 답글

The rotor flywhell is it magetic?

bk2571 - 답글

댓글 쓰기

조회 통계:

24 시간 전: 2

7일 전: 17

30일 전: 24

전체 시간: 1,375