주요 콘텐츠로 건너뛰기

Honda CSC29 Rectifer Bridge Assembly Replacement

필요한 것

  1. Honda CSC29 Rectifer Bridge Assembly Replacement, Alternator Front Cover: 1 단계, 이미지 1/3 Honda CSC29 Rectifer Bridge Assembly Replacement, Alternator Front Cover: 1 단계, 이미지 2/3 Honda CSC29 Rectifer Bridge Assembly Replacement, Alternator Front Cover: 1 단계, 이미지 3/3
    • Remove 4, 7.9mm nuts using a 7.9mm socket driver head

    • One of the nuts is placed underneath the L-Bracket. Remove the L-Bracket and the 3 circled nuts before attempting to remove the remaining nut

    • There are two covers that need to be removed from the alternator. This step describes how to remove the back cover.

  2. Honda CSC29 Rectifer Bridge Assembly Replacement: 2 단계, 이미지 1/3 Honda CSC29 Rectifer Bridge Assembly Replacement: 2 단계, 이미지 2/3 Honda CSC29 Rectifer Bridge Assembly Replacement: 2 단계, 이미지 3/3
    • Pull cover off the body of the alternator

    • Once you have done this, you should be able to see the internal components of the alternator, particularly the bridge assembly that houses the rectifier, voltage regulator and brushes.

  3. Honda CSC29 Rectifer Bridge Assembly Replacement, Removing the brush assembly.: 3 단계, 이미지 1/3 Honda CSC29 Rectifer Bridge Assembly Replacement, Removing the brush assembly.: 3 단계, 이미지 2/3 Honda CSC29 Rectifer Bridge Assembly Replacement, Removing the brush assembly.: 3 단계, 이미지 3/3
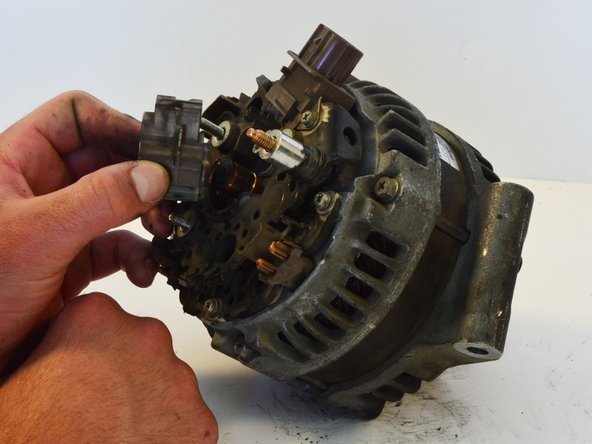
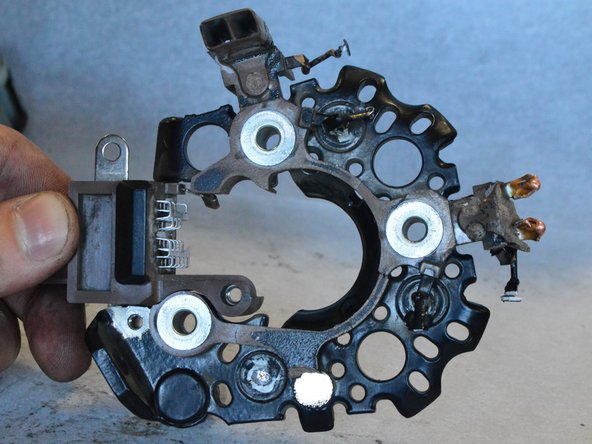
    • With the alternator cover removed, use a #2 Phillips screwdriver to remove the two, 6 mm screws that hold the brush cover in place.

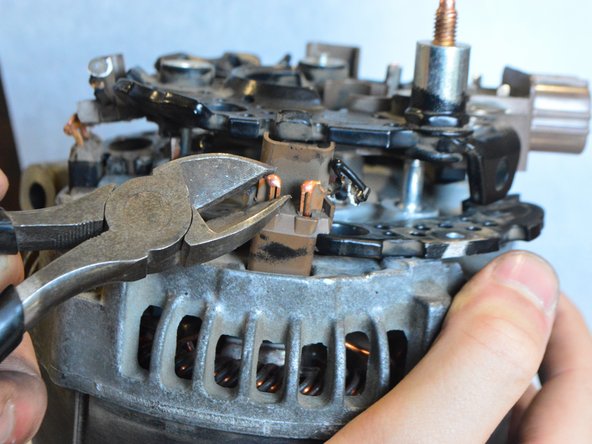
    • Remove the brush cover assembly from the alternator. You might need to insert a needle in the small hole to separate the brushes from the rotor. Pull it out without using much force to avoid damage.

    • Avoid disconnecting wires unless otherwise specified!

  4. Honda CSC29 Rectifer Bridge Assembly Replacement: 4 단계, 이미지 1/3 Honda CSC29 Rectifer Bridge Assembly Replacement: 4 단계, 이미지 2/3 Honda CSC29 Rectifer Bridge Assembly Replacement: 4 단계, 이미지 3/3
    • Use a #2 Phillips screwdriver to remove the two 6mm screws holding down the voltage regulator

    • There are three screws that attach the voltage regulator to the bridge assembly. One of these screws was removed in the previous step.

  5. Honda CSC29 Rectifer Bridge Assembly Replacement: 5 단계, 이미지 1/1
    • Locate and unscrew the 3, 6mm screws holding the bridge assembly in place

    • There are 4 screws attaching the bridge assembly to the alternator. One of these screws were removed in the previous step.

  6. Honda CSC29 Rectifer Bridge Assembly Replacement: 6 단계, 이미지 1/2 Honda CSC29 Rectifer Bridge Assembly Replacement: 6 단계, 이미지 2/2
    • Locate the copper leads connecting the stator to the bridge assembly. There are 3 sets of 2 leads on the perimeter of the bridge, making 6 leads total.

    • These leads must be cut in order to remove the bridge from the alternator. These leads will have to be soldered back together on reassembly. Keep the cut as clean as possible.

    • Use wire cutters to cut all 6 of the leads on the perimeter of the bridge.

  7. Honda CSC29 Rectifer Bridge Assembly Replacement: 7 단계, 이미지 1/3 Honda CSC29 Rectifer Bridge Assembly Replacement: 7 단계, 이미지 2/3 Honda CSC29 Rectifer Bridge Assembly Replacement: 7 단계, 이미지 3/3
    • If necessary, use a pry bar to gently raise the top of the bridge assembly off the alternator

    • Be extremely careful with the pry bar. Excessive force will damage the bridge assembly.

    • Make sure the cut ends of the copper leads are straight to make bridge assembly easier to pull off.

  8. Honda CSC29 Rectifer Bridge Assembly Replacement: 8 단계, 이미지 1/3 Honda CSC29 Rectifer Bridge Assembly Replacement: 8 단계, 이미지 2/3 Honda CSC29 Rectifer Bridge Assembly Replacement: 8 단계, 이미지 3/3
    • Remove the lower section of the bridge assembly

    • Use of a pry bar may be necessary. Be gentle.

결론

To reassemble your device, follow these instructions in reverse order.

다른 4명이 해당 안내서를 완성하였습니다.

Chad Lagomarsino

회원 가입일: 04/14/16

563 평판

안내서 2개 작성하였습니다

Cal Poly, Team 25-1, Maness Spring 2016 Cal Poly, Team 25-1, Maness Spring 2016 회원

CPSU-MANESS-S16S25G1

4 회원들

안내서 15개 작성하였습니다

댓글 0개

댓글 쓰기

조회 통계:

24 시간 전: 0

7일 전: 6

30일 전: 12

전체 시간: 1,603