주요 콘텐츠로 건너뛰기

이 버전에는 잘못된 편집 사항이 있을 수 있습니다. 최신 확인된 스냅샷으로 전환하십시오.

필요한 것

  1. 이 단계는 번역되지 않았습니다. 번역을 도와주십시오

    : 1 단계, 이미지 1/1
    • Flip the Hover-1 Chrome upside down.

    • Use a Phillips #2 screwdriver to remove the fourteen 14 mm screws from the bottom of the Hover-1.

    • Break the two black tape circles, and remove the two 15 mm Phillips screws underneath.

  2. 이 단계는 번역되지 않았습니다. 번역을 도와주십시오

    : 2 단계, 이미지 1/1
    • Lift the shell without the speaker grille and unplug the battery.

  3. 이 단계는 번역되지 않았습니다. 번역을 도와주십시오

    : 3 단계, 이미지 1/2 : 3 단계, 이미지 2/2
    • Lift the shell with the speaker grille.

    • Unplug the speaker.

    • Unplug the LEDs.

    • Unplug the power button

    • Unplug the charging port.

  4. 이 단계는 번역되지 않았습니다. 번역을 도와주십시오

    : 4 단계, 이미지 1/1
    • Remove the twelve 14 mm Phillips #2 screws holding the top shell on.

    • The other six screws are on the side without the battery.

  5. 이 단계는 번역되지 않았습니다. 번역을 도와주십시오

    : 5 단계, 이미지 1/3 : 5 단계, 이미지 2/3 : 5 단계, 이미지 3/3
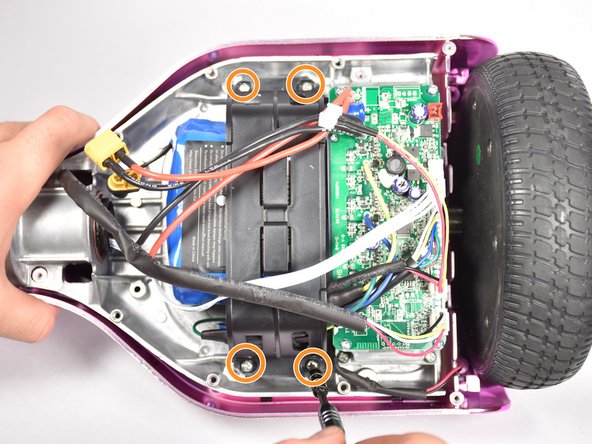
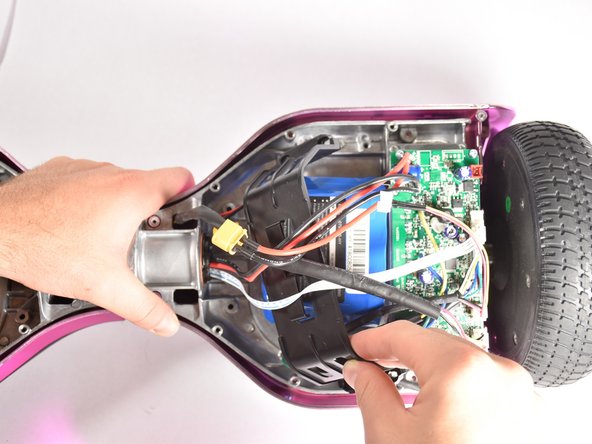
    • Free the cables held atop the bracket holding the battery in place.

    • Remove the four 14 mm Phillips #2 screws holding the battery bracket in place.

    • Pull the battery bracket free.

  6. 이 단계는 번역되지 않았습니다. 번역을 도와주십시오

    : 6 단계, 이미지 1/1
    • Unplug the cords for the top LEDs.

    • The other side of the board is structurally symmetrical. However instead of going under the battery bracket, these cords go through a zip tie. These cables must be removed from the zip tie in order to continue.

  7. 이 단계는 번역되지 않았습니다. 번역을 도와주십시오

    : 7 단계, 이미지 1/1
    • Turn the board over and pull the top panel off.

결승점

Dylan Prins

회원 가입일: 10/08/18

212 평판

안내서 1개 작성함

Cal Poly, Team S4-G1, White Fall 2018 Cal Poly, Team S4-G1, White Fall 2018 회원

CPSU-WHITE-F18S4G1

4 회원들

안내서 6개 작성하였습니다

댓글 한 개

Where can i get a replacement shell?

born4roblox - 답글

댓글 쓰기

조회 통계:

24 시간 전: 0

7일 전: 7

30일 전: 12

전체 시간: 326