주요 콘텐츠로 건너뛰기

Hover-1 Nomad LED Headlights Replacement

필요한 것

  1. Hover-1 Nomad LED Headlights Replacement, Outer Shell: 1 단계, 이미지 1/3 Hover-1 Nomad LED Headlights Replacement, Outer Shell: 1 단계, 이미지 2/3 Hover-1 Nomad LED Headlights Replacement, Outer Shell: 1 단계, 이미지 3/3
    • Break the two warranty stickers by poking a screwdriver through them or peeling them off.

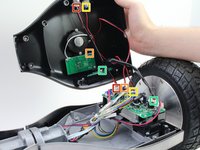
    • Remove the following twenty screws by rotating the screwdriver counterclockwise:

    • Eight 16.2mm Phillips #2 screws

    • Eight 15mm Phillips #2 screws

    • Four 19.1mm Phillips #2 screws

    • The holes containing most of the screws are deep and narrow. A screwdriver with interchangable bits will not be able to reach them.

    • Do not over-tighten the screws during reassembly. Over-tightened screws can crack the plastic channels holding the shell to the frame of the hoverboard.

  2. Hover-1 Nomad LED Headlights Replacement: 2 단계, 이미지 1/3 Hover-1 Nomad LED Headlights Replacement: 2 단계, 이미지 2/3 Hover-1 Nomad LED Headlights Replacement: 2 단계, 이미지 3/3
    • Use a nylon spudger to pry the metal handle away from the outer shell.

    • Rotate the metal handle toward the center of the hoverboard to unlock the plate from the retaining clips.

    • Lift the hoverboard off the metal handle.

    • Repeat for the handle on the other side of the hoverboard.

  3. Hover-1 Nomad LED Headlights Replacement: 3 단계, 이미지 1/1
    • Lift the plastic cover on each side up and away from the device.

    • Multiple wires connect the circuit boards to the outer shell. Remove the shell gently to avoid damaging the wires or components.

  4. Hover-1 Nomad LED Headlights Replacement: 4 단계, 이미지 1/2 Hover-1 Nomad LED Headlights Replacement: 4 단계, 이미지 2/2
    • Disconnect the following wires by pinching the connector tabs and pulling the plugs out of the connectors:

    • Charging port wires

    • Speaker assembly wires

    • Power button wires

    • Headlight wires

    • Only the headlight wires need to be disconnected from the other circuit board.

    • Ensure the wires are connected to the correct ports on the circuit board during reassembly.

  5. Hover-1 Nomad LED Headlights Replacement, LED Headlights: 5 단계, 이미지 1/1
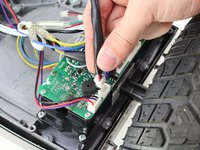
    • Remove the two 13mm Phillips #1 screws by rotating the screwdriver counterclockwise.

    • Repeat on the other side of the hoverboard to remove the other headlight.

  6. Hover-1 Nomad LED Headlights Replacement: 6 단계, 이미지 1/1
    • Pull the headlight up and off the outer shell.

    • Repeat on the other side of the hoverboard to remove the other headlight.

결론

To reassemble your device, follow these instructions in reverse order.

다른 한 분이 해당 안내서를 완성하였습니다.

Samuel Frazee

회원 가입일: 10/08/18

1,015 평판

안내서 7개 작성하였습니다

Cal Poly, Team S15-G1, White Fall 2018 Cal Poly, Team S15-G1, White Fall 2018 회원

CPSU-WHITE-F18S15G1

4 회원들

안내서 7개 작성하였습니다

댓글 0개

댓글 쓰기

조회 통계:

24 시간 전: 0

7일 전: 9

30일 전: 10

전체 시간: 241