주요 콘텐츠로 건너뛰기

Hover-1 Superstar Battery Replacement

필요한 것

  1. Hover-1 Superstar Battery Replacement, Bottom Case: 1 단계, 이미지 1/3 Hover-1 Superstar Battery Replacement, Bottom Case: 1 단계, 이미지 2/3 Hover-1 Superstar Battery Replacement, Bottom Case: 1 단계, 이미지 3/3
    • Flip your Hover-1 Superstar device upside down.

    • Using a Phillips #1 screwdriver, remove all twenty of the 18mm screws holding the case onto the device.

    • Remove the bottom case. Be careful of the connector holding the case and the device together.

  2. Hover-1 Superstar Battery Replacement: 2 단계, 이미지 1/1
    • Locate the cable connected to the front lights.

    • Pull apart the wires until the black clip separates.

  3. Hover-1 Superstar Battery Replacement, Battery: 3 단계, 이미지 1/2 Hover-1 Superstar Battery Replacement, Battery: 3 단계, 이미지 2/2
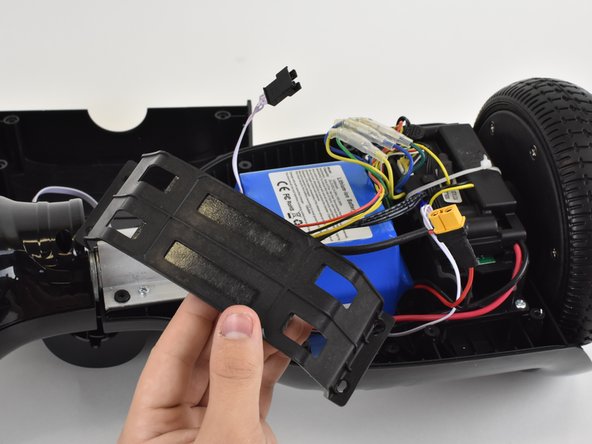
    • Locate the four 14mm screws securing the battery bracket.

    • Remove the screws with a Phillips #1 screwdriver.

  4. Hover-1 Superstar Battery Replacement: 4 단계, 이미지 1/1
    • Pull and disconnect the cable connector that is connected to the battery.

  5. Hover-1 Superstar Battery Replacement: 5 단계, 이미지 1/1
    • Pull on the battery until it separates from the hover board. You may need to use some force.

    • Be sure the battery is disconnected before performing this step to avoid electrocution.

    • There will be a loud crack when the battery is removed. This is normal due to the adhesive on the back of the battery.

    • Pull the battery out of the hoverboard. Move wires away from the battery if necessary.

결론

To reassemble your device, follow these instructions in reverse order.

Keegan

회원 가입일: 10/04/18

632 평판

안내서 5개 작성하였습니다

댓글 한 개

How do u get a 25.2v battery at for my hover-1

chivitbprince Boonking - 답글

댓글 쓰기

조회 통계:

24 시간 전: 1

7일 전: 11

30일 전: 20

전체 시간: 1,643