주요 콘텐츠로 건너뛰기

How to Dewalt Rotary Drill D25104 type 2

필요한 것

  1. How to Dewalt Rotary Drill D25104 type 2, checking power: 1 단계, 이미지 1/2 How to Dewalt Rotary Drill D25104 type 2, checking power: 1 단계, 이미지 2/2
    • first of all we will check the power.

    • plug your drill into a power outlet and try it.

    • If the machine wants to start but immediately shuts down , there is a chance the brushes needs to be replaced.

    • If no power comes up ( like mine) you have to check the power cord first

  2. How to Dewalt Rotary Drill D25104 type 2, removing plastic handframe: 2 단계, 이미지 1/3 How to Dewalt Rotary Drill D25104 type 2, removing plastic handframe: 2 단계, 이미지 2/3 How to Dewalt Rotary Drill D25104 type 2, removing plastic handframe: 2 단계, 이미지 3/3
    • remove the 2 flathead/ torx screws holding the plastic frame at the bottom.

    • remove the flathead/torx screw at the upper side of the frame.

    • slide the frame to the right.

  3. How to Dewalt Rotary Drill D25104 type 2, checking power cord: 3 단계, 이미지 1/2 How to Dewalt Rotary Drill D25104 type 2, checking power cord: 3 단계, 이미지 2/2
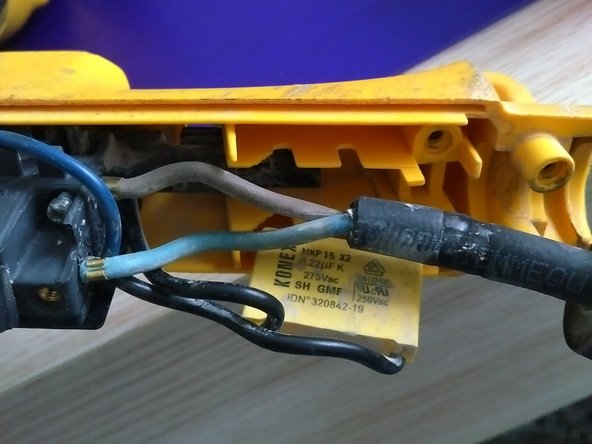
    • check the brown and blue wire with a multimeter.

    • put the red probe from the multimeter on the brown cable and ( copper head)and the black probe of the multimeter on the blue wire ( copper head)

    • if you measure 230 V it should be ok ( in Europe it is 230 V.. i think in the US it would be 110V ...)

    • be sure you put the multimeter in AC V mode and not in DC.

  4. How to Dewalt Rotary Drill D25104 type 2, removing power cable.: 4 단계, 이미지 1/3 How to Dewalt Rotary Drill D25104 type 2, removing power cable.: 4 단계, 이미지 2/3 How to Dewalt Rotary Drill D25104 type 2, removing power cable.: 4 단계, 이미지 3/3
    • Remove power cable by removing the 2 flathead/torx screws.

    • be gently and careful with the condensator. ( yellow "briwk" with the 2 black small wires.

  5. How to Dewalt Rotary Drill D25104 type 2, remove cable: 5 단계, 이미지 1/2 How to Dewalt Rotary Drill D25104 type 2, remove cable: 5 단계, 이미지 2/2
    • remove the 2 small screws holding the brown and blue powerwires.

  6. How to Dewalt Rotary Drill D25104 type 2: 6 단계, 이미지 1/1
    • check fot bad connections. ( in this case you will see one bad connection from the condensator )

  7. How to Dewalt Rotary Drill D25104 type 2: 7 단계, 이미지 1/2 How to Dewalt Rotary Drill D25104 type 2: 7 단계, 이미지 2/2
    • pull out the switch to check the connections and measure out the switch.

    • how more powerfull the motor , the more likely a bad switch is.

    • when reasemble the switch/machine : under the switch there is a plastic pin , that has to fit in a gap from the "forward, reverse) switch

  8. How to Dewalt Rotary Drill D25104 type 2, checking and renewing brushes: 8 단계, 이미지 1/3 How to Dewalt Rotary Drill D25104 type 2, checking and renewing brushes: 8 단계, 이미지 2/3 How to Dewalt Rotary Drill D25104 type 2, checking and renewing brushes: 8 단계, 이미지 3/3
    • remove the 2 swal torx (t9) screws , holding the brush head.

  9. How to Dewalt Rotary Drill D25104 type 2, checking and renewing brushes: 9 단계, 이미지 1/1
    • when replacing : push the brush in the head ; click the wire on the right place and put it back. sometimes you will need to push the brush in place.

  10. How to Dewalt Rotary Drill D25104 type 2, checking and renewing brush 2nd: 10 단계, 이미지 1/3 How to Dewalt Rotary Drill D25104 type 2, checking and renewing brush 2nd: 10 단계, 이미지 2/3 How to Dewalt Rotary Drill D25104 type 2, checking and renewing brush 2nd: 10 단계, 이미지 3/3
    • remove 1 torx ('t9) screw to remove the brush head.

  11. How to Dewalt Rotary Drill D25104 type 2, detailed view: 11 단계, 이미지 1/3 How to Dewalt Rotary Drill D25104 type 2, detailed view: 11 단계, 이미지 2/3 How to Dewalt Rotary Drill D25104 type 2, detailed view: 11 단계, 이미지 3/3
    • Insert wisdom here.

결론

To reassemble your device, follow these instructions in reverse order.

Kevin D

회원 가입일: 05/02/14

7,294 평판

안내서 21개 작성하였습니다

댓글 0개

댓글 쓰기

조회 통계:

24 시간 전: 5

7일 전: 12

30일 전: 52

전체 시간: 2,543