주요 콘텐츠로 건너뛰기

How to Perform an IBM ThinkPad X60s Fan Spindle Replacement

필요한 것

  1. How to Perform an IBM ThinkPad X60s Fan Spindle Replacement, Fan Spindle: 1 단계, 이미지 1/1
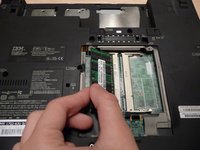
    • Turn the laptop upside-down, with the battery oriented away.

    • Slide the battery lock switch to the left.

  2. How to Perform an IBM ThinkPad X60s Fan Spindle Replacement: 2 단계, 이미지 1/1
    • Complete these steps after disconnecting the laptop from power and after powering the laptop down.

    • Simultaneously complete the following:

    • Slide and hold the battery release switch to the right.

    • Push the battery away from you, out of the back of the laptop.

  3. How to Perform an IBM ThinkPad X60s Fan Spindle Replacement: 3 단계, 이미지 1/3 How to Perform an IBM ThinkPad X60s Fan Spindle Replacement: 3 단계, 이미지 2/3 How to Perform an IBM ThinkPad X60s Fan Spindle Replacement: 3 단계, 이미지 3/3
    • Unscrew the black 4mm Phillips #2 screw securing the hard drive enclosure cover.

    • Pull the hard drive enclosure cover up and to the left to expose the hard drive caddy.

    • Pull the hard drive caddy out by the plastic pull tab.

  4. How to Perform an IBM ThinkPad X60s Fan Spindle Replacement: 4 단계, 이미지 1/3 How to Perform an IBM ThinkPad X60s Fan Spindle Replacement: 4 단계, 이미지 2/3 How to Perform an IBM ThinkPad X60s Fan Spindle Replacement: 4 단계, 이미지 3/3
    • Unscrew the two black Phillips #1 screws securing the RAM cover plate.

    • These screws will remain attached to the cover plate.

    • Remove the exposed RAM sticks by prying outward (away from the edges of the RAM sticks) on the securing tabs.

  5. How to Perform an IBM ThinkPad X60s Fan Spindle Replacement: 5 단계, 이미지 1/1
    • Unscrew the eleven black 6mm Phillips #1 screws securing the keyboard and palmrest.

    • Flip the laptop over.

  6. How to Perform an IBM ThinkPad X60s Fan Spindle Replacement: 6 단계, 이미지 1/2 How to Perform an IBM ThinkPad X60s Fan Spindle Replacement: 6 단계, 이미지 2/2
    • Simultaneously complete the following:

    • Push the keyboard backwards (away from yourself) with both hands.

    • Pry your thumb under the mouse buttons to lift the keyboard upwards (away from the work surface).

    • Pull up to detach the keyboard ribbon tab.

  7. How to Perform an IBM ThinkPad X60s Fan Spindle Replacement: 7 단계, 이미지 1/2 How to Perform an IBM ThinkPad X60s Fan Spindle Replacement: 7 단계, 이미지 2/2
    • Pull up to detach the fingerprint scanner ribbon tab.

    • Lift up on the faceplate to remove it.

  8. How to Perform an IBM ThinkPad X60s Fan Spindle Replacement: 8 단계, 이미지 1/2 How to Perform an IBM ThinkPad X60s Fan Spindle Replacement: 8 단계, 이미지 2/2
    • Unscrew the five silver 3mm Phillips #1 screws securing the motherboard.

    • Unscrew the silver 7mm Phillips #1 screw securing the motherboard.

  9. How to Perform an IBM ThinkPad X60s Fan Spindle Replacement: 9 단계, 이미지 1/2 How to Perform an IBM ThinkPad X60s Fan Spindle Replacement: 9 단계, 이미지 2/2
    • (Optional) Lay a piece of paper, or other protective material, over the laptop screen.

    • Flip the motherboard over onto the screen (or protective material).

    • Flipping the motherboard over should not require forceful motion.

    • Take extreme care not to damage any ribbon cables or wires still connected to the motherboard.

  10. How to Perform an IBM ThinkPad X60s Fan Spindle Replacement: 10 단계, 이미지 1/3 How to Perform an IBM ThinkPad X60s Fan Spindle Replacement: 10 단계, 이미지 2/3 How to Perform an IBM ThinkPad X60s Fan Spindle Replacement: 10 단계, 이미지 3/3
    • Pry back the three metal tabs on the now-exposed underside of the fan housing with needle-nose pliers.

    • Flip the motherboard back over.

    • Flipping the motherboard over should not require forceful motion.

    • Take extreme care not to damage any ribbon cables or wires still connected to the motherboard.

  11. How to Perform an IBM ThinkPad X60s Fan Spindle Replacement: 11 단계, 이미지 1/2 How to Perform an IBM ThinkPad X60s Fan Spindle Replacement: 11 단계, 이미지 2/2
    • Lift the metal housing off of the fan.

    • There may be foil tape securing the housing. If so, remove it carefully in order to put it back after replacing the fan spindle.

    • Remove and replace the fan spindle.

결론

To reassemble your device, follow these instructions in reverse order.

다른 한 분이 해당 안내서를 완성하였습니다.

Samuel Lees

회원 가입일: 02/23/15

171 평판

안내서 1개 작성함

Cal Poly, Team 12-2, Green Winter 2015 Cal Poly, Team 12-2, Green Winter 2015 회원

CPSU-GREEN-W15S12G2

6 회원들

안내서 13개 작성하였습니다

댓글 0개

댓글 쓰기

조회 통계:

24 시간 전: 0

7일 전: 3

30일 전: 18

전체 시간: 2,406