주요 콘텐츠로 건너뛰기

How to Repair Frayed Shoelaces

필요한 것

  1. How to Repair Frayed Shoelaces, How to Repair Frayed Shoelaces: 1 단계, 이미지 1/1
    • Cut of the excess frayed shoelace.

  2. How to Repair Frayed Shoelaces: 2 단계, 이미지 1/3 How to Repair Frayed Shoelaces: 2 단계, 이미지 2/3 How to Repair Frayed Shoelaces: 2 단계, 이미지 3/3
    • Slip the entire heat shrink tube over the frayed part of the lace.

    • Make sure to clump the frayed part of the lace together when inserting the tubing.

    • Do not cover too much of the lace that is not frayed with tubing as that could result in unwanted indents in the shoelace.

  3. How to Repair Frayed Shoelaces: 3 단계, 이미지 1/2 How to Repair Frayed Shoelaces: 3 단계, 이미지 2/2
    • After slipping the tube on, grab the scissors and trim the excess tubing to the length of your satisfaction.

    • Remember not to go beyond the frayed part of the lace with tubing.

  4. How to Repair Frayed Shoelaces: 4 단계, 이미지 1/3 How to Repair Frayed Shoelaces: 4 단계, 이미지 2/3 How to Repair Frayed Shoelaces: 4 단계, 이미지 3/3
    • Now use the lighter and heat the heat shrink tube, about an inch away from the lace, until the tube becomes compressed all the way around.

    • Make sure to heat the heat shrink tube all the way around, heating the entire tube

    • When heating, always keep moving the lighter all around and not staying on one part of the tube for too long.

  5. How to Repair Frayed Shoelaces: 5 단계, 이미지 1/1
    • Repeat these steps on all the other frayed shoelaces.

결론

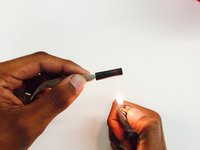
When the heat shrink tube is completely shrunk to appropriate size, you are finished. Repeat steps 1-4 depending on how many frayed laces are present.

다른 14명이 해당 안내서를 완성하였습니다.

Anirudh Jain

회원 가입일: 04/09/15

605 평판

안내서 1개 작성함

Cal Poly, Team 28-6, Green Spring 2015 Cal Poly, Team 28-6, Green Spring 2015 회원

CPSU-GREEN-S15S28G6

4 회원들

안내서 10개 작성하였습니다

댓글 0개

댓글 쓰기

조회 통계:

24 시간 전: 2

7일 전: 22

30일 전: 75

전체 시간: 11,682