주요 콘텐츠로 건너뛰기

How to Repair Water Damaged Nexus 5x

필요한 것

  1. How to Repair Water Damaged Nexus 5x, Rear Panel: 1 단계, 이미지 1/3 How to Repair Water Damaged Nexus 5x, Rear Panel: 1 단계, 이미지 2/3 How to Repair Water Damaged Nexus 5x, Rear Panel: 1 단계, 이미지 3/3
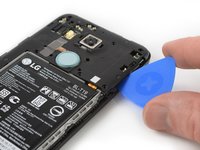
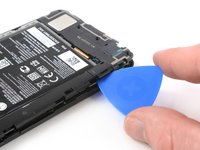
    • Place an opening pick in the opening of the SIM card tray slot and twist it sideways to release the first plastic clip that holds the rear panel in its place.

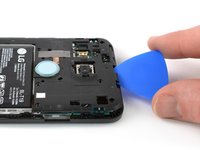
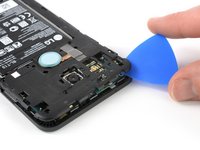
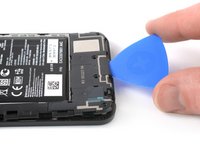
    • Slide the opening pick around the top edge of the phone to release the plastic clips that secure the rear panel.

  2. How to Repair Water Damaged Nexus 5x: 2 단계, 이미지 1/3 How to Repair Water Damaged Nexus 5x: 2 단계, 이미지 2/3 How to Repair Water Damaged Nexus 5x: 2 단계, 이미지 3/3
    • Continue to slide the opening pick around all sides of the phone to release all clips that secure the rear panel.

  3. How to Repair Water Damaged Nexus 5x: 3 단계, 이미지 1/2 How to Repair Water Damaged Nexus 5x: 3 단계, 이미지 2/2
    • Tilt the opening pick to lift the rear panel a little bit.

    • There are two more plastic clips next to the fingerprint sensor. Release them by gently pulling the rear panel.

    • Remove the rear panel.

  4. How to Repair Water Damaged Nexus 5x, Midframe: 4 단계, 이미지 1/1
    • Remove the ten 3.6 mm Phillips screws that secure the midframe.

  5. How to Repair Water Damaged Nexus 5x: 5 단계, 이미지 1/2 How to Repair Water Damaged Nexus 5x: 5 단계, 이미지 2/2
    • Insert an opening pick into the SIM card tray slot and twist the opening pick sideways to release the plastic clips.

  6. How to Repair Water Damaged Nexus 5x: 6 단계, 이미지 1/2 How to Repair Water Damaged Nexus 5x: 6 단계, 이미지 2/2
    • Continue sliding the opening pick around the upper part of the midframe to release the plastic clips.

  7. How to Repair Water Damaged Nexus 5x: 7 단계, 이미지 1/2 How to Repair Water Damaged Nexus 5x: 7 단계, 이미지 2/2
    • Use the plastic pick to pry open the plastic clips on the long edge of the midframe and on the bottom edge.

    • Make sure the clips on the long edge are released. The midframe is prone to break here if they are not disconnected properly.

  8. How to Repair Water Damaged Nexus 5x: 8 단계, 이미지 1/2 How to Repair Water Damaged Nexus 5x: 8 단계, 이미지 2/2
    • Make sure all the clips are free.

    • Carefully remove the midframe.

  9. How to Repair Water Damaged Nexus 5x, Motherboard: 9 단계, 이미지 1/3 How to Repair Water Damaged Nexus 5x, Motherboard: 9 단계, 이미지 2/3 How to Repair Water Damaged Nexus 5x, Motherboard: 9 단계, 이미지 3/3
    • Proceed with the following steps if you need to transfer the front-facing and rear-facing cameras to the new motherboard.

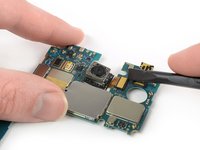
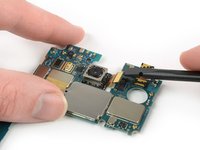
    • Use the flat end of a spudger to pry up the rear-facing camera connector from the motherboard.

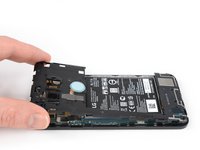
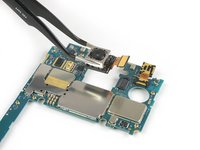
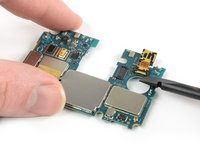
    • Carefully remove the rear facing camera.

  10. How to Repair Water Damaged Nexus 5x: 10 단계, 이미지 1/3 How to Repair Water Damaged Nexus 5x: 10 단계, 이미지 2/3 How to Repair Water Damaged Nexus 5x: 10 단계, 이미지 3/3
    • Use the flat end of a spudger to pry up the front-facing camera connector from the motherboard.

    • Carefully remove the front-facing camera.

  11. How to Repair Water Damaged Nexus 5x, How to Repair Water Damaged Nexus 5x: 11 단계, 이미지 1/1
    • ESD or Electro-Static Discharge can damage sensitive circuitry so do not touch anything on circuit board, such as connectors and resistors, with your bare hands!

    • This process may not work if you attempted to turn on /charge your device after it was exposed to water.

    • Hardware damage is always a possibility, so this process is only to give your device the best chance of survival.

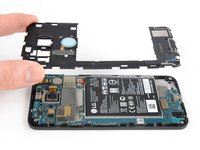
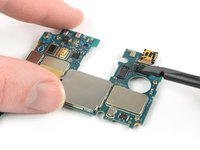
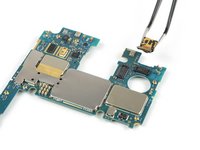
    • After completing the preliminary teardown task you will need to carefully remove metal covers on front and back of the motherboard with your knife.

    • They simply unclip and clip back in.

  12. How to Repair Water Damaged Nexus 5x: 12 단계, 이미지 1/2 How to Repair Water Damaged Nexus 5x: 12 단계, 이미지 2/2
    • Clean entire board with your Alcohol, making sure all water has been cleaned and all corrosion is gone after alcohol dries.

    • Alcohol MUST be 90% or higher

    • Continue cleaning any water within device as well as all connectors.

  13. How to Repair Water Damaged Nexus 5x: 13 단계, 이미지 1/1
    • Do not exeed temp greater than 150F to avoid damage to hardware

    • Take the screen portion only and place it in your oven/toaster oven that can stay at a constant 140-150F for 2hrs. This will evaporate any water behind the screen that you cannot reach with your alcohol.

  14. How to Repair Water Damaged Nexus 5x: 14 단계, 이미지 1/1
    • Re-assemble and power on!

결론

To reassemble your device, follow these instructions in reverse order.

다른 9명이 해당 안내서를 완성하였습니다.

Allen Finley

회원 가입일: 08/29/16

390 평판

안내서 1개 작성함

댓글 9개

Where is the microphone located at? Mine was water damaged and it works fine except for the microphone is very low. Thanks in advance for your help

John Zenobia - 답글

If you look at the bottom of your Nexus 5x you will see a pin hole that allows the microphone to receive your voice. The microphone component will be right above that small hole. Unfortunately, I believe that the microphone component itself is soldered to the motherboard. You may be able to clean it more with alcohol and try again after it dries. Buying a new microphone and soldering on the new one would require a special soldering iron and almost expert skill. If you could purchase one with a broken screen for a reasonable price you could replace your whole motherboard with ease

Allen Finley -

My nexus 5x was water damaged about 3 months ago.If follow this process ,is it possible to recover it?

Talha Babor - 답글

Did you tried it? I want to give it a go, if it’s still possible, but its broken about half a year.

Balázs Bulcsú -

My phone is not working it was fine till morning phone automatically switched off tried 1000 times its not working.

Amritpal Singh - 답글

댓글 쓰기

조회 통계:

24 시간 전: 0

7일 전: 1

30일 전: 9

전체 시간: 12,828