주요 콘텐츠로 건너뛰기

How to Repair a Broken Kitchen Faucet Pull-out Spray Head

필요한 것

  1. How to Repair a Broken Kitchen Faucet Pull-out Spray Head, Kitchen Faucet Pull-out Spray Head: 1 단계, 이미지 1/2 How to Repair a Broken Kitchen Faucet Pull-out Spray Head, Kitchen Faucet Pull-out Spray Head: 1 단계, 이미지 2/2
    • Located underneath the sink is the water-control valve.

    • Shut off the water supply by turning the water-control valve.

    • Not all water control values are the same so some nozzles may vary.

  2. How to Repair a Broken Kitchen Faucet Pull-out Spray Head: 2 단계, 이미지 1/3 How to Repair a Broken Kitchen Faucet Pull-out Spray Head: 2 단계, 이미지 2/3 How to Repair a Broken Kitchen Faucet Pull-out Spray Head: 2 단계, 이미지 3/3
    • Pull on the kitchen spray head nozzle to reveal the connected hose.

    • Unscrew the kitchen faucet spray head nozzle counterclockwise off of the hose assembly.

  3. How to Repair a Broken Kitchen Faucet Pull-out Spray Head: 3 단계, 이미지 1/2 How to Repair a Broken Kitchen Faucet Pull-out Spray Head: 3 단계, 이미지 2/2
    • Remove the rubber gasket from the hose to reveal the c-clip.

    • Remove the c-clip that is located on the pull-out sprayer connection point with a small flat head screwdriver.

    • Do not discard the gasket. It can be reused unless damaged.

  4. How to Repair a Broken Kitchen Faucet Pull-out Spray Head: 4 단계, 이미지 1/2 How to Repair a Broken Kitchen Faucet Pull-out Spray Head: 4 단계, 이미지 2/2
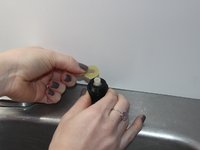
    • Pull on the sink faucet spray head from above the sink to find the main hose connection point to the water line located underneath the sink.

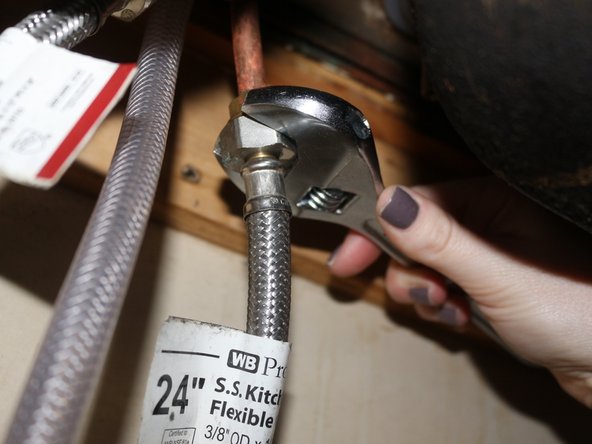
    • Unscrew the hose from the main faucet’s water line connection point.

    • A wrench may be necessary in order to loosen the nut.

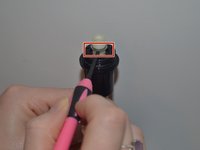
    • Remove the hose from the sink sprayer location.

    • Connect the new hose by pressing it into the connection point. Then screw hose back on clockwise.

    • A wrench may be necessary in order to secure the end of the hose to the nut.

  5. How to Repair a Broken Kitchen Faucet Pull-out Spray Head: 5 단계, 이미지 1/1
    • Apply plumber's tape to the male threads on the new sink sprayer head to avoid leakage.

결론

To reassemble your device, follow these instructions in reverse order.

다른 2명이 해당 안내서를 완성하였습니다.

Jodi Wright

회원 가입일: 02/23/16

158 평판

안내서 1개 작성함

Texas Tech, Team 26-2, Rauch Spring 2016 Texas Tech, Team 26-2, Rauch Spring 2016 회원

TTU-RAUCH-S16S26G2

2 회원들

안내서 1개 작성하였습니다

댓글 0개

댓글 쓰기

조회 통계:

24 시간 전: 0

7일 전: 19

30일 전: 89

전체 시간: 13,591