소개
Does your favorite stuffed animal have a tear in it? Use this guide to return your furry friend to mint condition.
필요한 것
-
-
Gather all of your materials.
-
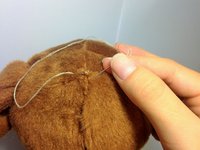
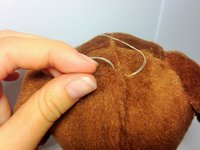
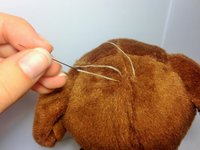
Pinpoint the tear in your stuffed animal.
-
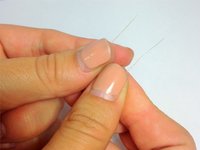
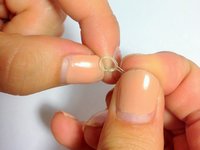
Measure out the desired length of thread that will fully cover your tear.
-
-


다른 49명이 해당 안내서를 완성하였습니다.
팀

Cal Poly, Team 17-5, Green Fall 2015 Cal Poly, Team 17-5, Green Fall 2015 회원
CPSU-GREEN-F15S17G5
4 회원들
안내서 12개를 작성함
10가이드 댓글
I have a vintage Mickey Mouse (1970s) he has red velvet shorts with yellow felt buttons. It looks like they were just attached by adhesive when made. One of the buttons have been lost due to time and left a bare patch of velvet. I am unable to find hints or suggestions on how to repair our Mickey. It was my husband's as a child and our youngest was in love with it until the button disappeared. He wont play with it now because he think he hurt it. Any help would be greatly appreciated.
You could sew on Another button, I'm sure you could find a very similar button on Amazon and quickly thread it back together, good as new. If you need any more help, just let me know :)
How about you try to make a duplicate button and sew it on to your Mickey. You can probably make one by cutting two pieces of yellow felt fabric and sewing them together, you can then sem the button on Mickey where the bare patch is. If it looks awkward, then you can make another button and replace it with the other (original) button if it looks different from the new one you made. You can always make a new button, but maybe not an original one.
By doing this repair, you might take some of the vintageness out of Mickey, but your son would be happy and play with him again. Which is more important? Don’t forget the reason why Mickey was made in the first place. You'll be restoring Mickey’s purpose of being played by children again!
Omar Farid - 답글
Simple and easy to follow instructions! Thank you so much!
I’m still only learning to sew, and a dog we were looking after decided to chew on my little sister’s FAVOURITE unicorn stuffy, and left a HUGE tear in it. Searched for ages to find instructions on how to sew it back up, but they were all extremely complicated, overdone, or way too confusing to follow. This one, however, was amazing! I was able to fix it for her like new! Thank you!
I have a Large Fireman Sam Plushie and between the feet and the legs the stuffed toy is ripped. What should I do?