주요 콘텐츠로 건너뛰기

How to Replace the Adhesive for Your Motorola Phone

필요한 것

  1. How to Replace the Adhesive for Your Motorola Phone, Scrape off the old adhesive: 1 단계, 이미지 1/3 How to Replace the Adhesive for Your Motorola Phone, Scrape off the old adhesive: 1 단계, 이미지 2/3 How to Replace the Adhesive for Your Motorola Phone, Scrape off the old adhesive: 1 단계, 이미지 3/3
    • Use the flat end of a spudger or your fingernail to scrape and remove the old adhesive from the phone body and back cover.

    • Pay attention to areas around the cameras and outer edge of the phone. Any remaining chunks will prevent your part from aligning properly.

  2. How to Replace the Adhesive for Your Motorola Phone, Remove the remaining adhesive: 2 단계, 이미지 1/2 How to Replace the Adhesive for Your Motorola Phone, Remove the remaining adhesive: 2 단계, 이미지 2/2
    이 단계에 사용된 도구:
    Microfiber Cleaning Cloths
    $3.99
    구매
    • Apply a few drops of high-concentration (90% or higher) isopropyl alcohol to any remaining adhesive.

    • Use a microfiber cloth to remove the remaining adhesive.

    • If you are having trouble removing the adhesive, apply a few drops of alcohol to the adhesive and scrape it with a spudger.

  3. How to Replace the Adhesive for Your Motorola Phone, Remove the protective film: 3 단계, 이미지 1/1
    • Remove the clear protective film from the new adhesive.

  4. How to Replace the Adhesive for Your Motorola Phone, Apply the adhesive: 4 단계, 이미지 1/2 How to Replace the Adhesive for Your Motorola Phone, Apply the adhesive: 4 단계, 이미지 2/2
    • Be very careful during this step! The adhesive is very sticky, and can't be repositioned once it sticks. Misaligned adhesive can lead to an improper seal.

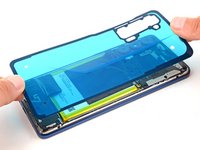
    • Before placing the adhesive on the frame, use the cameras to ensure the adhesive's proper alignment.

    • Lay the adhesive on the frame.

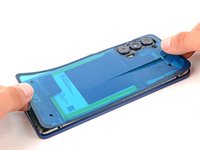
    • Press down firmly on the adhesive along the perimeter of the midframe to secure it to the phone.

  5. How to Replace the Adhesive for Your Motorola Phone: 5 단계, 이미지 1/2 How to Replace the Adhesive for Your Motorola Phone: 5 단계, 이미지 2/2
    • Grab the blue protective film's pull tab on the top of the phone and pull towards the bottom of the phone.

    • Pull carefully so the adhesive does not separate from the phone.

  6. How to Replace the Adhesive for Your Motorola Phone, Put the back cover on: 6 단계, 이미지 1/1
    • If your phone has a rear fingerprint sensor, make sure to secure it in its cutout on the back cover before proceeding.

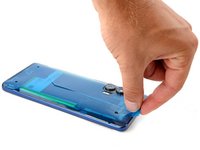
    • Align the back cover over the back of the phone.

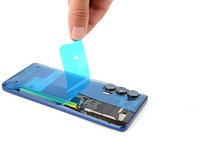
    • Press down firmly for one minute along the perimeter of the back cover and camera bezel to secure it with the new adhesive.

결승점

Spencer Day

회원 가입일: 09/14/22

53,745 평판

안내서 394개 작성하였습니다

iFixit iFixit 회원

Staff

135 회원들

안내서 17,198개 작성하였습니다

댓글 0개

댓글 쓰기

조회 통계:

24 시간 전: 0

7일 전: 15

30일 전: 42

전체 시간: 717