소개
Did your string rip or come out of place? Then you have come to the right place! Replacing strings can be intimidating, but don't worry! My guide will help you fit it. With seven simple steps, you can return to playing in no time.
Before you begin, calm the nerves and gather your materials. You will need a flathead screwdriver(preferably one that fits your screws), your string, and some scissors. Make sure to be in an area with good lighting, and somewhere you can rest your horn.
Reminder: have all your supplies beside you where it is reachable because once you get started, it may be a hassle to let go of the string and grab the tools.
Note: the horn has a massive bell, so you need a surface where it won't slip or fall from your hands. Preferably somewhere like your lap.
Caution: if the horn slips, it may hurt trying to catch it, or if it hurts any body part, so please make sure your horn is secure before you let it go to start restringing.
Alright! Let's get started! You will be back to playing in no time!
필요한 것
-
-
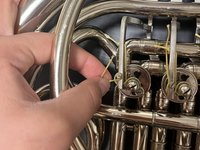
Place your horn where the back is easily accessible.
-
Loosen the set of screws, but DON’T take them out! Just loosen them enough that the string can wrap around.
-
-


To reassemble your device, follow these instructions in reverse order.
팀

CSU Los Angeles, Team 21-21, Briggs Spring 2024 CSU Los Angeles, Team 21-21, Briggs Spring 2024 회원
CSULA-BRIGGS-S24S21G21
1 회원
안내서 1개 작성