주요 콘텐츠로 건너뛰기

이 안내서에는 최근 변경 사항이 더 있습니다. 최신 비검증 버전으로 전환하십시오.

How to apply new adhesive on the Apple Watch Series 1

필요한 것

  1. How to apply new adhesive on the Apple Watch Series 1, Adhesive: 1 단계, 이미지 1/2 How to apply new adhesive on the Apple Watch Series 1, Adhesive: 1 단계, 이미지 2/2
    • Use a plastic opening tool to scrape adhesive off the back of the screen.

  2. How to apply new adhesive on the Apple Watch Series 1: 2 단계, 이미지 1/2 How to apply new adhesive on the Apple Watch Series 1: 2 단계, 이미지 2/2
    • You may be able to peel up the adhesive with tweezers.

    • Once you have all of the pieces of adhesive removed, you may want to use an alcohol soaked q-tip to clean any residue off the back of the screen.

  3. How to apply new adhesive on the Apple Watch Series 1: 3 단계, 이미지 1/2 How to apply new adhesive on the Apple Watch Series 1: 3 단계, 이미지 2/2
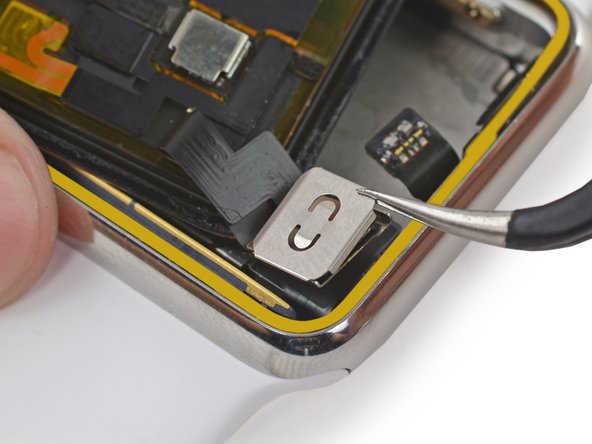
    • Use tweezers to peel the outer ring off of one of the adhesive strip pads.

    • Be sure to get both the double-sided adhesive and the brown backing paper.

    • If you're having trouble navigating the double-sided adhesive, check out this video.

    • Be very careful not to fold, bend, or stretch the adhesive tape, as this will make it too thick to seal the screen without a ridge between the screen and the case.

  4. How to apply new adhesive on the Apple Watch Series 1: 4 단계, 이미지 1/3 How to apply new adhesive on the Apple Watch Series 1: 4 단계, 이미지 2/3 How to apply new adhesive on the Apple Watch Series 1: 4 단계, 이미지 3/3
    • Lay the backed adhesive tape down on the Force Touch sensor, around the edge of the case where the screen rests.

    • Start in a corner with the tape as close to the corner wall as possible.

    • Press on the brown backing paper with a plastic opening tool to secure the adhesive around the entire perimeter.

  5. How to apply new adhesive on the Apple Watch Series 1: 5 단계, 이미지 1/2 How to apply new adhesive on the Apple Watch Series 1: 5 단계, 이미지 2/2
    • Use a plastic opening tool to reconnect the display data and digitizer cable connectors.

    • Be careful not to touch any of the contacts directly, as your finger oils may impede connectivity.

  6. How to apply new adhesive on the Apple Watch Series 1: 6 단계, 이미지 1/3 How to apply new adhesive on the Apple Watch Series 1: 6 단계, 이미지 2/3 How to apply new adhesive on the Apple Watch Series 1: 6 단계, 이미지 3/3
    • To reinstall the metal bracket, line up the single tab with the slot in the top of the lower half, and slide the bracket down.

    • Snap the upper bracket in place.

  7. How to apply new adhesive on the Apple Watch Series 1: 7 단계, 이미지 1/3 How to apply new adhesive on the Apple Watch Series 1: 7 단계, 이미지 2/3 How to apply new adhesive on the Apple Watch Series 1: 7 단계, 이미지 3/3
    • Line the battery connector up with its mate on the cable inside the watch body.

    • Use tweezers to press the two connectors together.

  8. How to apply new adhesive on the Apple Watch Series 1: 8 단계, 이미지 1/3 How to apply new adhesive on the Apple Watch Series 1: 8 단계, 이미지 2/3 How to apply new adhesive on the Apple Watch Series 1: 8 단계, 이미지 3/3
    • If your replacement battery came with pre-installed adhesive, peel off the protective tab now, exposing the adhesive.

    • Rotate the battery down into its slot, and press it into position.

    • Press the battery down against the S1 to re-adhere it in place.

    • Now is the best time to test powering on your watch—if it doesn't turn on, double check all three connectors and try again.

  9. How to apply new adhesive on the Apple Watch Series 1: 9 단계, 이미지 1/1
    • Use tweezers to peel off the adhesive backing strip.

    • Peel the backing strip up halfway, then snip it with scissors so you can peel the rest off without it snagging on the display.

  10. How to apply new adhesive on the Apple Watch Series 1: 10 단계, 이미지 1/3 How to apply new adhesive on the Apple Watch Series 1: 10 단계, 이미지 2/3 How to apply new adhesive on the Apple Watch Series 1: 10 단계, 이미지 3/3
    • Move the screen back to the right, folding the display data and digitizer cables neatly.

    • Center the screen over the case and press it down firmly onto the adhesive.

    • Alternatively, you can use screen vice clamps around the perimeter of your device to set the new adhesive.

결승점

다른 38명이 해당 안내서를 완성하였습니다.

Tobias Isakeit

회원 가입일: 03/31/14

117,588 평판

안내서 188개 작성하였습니다

Master Techs Master Techs 회원

Community

322 회원들

안내서 2,528개 작성하였습니다

댓글 3개

very good instructions…thanks for your help

Kenneth Lawson - 답글

Excellent! Apple claimed it was not economical to repair a watch with inflated battery that had pushed out the screen. I think 18 euro for a new battery and adhesive tape, together with this manual is excellent value, a new lease of life and less waste. :-)

michel.masui - 답글

댓글 쓰기

조회 통계:

24 시간 전: 1

7일 전: 12

30일 전: 55

전체 시간: 15,509