소개
Background Information
ChromeOS Flex is a fast, secure, cloud-based, easy-to-manage operating system that can be installed on both Macs and PCs. The overall purpose of this operating system is to refresh older devices by increasing their performance. The OS also gives older hardware a new life by providing the latest in security updates, and performance enhancements.
System Requirements
While ChromeOS Flex is a flexible operating system, it does have recommended system requirements, just like other operating systems.
CPU: Intel or AMD x86-64-bit compatible device
RAM: 8GB or more
Storage: 16GB of internal storage
Graphics: Components that were made before 2010 might cause a degraded experience. Intel GMA 500, 600, 3600, and 3650 graphics hardware do not meet Chrome OS Flex performance standards.
Things you'll need to get started
- 1 x 8GB USB drive
- BIOS Access on the computer you're installing on
필요한 것
-
-
Open Google Chrome and navigate to the Chrome Web Store
-
Add Google's Chromebook Recovery Utility to Chrome by clicking Add to Chrome
-
When prompted, click Add extension
-
-
-
At the top right of Chrome's browser window, click More Tools and then Extensions
-
Next to the newly installed Chromebook Recovery Utility toggle the switch to on.
-
-
-
-
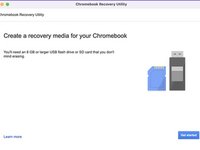
From Chrome, launch the Chrome Recovery Utility extension.
-
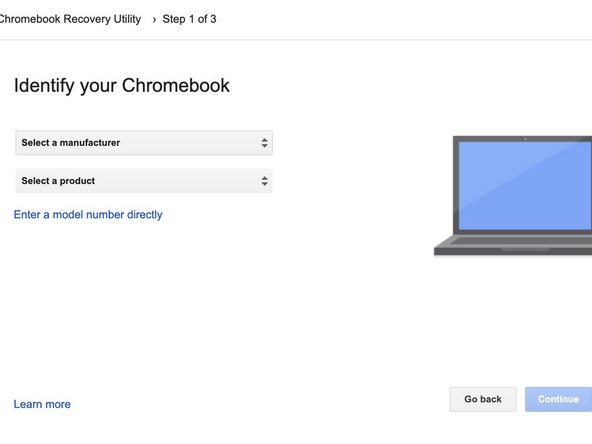
Click Get started
-
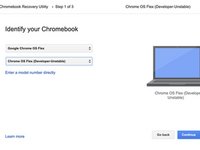
Click Select a model from a list
-
For the Select a manufacturer option, find and choose Google Chrome OS Flex.
-
For the Select a product option, find and choose Chrome OS Flex (Developer-Unstable).
-
-
-
Click on Continue, and choose your USB device from the dropdown menu.
-
Click Continue and once prompted click Create now.
-
You can remove your recovery USB once the finish message is displayed.
-


Now that you have your USB Installer, you can install ChromeOS Flex onto any computer from 2010 or later. To install Flex onto a computer, boot your USB drive from the device's BIOS and follow the onscreen instructions.
다른 18명이 해당 안내서를 완성하였습니다.

