이 버전에는 잘못된 편집 사항이 있을 수 있습니다. 최신 확인된 스냅샷으로 전환하십시오.
필요한 것
-
이 단계는 번역되지 않았습니다. 번역을 도와주십시오
-
Gather the necessary tools
-
1--Soldering Iron
-
2--Solder
-
3--DB9 Enclosure. This one is being used here.
-
4--RS232 to TTL/CMOS converter. alldav.com sells the one used here. Cisco does not recommend or endorse Alldav specifically.
-
5--Cable w/RJ45 connector on one end Any type of cable with an 8P8C (RJ45) connector could used as long as pins 1,2,7 & 8 are connected. A standard RJ45 cable is being used here.
-
You will also need wire strippers and possibly a screwdriver (depending on which DB9 enclosure you are using).
-
-
이 단계는 번역되지 않았습니다. 번역을 도와주십시오
-
Prep the cable. Strip the sheathing from the wires that correspond to pins 1,2,7 & 8.
-
-
이 단계는 번역되지 않았습니다. 번역을 도와주십시오
-
Connect the RS232 to TTL/CMOS converter. Connect the RS232 to TTL/CMOS converter to the cable and solder the connections. Note: The colors used in the wiring diagram don't correspond to the color of the actual wires.
-
-
-
이 단계는 번역되지 않았습니다. 번역을 도와주십시오
-
Install the Enclosure The EX90 console is now complete. The subsequent steps will cover making a console connection.
-
-
이 단계는 번역되지 않았습니다. 번역을 도와주십시오
-
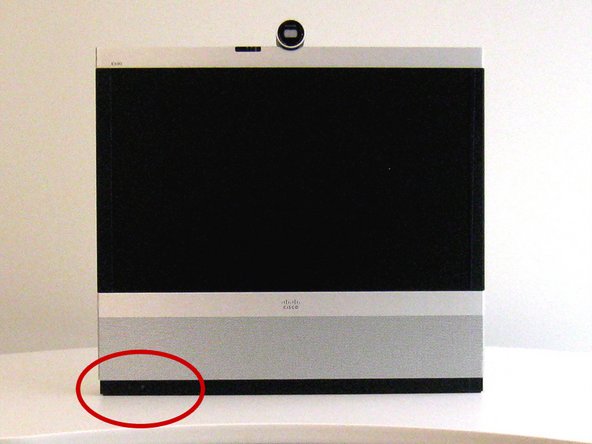
Make a Console Connection. Locate the Console Port. The EX90 console port is an 8P8C (RJ45) connection and is located on the bottom left corner of the unit.
-
-
이 단계는 번역되지 않았습니다. 번역을 도와주십시오
-
Connect to the Console Port. Plug the 8P8C (RJ45) end into the console port. You'll have to lean the unit forward to plug the cable in. It might be a little awkward to do alone. If someone else is available, ask for their assistance. As a last resort, lay the unit down. Ensure you have something soft (like a towel) to lay the unit on.
-
-
이 단계는 번역되지 않았습니다. 번역을 도와주십시오
-
Configure a Terminal Emulator Session Configure your terminal emulator with the following parameters:
-
Baud=38400
-
Data bits=8
-
Parity=none
-
Stop bits=1
-
Flow Control=none
-
The example uses HyperTerminal for Windows; configuring your terminal emulator may vary slightly.
-
You should now be at a login prompt when you connect with the terminal emulator.
-


다른 한 분이 해당 안내서를 완성하였습니다.
댓글 한 개
Thanks for this Amazing Blog. It is very informative and helpful for me.
<a href="http://pdfdumps.us/exam/220-801.html">Pass4sure 220-801 dumps</a>