주요 콘텐츠로 건너뛰기

How to fix HP Color LaserJet 2600n Fading Color

필요한 것

  1. How to fix HP Color LaserJet 2600n Fading Color, How to fix HP Color LaserJet 2600n Fading Color: 1 단계, 이미지 1/1
    • Before we begin, make sure to unplug the printer and any connected wires. To be extra safe, turn the power switch to 'off.'

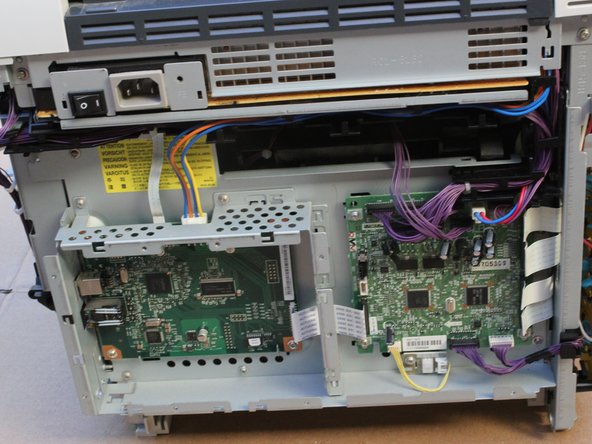
    • First, let's establish what part of the printer is what so that we can communicate clearly throughout the guide. The red square is the front and the orange square is the top. After those, we have left (yellow), and right (green). The back is opposite the front and the bottom is opposite the top.

  2. How to fix HP Color LaserJet 2600n Fading Color: 2 단계, 이미지 1/3 How to fix HP Color LaserJet 2600n Fading Color: 2 단계, 이미지 2/3 How to fix HP Color LaserJet 2600n Fading Color: 2 단계, 이미지 3/3
    • Laser printers often have loose toner, a very fine and vibrant powder that will invade everything you don't want it to. I did my disassembly outside

    • Open the front door and remove the toner cartridges.

    • Set the cartridges aside for later. To keep them clean, place them in a bag or closed box.

  3. How to fix HP Color LaserJet 2600n Fading Color: 3 단계, 이미지 1/2 How to fix HP Color LaserJet 2600n Fading Color: 3 단계, 이미지 2/2
    • Place the printer so that the right side is on the ground.

    • Remove the paper tray from the bottom of the printer.

  4. How to fix HP Color LaserJet 2600n Fading Color: 4 단계, 이미지 1/1
    • Remove the indicated Phillips M3 screw from the left side of the printer

    • In this photo, the paper tray is still in the printer. On your device, the tray should already be set aside.

  5. How to fix HP Color LaserJet 2600n Fading Color: 5 단계, 이미지 1/2 How to fix HP Color LaserJet 2600n Fading Color: 5 단계, 이미지 2/2
    • Release the tabs as indicated in the example by lifting or pressing them as needed.

    • Some of the press tabs are hard to reach with a finger. If needed, gently press in the tab with a screwdriver until it releases.

  6. How to fix HP Color LaserJet 2600n Fading Color: 6 단계, 이미지 1/2 How to fix HP Color LaserJet 2600n Fading Color: 6 단계, 이미지 2/2
    • Lift and remove the left base cover

    • If it feels like something is holding the cover in place, there probably is. Go back and look for additional tabs, as I may have missed listing some of them. This applies to any item removal in this guide.

  7. How to fix HP Color LaserJet 2600n Fading Color: 7 단계, 이미지 1/1
    • Release the tab fasteners on the left side cover

  8. How to fix HP Color LaserJet 2600n Fading Color: 8 단계, 이미지 1/3 How to fix HP Color LaserJet 2600n Fading Color: 8 단계, 이미지 2/3 How to fix HP Color LaserJet 2600n Fading Color: 8 단계, 이미지 3/3
    • Lift and remove the left cover

    • If it feels like something is holding the cover in place, there probably is.

    • When reassembling, you have to mate the three noted tabs/slots, even though they do not snap in place.

  9. How to fix HP Color LaserJet 2600n Fading Color: 9 단계, 이미지 1/1
    • Rotate the device so it rests on its back.

    • Unscrew and remove the two Phillips M3 screws as indicated from the right side covers.

    • Most of the screws in this printer are identical - the ones that are different will be noted as such.

  10. How to fix HP Color LaserJet 2600n Fading Color: 10 단계, 이미지 1/3 How to fix HP Color LaserJet 2600n Fading Color: 10 단계, 이미지 2/3 How to fix HP Color LaserJet 2600n Fading Color: 10 단계, 이미지 3/3
    • Release tabs on the right base cover and right cover.

    • Some of these tabs are inside the printer, so you will need to open the door and look along the right side.

  11. How to fix HP Color LaserJet 2600n Fading Color: 11 단계, 이미지 1/3 How to fix HP Color LaserJet 2600n Fading Color: 11 단계, 이미지 2/3 How to fix HP Color LaserJet 2600n Fading Color: 11 단계, 이미지 3/3
    • Remove the right base cover and right cover from the printer.

    • If it feels like something is holding the cover in place, there probably is.

    • When reassembling, you have to mate the three noted tabs/slots, even though they do not snap in place.

  12. How to fix HP Color LaserJet 2600n Fading Color: 12 단계, 이미지 1/1
    • Place the device right side up once again.

    • Remove the nine indicated Phillips M3 screws from the back plate.

  13. How to fix HP Color LaserJet 2600n Fading Color: 13 단계, 이미지 1/2 How to fix HP Color LaserJet 2600n Fading Color: 13 단계, 이미지 2/2
    • With the screws removed, lift the back cover from the bottom and remove from the printer.

  14. How to fix HP Color LaserJet 2600n Fading Color: 14 단계, 이미지 1/1
    • During the next two steps, do not unplug any of the connections in the example boxed in orange.

  15. How to fix HP Color LaserJet 2600n Fading Color: 15 단계, 이미지 1/2 How to fix HP Color LaserJet 2600n Fading Color: 15 단계, 이미지 2/2
    • Carefully and gently handle the wires and cables in the printer. They may break or bend, rendering your printer inoperable.

    • Remove the ribbon cable by pulling directly along the cable.

    • Remove the white connector by pressing down on the tab and pulling out.

    • Pull the purple wire connectors directly out. You do not need to mark which cable goes where, as they are all unique sizes.

    • Remove the white connector by pressing down on the tab and pulling out.

  16. How to fix HP Color LaserJet 2600n Fading Color: 16 단계, 이미지 1/2 How to fix HP Color LaserJet 2600n Fading Color: 16 단계, 이미지 2/2
    • Remove the four ribbon cables gently from the right edge of the circuit board assembly.

    • Remove the final two wires by pulling them straight out.

  17. How to fix HP Color LaserJet 2600n Fading Color: 17 단계, 이미지 1/1
    • Unwind the cables from the black harness on the top and right edges of the circuit board assembly.

  18. How to fix HP Color LaserJet 2600n Fading Color: 18 단계, 이미지 1/1
    • Depress the indicated tabs and remove the corner wiring harness from the circuit board assembly.

  19. How to fix HP Color LaserJet 2600n Fading Color: 19 단계, 이미지 1/2 How to fix HP Color LaserJet 2600n Fading Color: 19 단계, 이미지 2/2
    • Slide the top wiring harness to the left and remove it from the circuit board assembly.

  20. How to fix HP Color LaserJet 2600n Fading Color: 20 단계, 이미지 1/1
    • Remove the eleven indicated Phillips M3 screws from the circuit board assembly.

  21. How to fix HP Color LaserJet 2600n Fading Color: 21 단계, 이미지 1/2 How to fix HP Color LaserJet 2600n Fading Color: 21 단계, 이미지 2/2
    • Remove the circuit board assembly from the printer, being cautious of the wires and cables,

  22. How to fix HP Color LaserJet 2600n Fading Color: 22 단계, 이미지 1/1
    • Remove the two ribbon cables gently from the optical sub-assembly.

    • These ribbon cables are hard to replace. If you are having trouble, try asking someone with smaller hands! Be gentle, ribbon cables are not the most robust connectors.

  23. How to fix HP Color LaserJet 2600n Fading Color: 23 단계, 이미지 1/1
    • Tilt the printer forward and remove the Phillips screw with a lock-washer from the bottom area of the printer.

    • The lock-washer is attached to the screw, so you do not need to worry about losing it.

  24. How to fix HP Color LaserJet 2600n Fading Color: 24 단계, 이미지 1/2 How to fix HP Color LaserJet 2600n Fading Color: 24 단계, 이미지 2/2
    • Set the printer back down and remove two more Phillips screws with integrated lock-washers, which releases the optical sub-assembly.

    • Remove the optical sub-assembly, this is what you need to repair.

  25. How to fix HP Color LaserJet 2600n Fading Color: 25 단계, 이미지 1/2 How to fix HP Color LaserJet 2600n Fading Color: 25 단계, 이미지 2/2
    • Place the optical sub-assembly with the side that was facing you down.

    • Remove the indicated black screw.

    • Unhook and save the indicated spring.

    • Remove the top plate from the optical sub-assembly.

  26. How to fix HP Color LaserJet 2600n Fading Color: 26 단계, 이미지 1/3 How to fix HP Color LaserJet 2600n Fading Color: 26 단계, 이미지 2/3 How to fix HP Color LaserJet 2600n Fading Color: 26 단계, 이미지 3/3
    • These are lenses, mirrors, and sensors used by the printer to determine how it is printing. Any damage will affect the quality of printing.

    • Using a clean cotton swab or lens brush, GENTLY clean the visible sides of every clear or reflective surface you can find.

    • Do not scratch or rub the optics, use a brushing motion instead.

    • For more details on what you are doing and why, refer to the document mentioned in the introduction.

  27. How to fix HP Color LaserJet 2600n Fading Color: 27 단계, 이미지 1/1
    • Finish with a light blast of compressed air on all of the surfaces you cleaned.

    • Your printer should now be fully functional! Except for the part where it is disassembled.

    • To reassemble your device, repeat these steps in reverse order.

결론

To reassemble your device, follow these instructions in reverse order.

다른 30명이 해당 안내서를 완성하였습니다.

Jay Miley

회원 가입일: 04/22/14

5,042 평판

안내서 13개 작성하였습니다

Cal Poly, Team 10-55, Amido Spring 2014 Cal Poly, Team 10-55, Amido Spring 2014 회원

CPSU-AMIDO-S14S10G55

4 회원들

안내서 31개 작성하였습니다

댓글 33개

Takes 2-3 hours to disassemble and reassemble for a first timer but it worked really well!

And in the end all it cost me was my time.

Many thanks!

Jon Rousseau - 답글

Thank you very much for sharing your knowledge with this guide.

Since I had the machine apart I took the time to clean every area I could get to that is within the paper path.

It took me 6 hrs. to complete the job; but it did not work.

The printer indicated an Error Code 51.21.

So I did the job over again.

I had been fooled by the two ribbons that connect to the optical sub-assembly that by design rub up against the right side of the box, even when disconnected.

My second servicing took me about three hours.

Thank you.

I have a normal working color printer again, and did not have to buy saved the cost of parts and labor by using your guide for restoration.

John Knapp - 답글

Hi there - In step # 23, am I missing the right screw or is there really just one Phillips screw with a lock-washer?

R. Douleh - 답글

R. Douleh- the manufacturer did not put a screw on the right side for some reason.

sdelong25 - 답글

This really is, without doubt, the best set of do-it-yourself instructions I have seen in my 45+ years working in the IT industry.

I didn't see any dust in the area to be cleaned, so I am a little mystified as to what the cause was. I got the missing magenta colour working but despite running the process twice I could not get yellow to work properly. I only use it for printing letters and spreadsheets, so I can live without that.

Thanks again

Paul Roussell - 답글

댓글 쓰기

조회 통계:

24 시간 전: 1

7일 전: 17

30일 전: 109

전체 시간: 30,579