주요 콘텐츠로 건너뛰기

How to mend a hitch in an almost invisible way

필요한 것

  1. How to mend a hitch in an almost invisible way, How to mend a hitch in an almost invisible way: 1 단계, 이미지 2개 중 1개 How to mend a hitch in an almost invisible way, How to mend a hitch in an almost invisible way: 1 단계, 이미지 2개 중 2개
    • To mend a hitch, you only need a few accessories: thermo-sticky cloth, an iron, wire, a needle, a pair of scissors and ... a little patience!

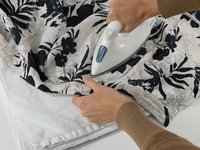
    • It is better to wash the piece of clothing first. Thus, the glue will adhere better to the fabric.

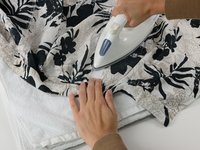
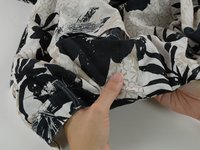
    • Iron the hole to flatten the edges and cut any excess wires to get clean, sharp edges.

  2. How to mend a hitch in an almost invisible way: 2 단계, 이미지 2개 중 1개 How to mend a hitch in an almost invisible way: 2 단계, 이미지 2개 중 2개
    • Cut the thermo-adhesive fabric to the correct size. The piece should be slightly larger than the hitch.

    • Round off the corners as sharp angles may cause the patch to peal off more easily.

  3. How to mend a hitch in an almost invisible way: 3 단계, 이미지 2개 중 1개 How to mend a hitch in an almost invisible way: 3 단계, 이미지 2개 중 2개
    • Lay the canvas side glue (this is the brightest side) on the wrong side of the fabric.

    • Secure it with the iron by pressing firmly on the iron and making it move back and forth and rotate.

    • Read carefully the garment label and the instructions for use of the thermo-adhesive fabric. Follow the instructions for iron temperature and ironing time. Otherwise you risk burning the fabric and / or the thermo-adhesive fabric.

  4. How to mend a hitch in an almost invisible way: 4 단계, 이미지 3개 중 1개 How to mend a hitch in an almost invisible way: 4 단계, 이미지 3개 중 2개 How to mend a hitch in an almost invisible way: 4 단계, 이미지 3개 중 3개
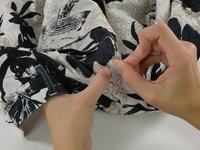
    • The canvas is now glued, but to make sure it does not peel off after a few washes, it is better to sew the edge to the fabric.

    • Choose a colored thread close to that of the fabric so that the seam is seen as little as possible.

    • Thread the thread on a needle and tie a knot at the end.

    • Starting from the wrong side of the fabric (so that the knot does not appear), sew the needle on both sides of the fabric along the edge of the piece of fabric.

    • I prefer to work here on the place of the fabric to better control the visibility of the points.

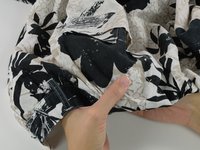
    • Once arrived at the end, make a knot again and cut the excess thread. There you go ! We see almost nothing!

    • Who has a sewing machine, can obviously use it during this stage. But it's just as easy to hand :)

결론

Admire your work and put on your favorite skirt / pants / shirt / tee shirt!

다른 3명이 해당 안내서를 완성하였습니다.

다음 번역가들에게 특별히 감사 드립니다:

fr en

100%

이 번역인들은 저희가 세상을 수리하는 데 도움을 주고 있어요! 기여하시겠습니까?
번역 시작하기 ›

Claire Miesch

회원 가입일: 10/25/16

175,772 평판

안내서 1개를 작성함

iFixit EU Team iFixit EU Team 회원

Staff

37 회원들

안내서 1,205개를 작성함

0가이드 댓글

댓글 쓰기

조회 통계:

지난 24시간: 10

지난 7일: 91

지난 30일: 532

전체 시간: 70,268