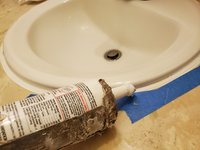
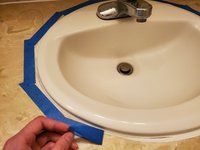
주요 콘텐츠로 건너뛰기

How to re-caulk a bathroom sink

필요한 것

  1. How to re-caulk a bathroom sink, Caulk seal: 1 단계, 이미지 1/1
    • Clean and dry around the rim of the sink with a paper towel.

    • Make sure the old caulk is completely dry before moving on.

  2. How to re-caulk a bathroom sink: 2 단계, 이미지 1/1
    • Remove the old caulk around the rim of the sink with a utility knife.

  3. How to re-caulk a bathroom sink: 3 단계, 이미지 1/1
    • Remove any old caulk residue around the rim of the sink with a wet paper towel.

    • Then dry the area completely.

    • Ensure the area is completely clean and dry before applying the new caulk.

  4. How to re-caulk a bathroom sink: 4 단계, 이미지 1/3 How to re-caulk a bathroom sink: 4 단계, 이미지 2/3 How to re-caulk a bathroom sink: 4 단계, 이미지 3/3
    • Apply painter's tape around the rim of the sink while leaving a small gap for caulk to be applied.

  5. How to re-caulk a bathroom sink: 5 단계, 이미지 1/2 How to re-caulk a bathroom sink: 5 단계, 이미지 2/2
    • Place the caulk tube into the gun.

    • Slowly press the trigger to release a thin line of caulk and move around the edge of the sink as you go.

  6. How to re-caulk a bathroom sink: 6 단계, 이미지 1/3 How to re-caulk a bathroom sink: 6 단계, 이미지 2/3 How to re-caulk a bathroom sink: 6 단계, 이미지 3/3
    • Smooth out the caulk against the edge of the rim and counter with your wet index finger.

    • Keep a rag nearby to wipe excess caulk from your finger periodically.

    • Press against the caulk firmly while sliding your index finger as you go around the rim of the sink.

  7. How to re-caulk a bathroom sink: 7 단계, 이미지 1/3 How to re-caulk a bathroom sink: 7 단계, 이미지 2/3 How to re-caulk a bathroom sink: 7 단계, 이미지 3/3
    • Pull the tape away from the counter immediately after applying the caulk.

    • Pulling away from the counter will help keep the caulk in a straight line.

  8. How to re-caulk a bathroom sink: 8 단계, 이미지 1/1
    • Wipe off any excess caulk from the edge of the rim with a wet paper towel.

  9. How to re-caulk a bathroom sink: 9 단계, 이미지 1/1
    • Let the new caulk dry for at least a day before using the sink.

결승점

다른 한 분이 해당 안내서를 완성하였습니다.

Thi Nguyen

회원 가입일: 04/29/20

201 평판

안내서 1개 작성함

UW Tacoma, Team S1-G43, Cardinal Spring 2020 UW Tacoma, Team S1-G43, Cardinal Spring 2020 회원

UWT-CARDINAL-S20S1G43

1 회원

안내서 3개 작성하였습니다

댓글 0개

댓글 쓰기

조회 통계:

24 시간 전: 7

7일 전: 27

30일 전: 194

전체 시간: 4,644