소개
Aldi sells these Keurig-type coffeemakers for about $29. After running ours for 4 months, it suddenly starting dispensing a quarter cup of coffee in dribbles. Descaling with vinegar was no help. It was time for a teardown.
필요한 것
-
-
First, unplug the unit and dump out all the water. Find a hospitable teardown area, and suitable storage for screws and parts.
-
-
-
Remove the two screws that hold the back end of the top cover. Unsnap the front of the cover with a spudger or screwdriver. Note the two underneath which help hold the back shell on.
-
-
-
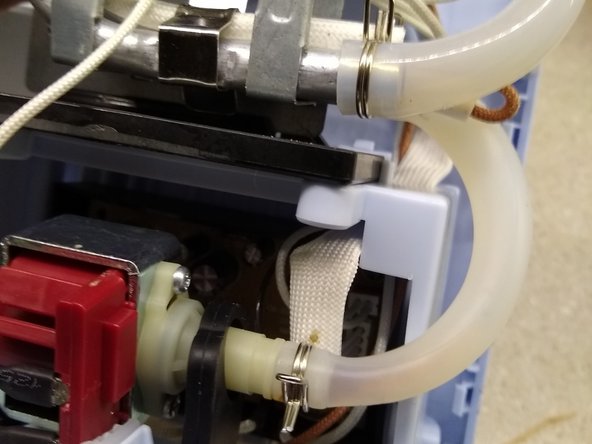
In the center you see the dispenser that punctures your K cup, The output pipe comes into the end of this from the heater (removed here). Reach in with pliers and squeeze the hose clamp ends to release it, and slide it down so you can pull the hose off the hose barb on the head. The switch on the bottom right closes when the lever is down.
-
-
-
The top end of this pipe is right at the dispenser head right angle bend. Clogs are likely here. If you are very lucky, you can get them out from the head end without tearing apart the rest of the unit. Plug it in and expansion of the hot water may pump it out. You can slip a hose over it or just dump it into the bottom of the dispenser head.
-
If this works, just reattach the hose and put the cover and 2 screws back in, and you've earned a cup of coffee. If you are unsuccessful, continue with disassembly. The bracket with the two holes doesn't attach to anything.
-
-
-
-
Working on the pump or internal pipes is impossible without removing the back shell, as seen here.
-
-
-
Remove the 5 screws (shown loose here) that attach the outside shell to the bottom. Remove the two at the top which were under the top cover.
-
-
-
Use a spudger or screwdriver to pry the back shell off of the front. the back shell presses inward at the catches to release them.
-
-
-
Check all the piping for clogs or contaminants. Release the hose clamps and pull the pipes off if needed.
-
-
-
Clean out the inlet pipe adapter if needed, by releasing the clamp. This item serves no apparent purpose, but could clog up, rendering the device inoperative. Perhaps it is a Planned Obsolescence Filter.
-
-
-
the wires at top are the thermostat for the heater. The bottom, black/white wires are a thermal overload which blows if the heater gets way too hot. This is a common failure item and are replaceable. Be sure the thermostat works first. The spring in the output pipe keeps the pipe from kinking, and just falls out if you remove the pipe.
-
-
-
This filters out stray coffee grounds and other large debris. Unscrew the two screws and clean it out if necessary. You can also just clean it with a small brush without removing it, the dirt will be on the outside. Rinse out the debris and dump it.
-
-
-
There are two timers which simply adjust the pump time for different volumes of coffee. If flow is restricted, volume delivered will be greatly reduced. There are no other complicated level sensors like other coffeemakers.
-
-
-
Reassembly is a backwards disassemble. It's easiest to attach the inlet pipe to the pump as shown here, then reattach the top of the pipe up to the reservoir.
-


To reassemble your device, follow these instructions in reverse order.
To reassemble your device, follow these instructions in reverse order.
