주요 콘텐츠로 건너뛰기

Huawei Ascend P6-U06 Motherboard Replacement

필요한 것

  1. Huawei Ascend P6-U06 Motherboard Replacement, SIM  Card: 1 단계, 이미지 1/2 Huawei Ascend P6-U06 Motherboard Replacement, SIM  Card: 1 단계, 이미지 2/2
    • Pull and twist the pin near the bottom left-side of the phone to remove it from the headphone jack.

  2. Huawei Ascend P6-U06 Motherboard Replacement: 2 단계, 이미지 1/2 Huawei Ascend P6-U06 Motherboard Replacement: 2 단계, 이미지 2/2
    • Insert the pin into the SIM card opening located on the right-side of the phone.

    • Gently push in until the SIM card clicks, and then pull the pin and SIM card out.

    • Repeat this process for the additional SIM card.

  3. Huawei Ascend P6-U06 Motherboard Replacement, Back Panel: 3 단계, 이미지 1/2 Huawei Ascend P6-U06 Motherboard Replacement, Back Panel: 3 단계, 이미지 2/2
    • Firmly push down on the black plastic covering at the bottom of the phone, and pull down.

    • You may need a sharp thin object to get underneath the plastic.

  4. Huawei Ascend P6-U06 Motherboard Replacement: 4 단계, 이미지 1/2 Huawei Ascend P6-U06 Motherboard Replacement: 4 단계, 이미지 2/2
    • Rotate the phone 180 degrees so that the bottom of the phone is now facing up.

    • Firmly push up on the back panel with your thumbs.

    • Lift up the back panel from the top right corner and gently pull it away from the phone.

  5. Huawei Ascend P6-U06 Motherboard Replacement, Battery: 5 단계, 이미지 1/3 Huawei Ascend P6-U06 Motherboard Replacement, Battery: 5 단계, 이미지 2/3 Huawei Ascend P6-U06 Motherboard Replacement, Battery: 5 단계, 이미지 3/3
    • Remove the following screws securing the logic board to the main frame:

    • Five 2mm Phillips #000 screws

    • Two 2.5mm Phillips #000 screws

  6. Huawei Ascend P6-U06 Motherboard Replacement: 6 단계, 이미지 1/2 Huawei Ascend P6-U06 Motherboard Replacement: 6 단계, 이미지 2/2
    • Push down the yellow plastic lining at the top of the battery and remove the two 2.5mm Phillips #000 screws.

  7. Huawei Ascend P6-U06 Motherboard Replacement: 7 단계, 이미지 1/3 Huawei Ascend P6-U06 Motherboard Replacement: 7 단계, 이미지 2/3 Huawei Ascend P6-U06 Motherboard Replacement: 7 단계, 이미지 3/3
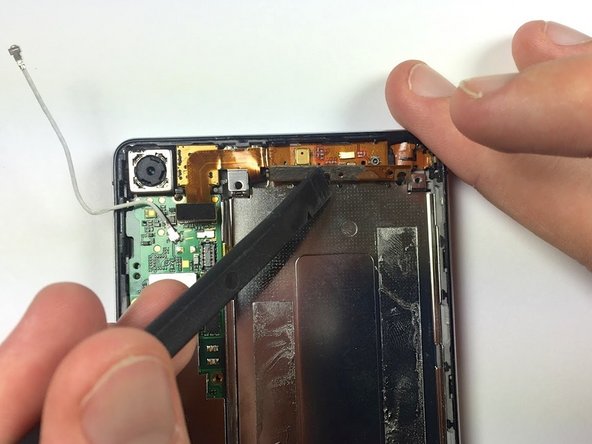
    • Use the flat end of a spudger to gently snap open the first clip located on the the right arm of the retaining plate.

    • Use the flat end of a spudger to gently snap the second clip located on the left arm of the retaining plate.

    • Use the flat end of a spudger to gently lift the upper retaining plate from the phone.

  8. Huawei Ascend P6-U06 Motherboard Replacement: 8 단계, 이미지 1/3 Huawei Ascend P6-U06 Motherboard Replacement: 8 단계, 이미지 2/3 Huawei Ascend P6-U06 Motherboard Replacement: 8 단계, 이미지 3/3
    • Use the pointy end of a spudger to pry the antenna connector off of its socket.

    • Upon reassembly, you will hear a "click" that indicates the pin has been properly reconnected.

  9. Huawei Ascend P6-U06 Motherboard Replacement: 9 단계, 이미지 1/3 Huawei Ascend P6-U06 Motherboard Replacement: 9 단계, 이미지 2/3 Huawei Ascend P6-U06 Motherboard Replacement: 9 단계, 이미지 3/3
    • Use the pointy end of a spudger to gently pry the following connectors out of their sockets:

    • silver LCD cable connector

    • silver Headphone jack cable connector

  10. Huawei Ascend P6-U06 Motherboard Replacement: 10 단계, 이미지 1/3 Huawei Ascend P6-U06 Motherboard Replacement: 10 단계, 이미지 2/3 Huawei Ascend P6-U06 Motherboard Replacement: 10 단계, 이미지 3/3
    • Use the pointy end of a spudger to gently pry the following connectors out of their sockets.

    • Sliver Micro-USB cable connector

    • Copper battery cable connector

  11. Huawei Ascend P6-U06 Motherboard Replacement: 11 단계, 이미지 1/2 Huawei Ascend P6-U06 Motherboard Replacement: 11 단계, 이미지 2/2
    • Be careful not to bend, puncture, or crush the battery, even if it is being replaced. The battery can potentially release toxic and flammable chemicals.

    • Use a plastic opening tool to gently lift up the battery from the bottom end.

    • You may need to loosen the adhesive under the battery with slow sawing motions.

  12. Huawei Ascend P6-U06 Motherboard Replacement, Micro-USB Flex Cable: 12 단계, 이미지 1/2 Huawei Ascend P6-U06 Motherboard Replacement, Micro-USB Flex Cable: 12 단계, 이미지 2/2
    • Remove the two 2mm Phillips #000 screws securing the copper flex cable to the silver metal tab.

    • The screw on the left has white paint on the top. Chipping the paint will void any warranty you have for your phone.

  13. Huawei Ascend P6-U06 Motherboard Replacement: 13 단계, 이미지 1/3 Huawei Ascend P6-U06 Motherboard Replacement: 13 단계, 이미지 2/3 Huawei Ascend P6-U06 Motherboard Replacement: 13 단계, 이미지 3/3
    • Wedge the flat end of a spudger underneath the bottom left of the metal tab.

    • Run the spudger along the bottom edge of the metal tab and gently pry upward.

    • Adhesive under the metal tab will make lifting the tab slightly tedious. The adhesive will come off as long as you gently run the spudger along the bottom of the tab.

  14. Huawei Ascend P6-U06 Motherboard Replacement: 14 단계, 이미지 1/1
    • Gently lift the flex cable from the top-right corner.

    • Do not use excessive force when removing the flex cable. Doing so may tear the cable.

  15. Huawei Ascend P6-U06 Motherboard Replacement: 15 단계, 이미지 1/3 Huawei Ascend P6-U06 Motherboard Replacement: 15 단계, 이미지 2/3 Huawei Ascend P6-U06 Motherboard Replacement: 15 단계, 이미지 3/3
    • Use tweezers to lift the rubber alignment tab out of its frame.

  16. Huawei Ascend P6-U06 Motherboard Replacement, Motherboard: 16 단계, 이미지 1/1
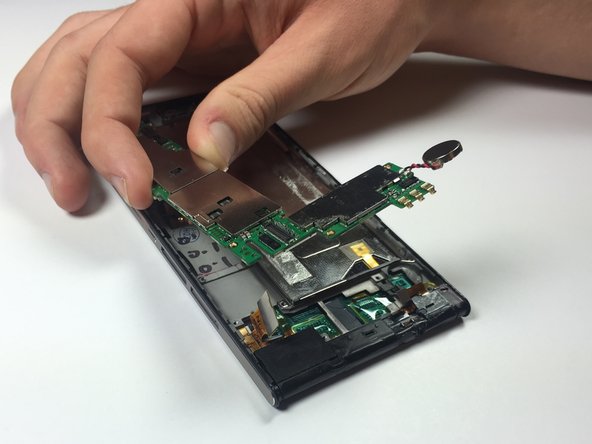
    • Use the pointy end of a spudger to wedge underneath the black circular vibrator motor near the bottom right of the phone.

    • Slowly lift up to separate the black circular vibrator motor from the adhesive.

    • The vibrator motor will remain connected to the motherboard by two red and black wires.

    • Be careful not to tear the red and black wires. If damaged, they will require soldering.

  17. Huawei Ascend P6-U06 Motherboard Replacement: 17 단계, 이미지 1/2 Huawei Ascend P6-U06 Motherboard Replacement: 17 단계, 이미지 2/2
    • Hold down the bottom left corner of the motherboard and slowly lift the right side out of the main frame.

    • Gently wiggle the logic board to release it from the phone.

결론

To reassemble your device, follow these instructions in reverse order.

다른 15명이 해당 안내서를 완성하였습니다.

Victor Munoz

회원 가입일: 10/14/14

295 평판

안내서 1개 작성함

Cal Poly, Team 4-44, Amido Fall 2014 Cal Poly, Team 4-44, Amido Fall 2014 회원

CPSU-AMIDO-F14S4G44

5 회원들

안내서 11개 작성하였습니다

댓글 6개

Hi, I need the mother board from where can I get it ??

Dost Muhammad Shah - 답글

Thanks Great post !!!

Angel Rivas - 답글

emmc probleme

mm - 답글

Amigo en que parte de la placa esta el wifi y bluetooth, gracias

Jean Jumbo - 답글

Friends in that part of the plate is wifi and bluetooth, thank you, have the problem that when I try to turn the wifi or bluetooth light does not help please

Jean Jumbo - 답글

댓글 쓰기

조회 통계:

24 시간 전: 0

7일 전: 1

30일 전: 7

전체 시간: 13,290