이 번역은 기계에 의해 생성된 것이며, 아직 사람이 검토하지 않았습니다. 이 언어를 아세요? 리뷰 보기.

Huawei P8 배터리 교체

최종 수정일 2026년 8월 3일
조회수: 4.2만
통계 보기:
- 지난 24시간
- 9
- 지난 7일:
- 35
- 지난 30일:
- 148
- 전체 시간:
- 42,068
댓글: 13
4 comments on steps, 9 guide comments.
Go to guide comments완료함: 18 19
18명이 이 안내서를 "완료"로 표시했습니다. 다음은 귀하의 차례입니까?
19명이 이 안내서를 "완료"로 표시했습니다. 귀하를 포함해서요 — 수고하셨어요!
즐겨찾기: 3 4
3명이 이 가이드를 즐겨찾기 (및 구독) 했습니다. 다음은 귀하의 차례입니까?
4명이 이 가이드를 즐겨찾기 (및 구독) 했습니다 — 귀하를 포함해서요!
추천 가이드
해당 안내서는 iFixit 직원들이 뛰어난 안내서로 판명하였습니다.
소개
1단계로 이동하기 ↓이 안내서를 사용하여 Huawei P8 스마트폰의 배터리를 교체하세요.
필요한 것


-
-
-
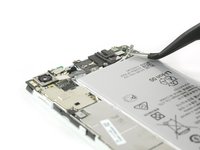
집게를 사용하여 디스플레이와 배터리 커넥터를 덮고 있는 브래킷을 제거하세요.
-
스퍼저를 사용하여 배터리 커넥터를 뽑으세요.
-
전면 카메라의 커넥터를 덮고 있는 브래킷을 제거하세요.
-
-
-
-
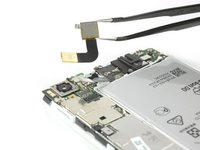
스피커의 플렉스 케이블을 조심스럽게 들어 올려 분리하세요.
-
케이블을 분리하기 어렵다면 iOpener나 열선총을 사용하여 스피커 어셈블리에 열을 가하세요.
-
스퍼저를 사용하여 스피커 어셈블리를 들어 올려 제거하세요.
-


 FixBot에 문의하기






기기를 재조립하려면 이 지침을 역순으로 따르세요.
다른 18명이 해당 안내서를 완성하였습니다.

팀

9가이드 댓글
Really helpful guide. Only hiccup was that on my handset the screws holding the casing together (Step 2) were Torx 2 rather than pentalobe, possibly a regional variation. I opted not to remove the loudspeaker (Step 10) as the ribbon cable was firmly stuck down and I worried it would break. This meant I could only cleanly remove the adhesive pad in line with the charging port. I was able to prise out the battery using spudger and screwdriver to scrape the other pad from the phone body. All now reassembled and working properly!
Ben Raphael - 답글 공유
Overall a very helpful guide . I also had torx screws in mine . The torx screws are tiny , so make sure you have the right screwdriver before starting . We didn’t bother removing the loudspeader assembly either (Step 10) . You can just prise up the ribbon cable (carefully) . Add heat if necessary . Now to the biggest problem . Removing the old battery from the phone . What a nightmare ! It’s really stuck down .We took our time using a hairdryer (no heat gun) , and a flat head screwdriver , and went from one end to the other prising it off gently . It still took about 20 minutes . Saying that . Don’t rush it , as it’s the final stage . Also . If you do use a flat head screwdriver then don’t twist it , as you might damage the casing . Just slide it underneath it applying heat . Total time to remove the old battery was 90 minutes , but about 50 of those were spent just getting the first 2 screws out . 20 minutes to put the new battery in and reassemble . Make sure all flex connectors are properly reseated .
My P8 battery has completely died on me. I cannot believe that to replace a battery, we have to now go to these lengths to do it. There must be a mountain of mobile phones, where the only issue with them is a flat battery. Surely, this cannot be allowed to continue. I know why the manufacturers want to make it hard to simply replace a battery, because it sells more mobile phones. But think of all that wasted technology, where a phone may have lasted just over a 24 month contract before the battery is done.
joeninetee - 답글 공유
Many thanks for this tutorial. Together we shall beat them!
joeninetee - 답글 공유
Thank you for a very nice and easy to follow tutorial!
I have now replaced my battery with what should be an original battery for the Huawei Ascend P8, battery nr: HB3447A9EBW. For some reason the width of the new battery is a few millimeters smaller than the old one, meaning that it does not fill out the space completely. Has anyone else experienced the same?
After having assembled the phone again I experience some weird issues with the battery level dropping from 50%, 60%, 70% or even 100% in an instant. I have tried calibrating the battery by, letting it die completely, recharge it to 100% let it drain completely again and recharge. I have tried different battery calibration apps and a factory reset - nothing helps.
I contacted the company I bought the battery from and got a replacement - still same issue.
Unfortunately i damaged the original battery when taking it out, so i cant use that as a reference.
Any suggestions would be most appreciated!
