주요 콘텐츠로 건너뛰기

Huawei P9 Plus Rear Case Replacement

필요한 것

  1. Huawei P9 Plus Rear Case Replacement, Rear Case: 1 단계, 이미지 1/2 Huawei P9 Plus Rear Case Replacement, Rear Case: 1 단계, 이미지 2/2
    • First switch off your phone.

    • Remove the SD and SIM card tray.

  2. Huawei P9 Plus Rear Case Replacement: 2 단계, 이미지 1/1
    • Remove the two P2 Pentalobe screws on either side of the USB C port.

  3. Huawei P9 Plus Rear Case Replacement: 3 단계, 이미지 1/2 Huawei P9 Plus Rear Case Replacement: 3 단계, 이미지 2/2
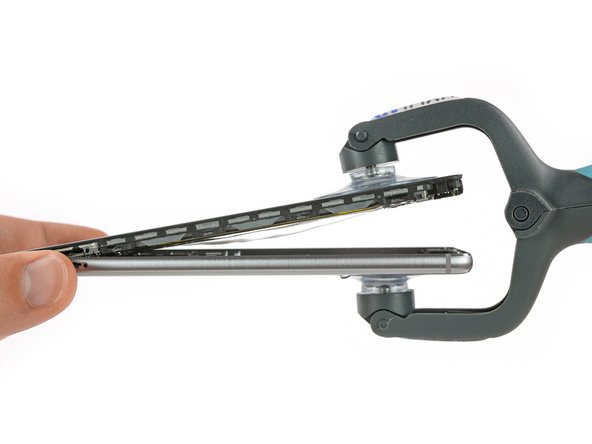
    • Use an iSclack or a suction handle to separate the display unit from the rear case.

    • Do not fully separate the pieces as they are still connected by the fingerprint sensor cable.

  4. Huawei P9 Plus Rear Case Replacement: 4 단계, 이미지 1/3 Huawei P9 Plus Rear Case Replacement: 4 단계, 이미지 2/3 Huawei P9 Plus Rear Case Replacement: 4 단계, 이미지 3/3
    • After separating the rear case flip the other half open to get to the flex connectors.

    • With a spudger unplug the flex connector of the fingerprint sensor and the one of the side buttons.

    • Remove the rear case.

결론

To reassemble your device, follow these instructions in reverse order.

다른 2명이 해당 안내서를 완성하였습니다.

Dominik Schnabelrauch

회원 가입일: 11/23/16

203,299 평판

안내서 682개 작성하였습니다

iFixit iFixit 회원

Staff

135 회원들

안내서 16,817개 작성하였습니다

댓글 0개

댓글 쓰기

조회 통계:

24 시간 전: 0

7일 전: 3

30일 전: 5

전체 시간: 1,995