주요 콘텐츠로 건너뛰기

Huawei Y7 2018 (LDN-L21) Display Assembly with Frame Replacement

필요한 것

동영상 개요

  1. Huawei Y7 2018 (LDN-L21) Display Assembly with Frame Replacement, Switch off the device: 1 단계, 이미지 1/3 Huawei Y7 2018 (LDN-L21) Display Assembly with Frame Replacement, Switch off the device: 1 단계, 이미지 2/3 Huawei Y7 2018 (LDN-L21) Display Assembly with Frame Replacement, Switch off the device: 1 단계, 이미지 3/3
    • Turn off the device

    • Remove the sim tray

  2. Huawei Y7 2018 (LDN-L21) Display Assembly with Frame Replacement, Back Cover: 2 단계, 이미지 1/3 Huawei Y7 2018 (LDN-L21) Display Assembly with Frame Replacement, Back Cover: 2 단계, 이미지 2/3 Huawei Y7 2018 (LDN-L21) Display Assembly with Frame Replacement, Back Cover: 2 단계, 이미지 3/3
    • Use Plastic tool to separate the back cover

    • With a Phillips screwdriver remove two black screws and the battery flex connector shield

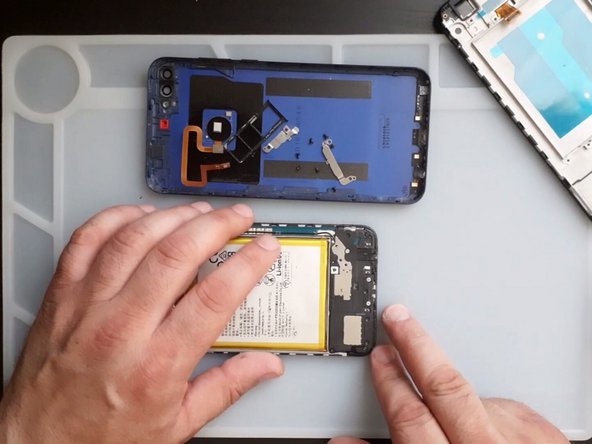
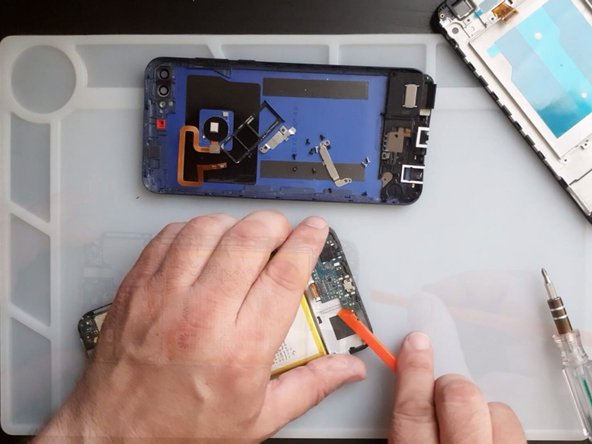
    • Disconnect the battery and the finger print sensor flex cable

  3. Huawei Y7 2018 (LDN-L21) Display Assembly with Frame Replacement, Logic Board Removal Part 1: 3 단계, 이미지 1/3 Huawei Y7 2018 (LDN-L21) Display Assembly with Frame Replacement, Logic Board Removal Part 1: 3 단계, 이미지 2/3 Huawei Y7 2018 (LDN-L21) Display Assembly with Frame Replacement, Logic Board Removal Part 1: 3 단계, 이미지 3/3
    • Remove all screws from the top of the logic board

    • Remove the shield covering the camera connectors

    • Remove the screws and the plastic cover at the bottom of the device

    • Be careful! Different colored screws have different size

  4. Huawei Y7 2018 (LDN-L21) Display Assembly with Frame Replacement, Logic Board Removal - Part 2: 4 단계, 이미지 1/3 Huawei Y7 2018 (LDN-L21) Display Assembly with Frame Replacement, Logic Board Removal - Part 2: 4 단계, 이미지 2/3 Huawei Y7 2018 (LDN-L21) Display Assembly with Frame Replacement, Logic Board Removal - Part 2: 4 단계, 이미지 3/3
    • Disconnect the Screen Flex cable

    • Remove the logic board

    • Note that at the bottom side of board is attached to the display with double-sided tape

  5. Huawei Y7 2018 (LDN-L21) Display Assembly with Frame Replacement: 5 단계, 이미지 1/3 Huawei Y7 2018 (LDN-L21) Display Assembly with Frame Replacement: 5 단계, 이미지 2/3 Huawei Y7 2018 (LDN-L21) Display Assembly with Frame Replacement: 5 단계, 이미지 3/3
    • Now you have to transfer:

    • Receiver

    • Proximity sensor

    • Volume buttons flex

    • Vibration

    • Battery

결론

To reassemble your device, follow these instructions in reverse order.

다른 11명이 해당 안내서를 완성하였습니다.

ZFix

회원 가입일: 12/09/13

191,647 평판

안내서 330개 작성하였습니다

Master Techs Master Techs 회원

Community

321 회원들

안내서 1,498개 작성하였습니다

댓글 한 개

Can i get video guide

filmon - 답글

댓글 쓰기

조회 통계:

24 시간 전: 5

7일 전: 20

30일 전: 91

전체 시간: 6,697