주요 콘텐츠로 건너뛰기

IBM ThinkPad A31 Keyboard Replacement

필요한 것

  1. IBM ThinkPad A31 Keyboard Replacement, Battery: 1 단계, 이미지 1/2 IBM ThinkPad A31 Keyboard Replacement, Battery: 1 단계, 이미지 2/2
    • Flip the ThinkPad over so that it is upside down.

    • Push latch switch to the left.

    • Gently lift the battery out and away from the ThinkPad

    • You have to hold the latch to the left while you remove the battery. Simply pushing once will not unlock the battery

  2. IBM ThinkPad A31 Keyboard Replacement, Keyboard: 2 단계, 이미지 1/3 IBM ThinkPad A31 Keyboard Replacement, Keyboard: 2 단계, 이미지 2/3 IBM ThinkPad A31 Keyboard Replacement, Keyboard: 2 단계, 이미지 3/3
    • The sticker is to keep the warranty on the laptop so once removed the warranty is void

    • Peel the sticker and remove the 15mm screw

    • Remove all 6 of the 16mm screws

  3. IBM ThinkPad A31 Keyboard Replacement: 3 단계, 이미지 1/2 IBM ThinkPad A31 Keyboard Replacement: 3 단계, 이미지 2/2
    • use a prying tool and insert it on the cracks on the sides of the keyboard and lift gently until you here a click

    • repeat this step on all sides of the keyboard until the keyboard is completely detached from the laptop

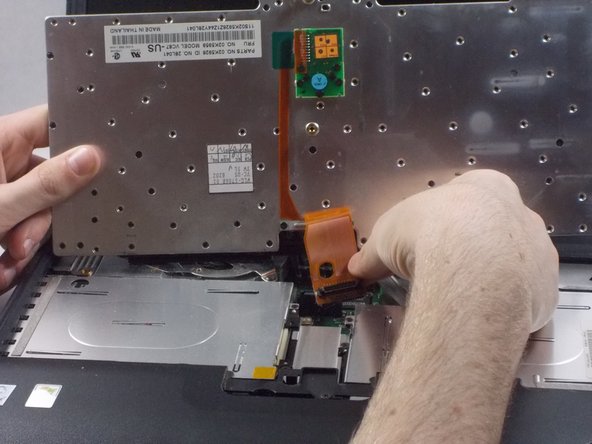
  4. IBM ThinkPad A31 Keyboard Replacement: 4 단계, 이미지 1/3 IBM ThinkPad A31 Keyboard Replacement: 4 단계, 이미지 2/3 IBM ThinkPad A31 Keyboard Replacement: 4 단계, 이미지 3/3
    • Lift the keyboard and remove the keyboard ribbon cable from the laptop

결론

To reassemble your device, follow these instructions in reverse order.

다른 2명이 해당 안내서를 완성하였습니다.

Matheus

회원 가입일: 03/19/18

128 평판

안내서 1개 작성함

UMass Dartmouth, Team S2-G2, Bernier Spring 2018 UMass Dartmouth, Team S2-G2, Bernier Spring 2018 회원

UMASSD-BERNIER-S18S2G2

3 회원들

안내서 10개 작성하였습니다

댓글 0개

댓글 쓰기

조회 통계:

24 시간 전: 0

7일 전: 1

30일 전: 2

전체 시간: 405