주요 콘텐츠로 건너뛰기

IBM ThinkPad T30 Hard Drive Replacement

필요한 것

  1. IBM ThinkPad T30 Hard Drive Replacement, Battery: 1 단계, 이미지 3개 중 1개 IBM ThinkPad T30 Hard Drive Replacement, Battery: 1 단계, 이미지 3개 중 2개 IBM ThinkPad T30 Hard Drive Replacement, Battery: 1 단계, 이미지 3개 중 3개
    • Before starting, make sure to have the Think pad turned off and the power supply is closed.

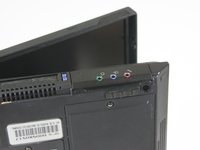
    • Flip the ThinkPad upside down with the bottom facing you.

    • Slide the latch to the right into the unlock position.

    • While holding the latch in the unlock position, lift the battery out with your other hand.

  2. IBM ThinkPad T30 Hard Drive Replacement, Hard Drive: 2 단계, 이미지 1개 중 1개
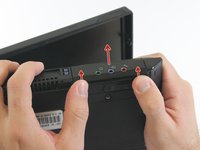
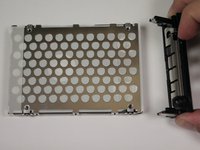
    • Flip to the back of the Thinkpad.

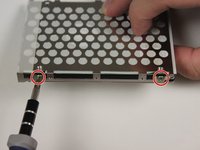
    • Remove the single 11 mm screw using the Phillips #0 screwdriver.

  3. IBM ThinkPad T30 Hard Drive Replacement: 3 단계, 이미지 3개 중 1개 IBM ThinkPad T30 Hard Drive Replacement: 3 단계, 이미지 3개 중 2개 IBM ThinkPad T30 Hard Drive Replacement: 3 단계, 이미지 3개 중 3개
    • Flip the Thinkpad on its side to get a better view of the hard drive.

    • Push on the lower edge of the hard drive cover to detach the hard drive from the Thinkpad.

    • Once you have detached the hard drive from the Thinkpad, slide the hard drive out of the device.

  4. IBM ThinkPad T30 Hard Drive Replacement: 4 단계, 이미지 2개 중 1개 IBM ThinkPad T30 Hard Drive Replacement: 4 단계, 이미지 2개 중 2개
    • Using the plastic tool, remove the black plastic cover from the main body of the hard drive.

    • Place the plastic tool at the ends of the plastic cover to detach it from the hard drive.

    • Once the black plastic has been detached, the plastic will then slide off the body of the hard drive.

  5. IBM ThinkPad T30 Hard Drive Replacement: 5 단계, 이미지 2개 중 1개 IBM ThinkPad T30 Hard Drive Replacement: 5 단계, 이미지 2개 중 2개
    • Remove the four 2.8 mm screws from the mounting bracket using a Phillips #0 screwdriver.

    • Pull the mounting bracket off of the hard drive.

    • It may be easier to remove the mounting bracket by rotating it off of the hard drive as if it is on a hinge.

결론

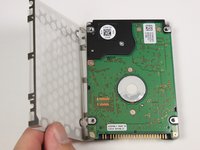
To reassemble your device with a new hard drive, follow these instructions in reverse order with a new hard drive replacing the old one.

다른 11명이 해당 안내서를 완성하였습니다.

작성자

13다른 기여자 명과 함께

Allie Knauer

회원 가입일: 10/05/12

90 평판

안내서 3개를 작성함

Cal Poly, Team 3-20, Amido Fall 2012 Cal Poly, Team 3-20, Amido Fall 2012 회원

CPSU-AMIDO-F12S3G20

3 회원들

안내서 16개를 작성함

댓글 한 개

good description and photos..thanks :]

David - 답글

댓글 쓰기

조회 통계:

지난 24시간: 1

지난 7일: 8

지난 30일: 29

전체 시간: 19,542