주요 콘텐츠로 건너뛰기

이 버전에는 잘못된 편집 사항이 있을 수 있습니다. 최신 확인된 스냅샷으로 전환하십시오.

필요한 것

  1. 이 단계는 번역되지 않았습니다. 번역을 도와주십시오

    : 1 단계, 이미지 1/2 : 1 단계, 이미지 2/2
    • Before performing any repairs, perform a water test on the pump by raising and lowering the handle a full 40 strokes. A properly performing pump will yield greater than 10 liters.

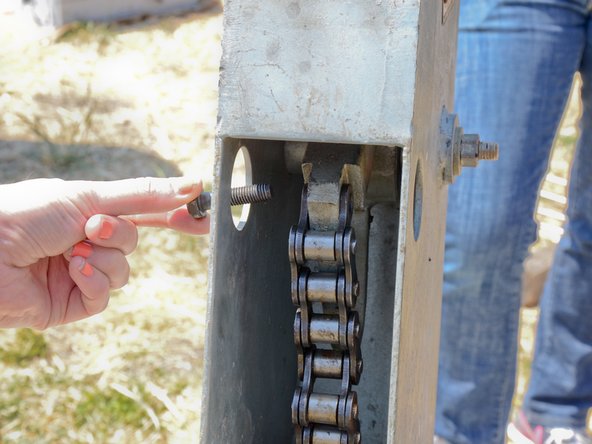
    • Remove the hex head bolt from the top of the access door on the pump head.

    • On reassembly, this bolt should be hand-tight.

  2. 이 단계는 번역되지 않았습니다. 번역을 도와주십시오

    : 2 단계, 이미지 1/3 : 2 단계, 이미지 2/3 : 2 단계, 이미지 3/3
    • Pull the access door straight up off the pump head.

    • Store the access door in a sanitary place to prevent contamination.

  3. 이 단계는 번역되지 않았습니다. 번역을 도와주십시오

    : 3 단계, 이미지 1/2 : 3 단계, 이미지 2/2
    • The access door has a tongue that fits into the base of the pump head.

    • The access door makes a convenient tray to hold nuts and bolts during the disassembly.

  4. 이 단계는 번역되지 않았습니다. 번역을 도와주십시오

    : 4 단계, 이미지 1/3 : 4 단계, 이미지 2/3 : 4 단계, 이미지 3/3
    • Place the spacer collar around the pump rod below the raised chain, with the beveled side down, and the flat side facing up.

  5. 이 단계는 번역되지 않았습니다. 번역을 도와주십시오

    : 5 단계, 이미지 1/3 : 5 단계, 이미지 2/3 : 5 단계, 이미지 3/3
    • The following procedure requires two people. If you attempt to do this alone, you risk injuring yourself and damaging the pump.

    • Lift the pump handle until the base of the chain comes to rest on the spacer collar, and the chain is slack. Hold the handle in this position while the chain is being detached.

  6. 이 단계는 번역되지 않았습니다. 번역을 도와주십시오

    : 6 단계, 이미지 1/3 : 6 단계, 이미지 2/3 : 6 단계, 이미지 3/3
    • Using the two access holes, place an angled socket wrench on the bolt and nut attaching the chain to the pump handle.

  7. 이 단계는 번역되지 않았습니다. 번역을 도와주십시오

    : 7 단계, 이미지 1/3 : 7 단계, 이미지 2/3 : 7 단계, 이미지 3/3
    • Hold the wrench on the bolt stationary.

    • Loosen the nut.

  8. 이 단계는 번역되지 않았습니다. 번역을 도와주십시오

    : 8 단계, 이미지 1/3 : 8 단계, 이미지 2/3 : 8 단계, 이미지 3/3
    • Remove the nut from the chain bolt.

  9. 이 단계는 번역되지 않았습니다. 번역을 도와주십시오

    : 9 단계, 이미지 1/2 : 9 단계, 이미지 2/2
    • Remove the washer from the chain bolt.

  10. 이 단계는 번역되지 않았습니다. 번역을 도와주십시오

    : 10 단계, 이미지 1/2 : 10 단계, 이미지 2/2
    • Remove the chain bolt.

  11. 이 단계는 번역되지 않았습니다. 번역을 도와주십시오

    : 11 단계, 이미지 1/3 : 11 단계, 이미지 2/3 : 11 단계, 이미지 3/3
    • Pull the top of the chain straight off of the pump handle.

  12. 이 단계는 번역되지 않았습니다. 번역을 도와주십시오

    : 12 단계, 이미지 1/3 : 12 단계, 이미지 2/3 : 12 단계, 이미지 3/3
    • Use a wrench to loosen the nut on the end of the handle axle.

    • Remove the nut and washer from the end of the axle.

  13. 이 단계는 번역되지 않았습니다. 번역을 도와주십시오

    : 13 단계, 이미지 1/2 : 13 단계, 이미지 2/2
    • Set the axle punch over the exposed threaded section of the axle.

  14. 이 단계는 번역되지 않았습니다. 번역을 도와주십시오

    : 14 단계, 이미지 1/3 : 14 단계, 이미지 2/3 : 14 단계, 이미지 3/3
    • The following procedure requires two people. If you attempt to do this alone, you risk injuring yourself and damaging the pump.

    • The first person will use a hammer to gently tap on the axle punch, to push the axle through the handle bearings and out of the pump head.

    • At the same time, a second person will hold up the handle, supporting its weight, while twisting the axle with a wrench, to loosen it in the bearings and make it easier to dislodge.

  15. 이 단계는 번역되지 않았습니다. 번역을 도와주십시오

    : 15 단계, 이미지 1/2 : 15 단계, 이미지 2/2
    • Gently tap the axle punch to push the axle out of the pump head.

  16. 이 단계는 번역되지 않았습니다. 번역을 도와주십시오

    : 16 단계, 이미지 1/3 : 16 단계, 이미지 2/3 : 16 단계, 이미지 3/3
    • Once the axle is loose, push it through the pump head.

  17. 이 단계는 번역되지 않았습니다. 번역을 도와주십시오

    : 17 단계, 이미지 1/3 : 17 단계, 이미지 2/3 : 17 단계, 이미지 3/3
    • While supporting the pump handle, remove the axle.

  18. 이 단계는 번역되지 않았습니다. 번역을 도와주십시오

    : 18 단계, 이미지 1/3 : 18 단계, 이미지 2/3 : 18 단계, 이미지 3/3
    • Slide the pump handle out of the pump head.

  19. 이 단계는 번역되지 않았습니다. 번역을 도와주십시오

    : 19 단계, 이미지 1/1
    • At this point you can inspect the pump handle bearing for damage or excessive wear.

  20. 이 단계는 번역되지 않았습니다. 번역을 도와주십시오

    : 20 단계, 이미지 1/2 : 20 단계, 이미지 2/2
    • The following steps demonstrate reassembly.

    • After sliding the pump handle back into the pump head, line up the pump handle bearing with the holes in the side of the pump head.

  21. 이 단계는 번역되지 않았습니다. 번역을 도와주십시오

    : 21 단계, 이미지 1/3 : 21 단계, 이미지 2/3 : 21 단계, 이미지 3/3
    • Insert the axle back into the pump head.

    • Be sure to support the weight of the handle and line up the holes in the sides of the pump head with the pump handle bearing.

  22. 이 단계는 번역되지 않았습니다. 번역을 도와주십시오

    : 22 단계, 이미지 1/2 : 22 단계, 이미지 2/2
    • Use a block of wood and hammer to gently tap the axle back into place.

    • Do not hit the axle directly with a hammer, as you may damage it.

  23. 이 단계는 번역되지 않았습니다. 번역을 도와주십시오

    : 23 단계, 이미지 1/3 : 23 단계, 이미지 2/3 : 23 단계, 이미지 3/3
    • Replace the washer and nut on the axle.

    • Tighten the nut with a wrench.

결승점

Andrew Optimus Goldheart

회원 가입일: 10/17/09

503,049 평판

안내서 407개 작성하였습니다

iFixit iFixit 회원

Staff

135 회원들

안내서 17,218개 작성하였습니다

댓글 0개

댓글 쓰기

조회 통계:

24 시간 전: 2

7일 전: 13

30일 전: 19

전체 시간: 261