주요 콘텐츠로 건너뛰기

Infant Optics DXR-8 Monitor Replacement

보관된 가이드
해당 안내서는 단지 역사적인 목적으로 보관됩니다. 최신 버전 안내서를 사용하여 수리 하십시오.

필요한 것

  1. Infant Optics DXR-8 Monitor Replacement, Monitor: 1 단계, 이미지 1/1
    • Start by gently inserting the plastic opening tool between the led and casing.

  2. Infant Optics DXR-8 Monitor Replacement: 2 단계, 이미지 1/1
    • Slowly pry the cover away from the bottom using the plastic opening tool.

  3. Infant Optics DXR-8 Monitor Replacement: 3 단계, 이미지 1/1
    • Glide the tool around the entire cover to reveal the screws, which are 5.0 mm.

  4. Infant Optics DXR-8 Monitor Replacement: 4 단계, 이미지 1/1
    • Remove the cover and set it aside.

  5. Infant Optics DXR-8 Monitor Replacement: 5 단계, 이미지 1/2 Infant Optics DXR-8 Monitor Replacement: 5 단계, 이미지 2/2
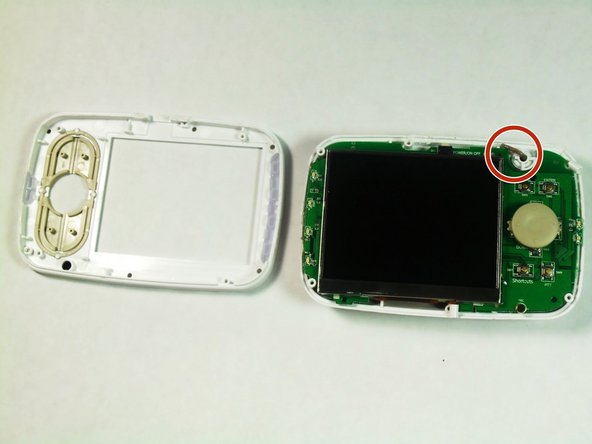
    • Remove the four corner screws, 5.0 mm, using a J1 bit.

    • Lift the top away from the bottom using the metal spudger. Be careful not to rip the antenna wire.

결론

To reassemble your device, follow these instructions in reverse order.

다른 6명이 해당 안내서를 완성하였습니다.

Larsha Johnson

회원 가입일: 08/26/15

526 평판

안내서 3개 작성하였습니다

USF Tampa, Team 6-4, Remmell Fall 2015 USF Tampa, Team 6-4, Remmell Fall 2015 회원

USFT-REMMELL-F15S6G4

4 회원들

안내서 3개 작성하였습니다

댓글 2개

What is the part number for the LCD?

jstarion - 답글

From the pictures LQ035NC111 seem to be the part number.

Michael C -

댓글 쓰기

조회 통계:

24 시간 전: 0

7일 전: 2

30일 전: 2

전체 시간: 5,830