주요 콘텐츠로 건너뛰기

Infant Optics DXR-8 Monitor Replacement

보관된 가이드
해당 안내서는 단지 역사적인 목적으로 보관됩니다. 최신 버전 안내서를 사용하여 수리 하십시오.

필요한 것

  1. Infant Optics DXR-8 Monitor Replacement, Monitor: 1 단계, 이미지 1/1
    • Start by gently inserting the plastic opening tool between the led and casing.

  2. Infant Optics DXR-8 Monitor Replacement: 2 단계, 이미지 1/1
    • Slowly pry the cover away from the bottom using the plastic opening tool.

  3. Infant Optics DXR-8 Monitor Replacement: 3 단계, 이미지 1/1
    • Glide the tool around the entire cover to reveal the screws, which are 5.0 mm.

    This photo is a little blurry

    Patty Remmell - 답글

  4. Infant Optics DXR-8 Monitor Replacement: 4 단계, 이미지 1/1
    • Remove the cover and set it aside.

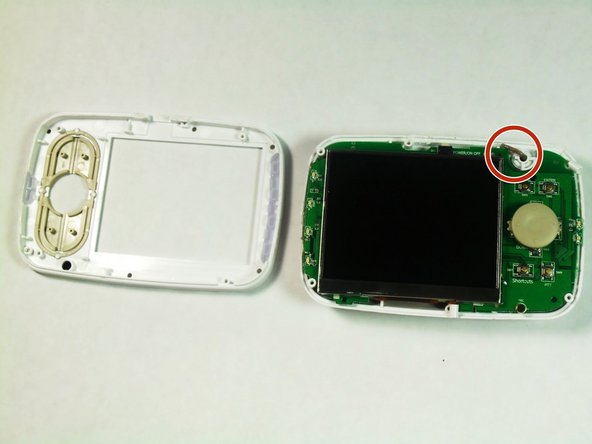
  5. Infant Optics DXR-8 Monitor Replacement: 5 단계, 이미지 1/2 Infant Optics DXR-8 Monitor Replacement: 5 단계, 이미지 2/2
    • Remove the four corner screws, 5.0 mm, using a J1 bit.

    • Lift the top away from the bottom using the metal spudger. Be careful not to rip the antenna wire.

    Lift it how? With a tool? With fingers?

    Patty Remmell - 답글

결론

To reassemble your device, follow these instructions in reverse order.

다른 6명이 해당 안내서를 완성하였습니다.

Larsha Johnson

회원 가입일: 08/26/15

526 평판

안내서 3개 작성하였습니다

USF Tampa, Team 6-4, Remmell Fall 2015 USF Tampa, Team 6-4, Remmell Fall 2015 회원

USFT-REMMELL-F15S6G4

4 회원들

안내서 3개 작성하였습니다

댓글 2개

What is the part number for the LCD?

jstarion - 답글

From the pictures LQ035NC111 seem to be the part number.

Michael C -

댓글 쓰기

조회 통계:

24 시간 전: 0

7일 전: 0

30일 전: 2

전체 시간: 5,830