소개
This guide will walk you through how to install Arch Linux using a live system and will show how to configure your fresh Arch installation into a fully configured web development system using Omarchy.
Recommended Systems
- Framework 13:
- Framework Desktop:
- Beelink SER8
- Beelink SER9
- Beelink EQR5
필요한 것
-
-
Download the official Installation Image from the Arch Linux Download page.
-
-
-
While it isn't a required step, it is recommended to verify the image before trying to use the ISO file.
-
Use GnuPG and import the Arch Linux Developer Key with the following command.
-
Once completed, navigate to the directory where your ISO file and the signature file are located. You can then verify the signature with the following command.
-
-
-
Navigate to the BalenaEtcher website and download the appropriate version of BalenaEtcher for your operating system.
-
Insert your USB drive into your computer and launch BalenaEtcher. Select the Arch Linux ISO file you downloaded, then choose the USB drive as the target. Click 'Flash' to start the flashing process.
-
Once the flashing process is complete, you can remove the USB drive.
-
-
-
-
Power off the computer you want to install Arch Linux onto, and insert the USB drive.
-
Power on your machine and boot your machine into your BIOS or UEFI settings, and choose the USB drive as your boot option.
-
-
-
Once the live system has loaded, you will be booted into Arch's terminal.
-
-
-
You'll need to connect your Arch machine to the internet. If you have access to an ethernet connection, connect your computer now.
-
If you are using Wi-Fi run the command iwctl then type station wlan0 scan, and station wlan0 connect <tab>
-
-
-
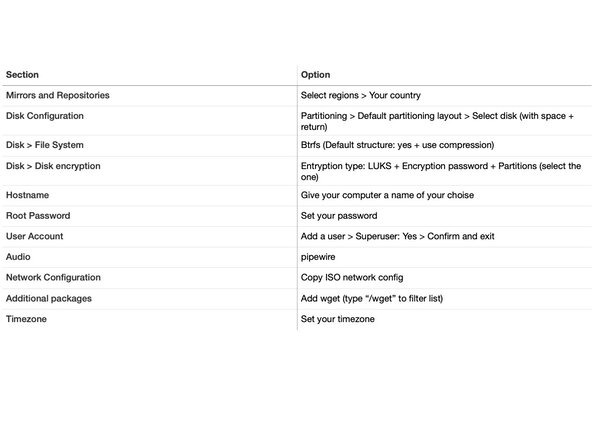
Run the archinstall command and pick the options shown in the table to the left. Any options not mentioned should be left as-is.
-
-
-
Once Arch Linux has been fully set up, reboot, and login with your newly set up user account.
-
Once logged in run the command wget -qO- https://omarchy.org/install | bash (capital oh not zero in -q0-)
-
Congratulations, you've just finished installing and are ready to start using Omarchy. If you're a purist who does not want Omarchy to install any of the full-featured applications like Spotify, Pinta, LocalSend, OBS Studio, etc, you can run the installer in "bare mode" with the command wget -qO- https://omarchy.org/install-bare | bash.
