이 버전에는 잘못된 편집 사항이 있을 수 있습니다. 최신 확인된 스냅샷으로 전환하십시오.
필요한 것
-
이 단계는 번역되지 않았습니다. 번역을 도와주십시오
-
Lower the headliner. You'll need to remove both visors and the overhead storage console.
-
Get your fingers where you can grab the (4) metal clips to release.
-
You will also need to remove the driver and passenger side A-pillar covers.
-
-
이 단계는 번역되지 않았습니다. 번역을 도와주십시오
-
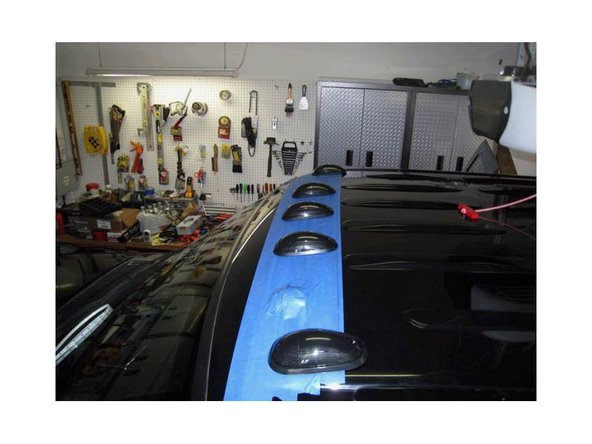
Get some painters tape and tape up the entire front area of the roof where you will be installing the LED cab lights.
-
Mark the locations where you will be attaching each LED light and the holes that you will be drilling. (You can use a dry erase marker.)
-
-
이 단계는 번역되지 않았습니다. 번역을 도와주십시오
-
Draw a line perpendicular to the sides of the truck and measure the distance from the windshield molding by the driver's side door. You will basically need to draw a horizontal straight line from both sides of the truck and then find the center of the truck. Use the midpoint as a guideline and measure where you will be placing the rest.
-
-
-
이 단계는 번역되지 않았습니다. 번역을 도와주십시오
-
You should have five lines to mark each of the LED roof lights.
-
Measure 6.5 inches for each of the lines to mark the center hole. When you mark all the center holes, lay all of the LED cab lights in place to see if you like the look.
-
-
이 단계는 번역되지 않았습니다. 번역을 도와주십시오
-
Get some spare cardboard laying around and trace out a template of the LED roof light. Mark the locations where you will drill the holes and align the template onto the lines you drew so you know where all the holes will be drilled later on.
-
Double check all the locations.
-
-
이 단계는 번역되지 않았습니다. 번역을 도와주십시오
-
Drill the holes through the painter's tape.
-
Bolt down the LED cab lights onto the truck's roof.
-
The underside of the LED roof cab light shows the 3 locations that will need to be marked on the roof to drill.
-
-
이 단계는 번역되지 않았습니다. 번역을 도와주십시오
-
Connect the wires. The plugs are polar sensitive, so if it doesn't light up, you will need to flip it 180 degrees. You'll need to wire them up in parallel and use some electrical tape so they maintain a parallel wiring.
-
Tape the wire harness onto the reinforcement beam.
-
-
이 단계는 번역되지 않았습니다. 번역을 도와주십시오
-
Route all the wire through the front map light assembly to complete installation.
-


다른 한 분이 해당 안내서를 완성하였습니다.
